a
Introduction to React
We will now start getting familiar with probably the most important topic of this course, namely the React library. Let's start by making a simple React application as well as getting to know the core concepts of React.
The easiest way to get started by far is by using a tool called Vite.
First, visit the classroom link: http://go.djosv.com/227lab1 and use the steps outlined in part 0c to accept, download and set up the repository from within WebStorm. The only different step in our high-level checklist is that in step 3 we need to do is say File->New Project from Version Control from within WebStorm to open the URL prompt.
I would also make sure to check the option trust projects presented in the first window so that you don't have to keep doing so.
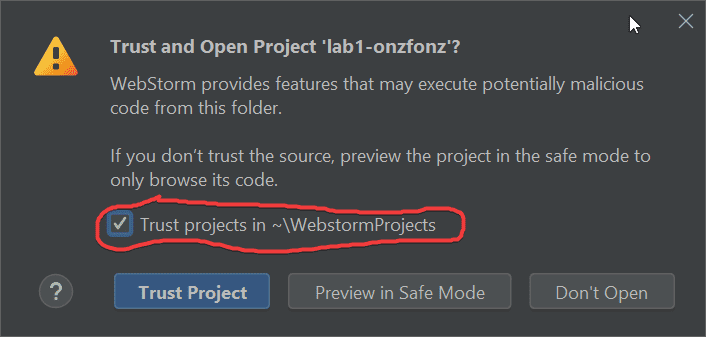
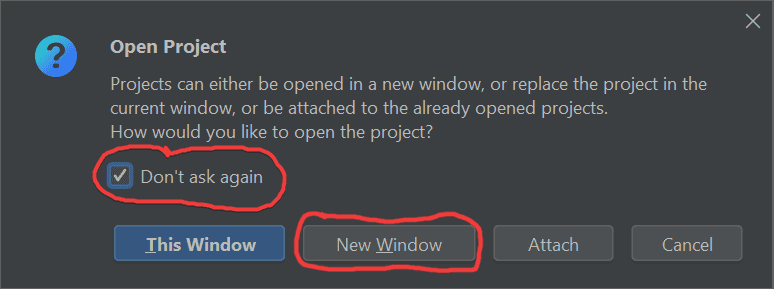
Lastly, I would choose the option New Window and check don't ask again in the next window.
Using a new window with the project will provide you with a new window for every project.
Having a new window is nice for having a separate area but not being confined to having only one project open at a time.
I liked using attach, which puts all the repos in a single folder.
However, this creates more issues in particular views like the git view as it shows you all the same files and you have to keep making sure you have the right path.
Importing File Watcher Settings
One thing we'll need to remember to do is to import our file watcher settings that we created when we were configuring our WebStorm
- Open up WebStorm's Settings again, then go to Tools->File Watchers, and click the Import icon.
- Select the watchers file that you had previously exported
- Once you locate the file, click OK
- You should see COMP 227 Git Watcher appear enabled
- Click OK to close settings.
You can click on the project bar in the upper right to see the project files and verify that you only see lab1-<your username>.

Starting Development
You can now right-click on the lab1 folder in the project and select Open in->Terminal. If you did not review part 0d's coverage of git commands and the terminal, it might make sense to do so now.
With your terminal now open you can type the following:
npm create vite@latestNow use the following image to help you enter the following options.
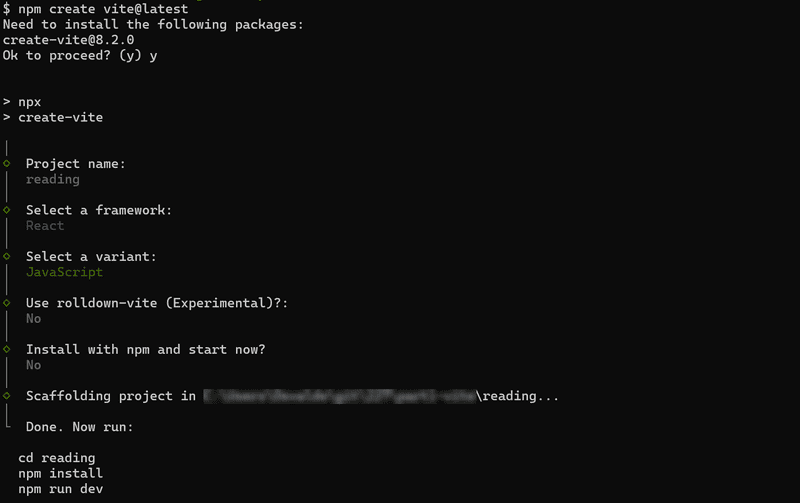
We answered no so that we can do some of these steps manually so you can see how to do each part. Next, let's move into the application's directory and install the required libraries:
cd reading
npm i
Say yes to any prompts that appear asking you to update or that ask you to allow access.
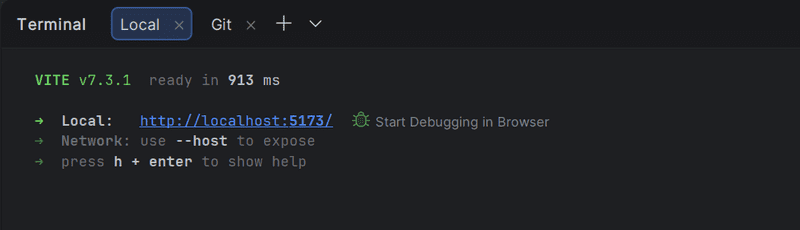
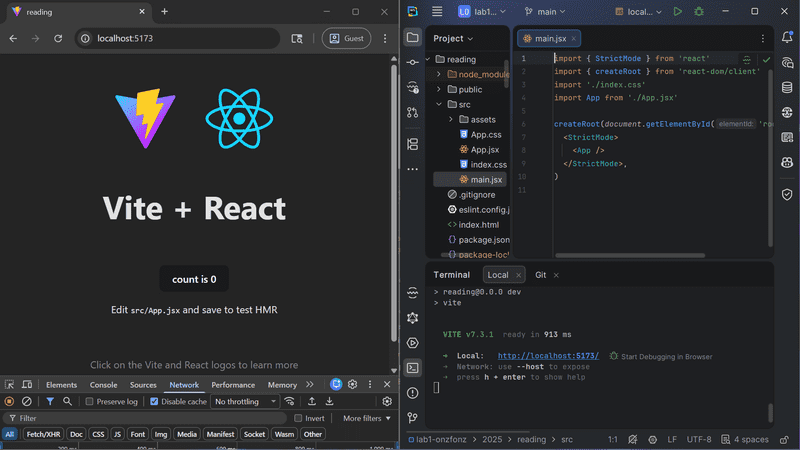
Once you are in the reading directory, start our application by typing:
npm run devThe console says that the application has started on localhost port 5173, i.e. the address http://localhost:5173/.
Vite uses the port 5173 by default. If it's not available, Vite will use the next free port number.
Your default browser may have launched automatically. If not, click on the localhost address in your terminal. Once the browser opens, open the console (Ctrl-Shift-I) immediately. Also, open a text editor so that you can view the code as well as the webpage at the same time on the screen:
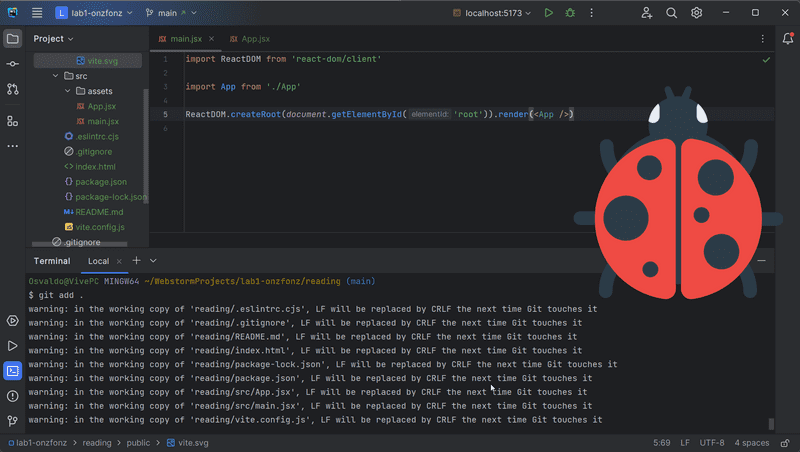
You can close lab0 and close the README.md from that lab that we had from the previous folder. Because we may be working on multiple projects, you'll need to make sure that you are editing the correct file, which you can check in the lower-left breadcrumb trail. You'll also need to add the files to git for this reading, this will be part of the process to get credit for the course
The code of the application resides in the reading/src folder. Let's simplify the default code such that the contents of main.jsx looks like this:
import ReactDOM from 'react-dom/client'

import App from './App'

ReactDOM.createRoot(document.getElementById('root')).render(<App />)
and App.jsx looks like this
const App = () => (
  <div>
      <p>Hello COMP 227!</p>
  </div>
)

export default App
You may delete the files:
- src/App.css
- src/assets/react.svg
- src/index.css
as they are not needed in our application right now. If you use WebStorm's safe delete feature, you should not see any warnings about the files being used.
If you do see warnings, then you may want to read this future section about react version differences.
Test our file watcher workflow
Remember that as we mentioned before, the goal should not just be to read the material, but to follow along with the material and to perform the steps as you go.
Remember how we used the File Watchers previously?
We're going to make sure that process is working,
as any time that we add files or use create@vite-latest app,
we need to make sure that the files we created continue to change back to being white in WebStorm's Project Explorer Window.
This should happen automatically when we edit our code.
Please open up main.jsx, if it's not open already, and ensure that all of the text is white and that you see a git repo in the upper left.
If you see that all of the files have green or blue text in WebStorm, for a long time, This means that our file watcher may be working correctly. Depending on your configuration, you may get warnings about the line endings. This is safe to ignore.
If the files do not change back to white and you feel as though your file watchers are working, if you type
git statusIf your file watcher is working correctly, you'll see that the files have turned white again.
For this class, you should not ever really have files in Red, Green or any color in WebStorm for very long, since this will prevent our use of our Auto-Save feature and the File Watchers.
To test that this is working, please go to App.jsx and change the word Hello to Hola.
When you do this, you may notice that App.jsx turns blue which means that there are changes that have yet to be committed.

However, the file will not stay blue for long, and our workflow automation will be triggered, which will cause the file to be white again.
The last thing I wanted to point your attention to is to be aware of a green arrow near our main branch at the top. You should not have one at this moment. If you do, then you may not have setup file watchers correctly. You can create that arrow by going to terminal, and creating an empty commit message, which I'll have you do everytime you complete the exercises.
We'll use the empty commits to give us a non-standard way of leaving memos in our code. Go to terminal and write this line.
git commit --allow-empty -m "Practicing an empty commit while reading part 1a"After typing that line, do not make any changes in your JSX file, and go back to webstorm, and if you type another git status, you should now see this green arrow appear.

Webstorm uses the arrows to let you know that your github repo and local computer are out of sync. The green arrow can also happen if you add new files to your project.
To make the arrow go away, we'll push the empty commit, which we can do via the terminal or WebStorm. In Terminal, you can just type:
git pushOnce you complete this command, you'll notice that the main branch no longer has the green arrow next to it. You can also ensure that your changes are on GitHub (including your empty commit message) To ensure that you are working through the material correctly, you will message me directly once you finish this to confirm that you are following the steps.
If you use more than one computer, you'll need to make sure that you pull at the beginning of the session and push at the end. Not following this process will most likely result in you needing to meet with me to fix things. Let's avoid having unnecessary meetings and promise to follow these instructions.
FYI: create-react-app
An alternative to Vite is the older generation tool create-react-app. This tool was used in previous versions of the course.
Here are some of the most notable differences
Difference Vite create-react-app (AKA CRA) Application Startup filename main.jsx index.js Filename for <App />componentApp.jsx App.js command to launch application npm run devnpm startThis year the course has been updated to Vite, though some parts may still use the application base created with
create-react-app.
Component
App.jsx now defines a React component with the name App.
The command on the final line of main.jsx
ReactDOM.createRoot(document.getElementById('root')).render(<App />)renders its contents into the file public/index.html, inside a div element that has the id value 'root'.
FYI: By default, the file public/index.html doesn't contain any HTML markup that is visible to us in the browser.
<!doctype html>
<html lang="en">
  <head>
    <meta charset="UTF-8" />
    <link rel="icon" type="image/svg+xml" href="/vite.svg" />
    <meta name="viewport" content="width=device-width, initial-scale=1.0" />
    <title>reading</title>
  </head>
  <body>
    <div id="root"></div>
    <script type="module" src="/src/main.jsx"></script>
  </body>
</html>
You can try adding some HTML to the file. However, when using React, all content that needs to be rendered is usually defined as React components.
Let's take a closer look at the code defining the component:
const App = () => (
  <div>
    <p>Hola COMP 227!</p>
  </div>
)
As you probably guessed, the component will be rendered as a div tag, which wraps a p tag containing the text Hola COMP 227!.
Technically the component is defined as a JavaScript function. The following is a function (which does not receive any parameters):
() => (
  <div>
    <p>Hola COMP 227!</p>
  </div>
)
The function is then assigned to a constant variable App:
const App = ...There are a few ways to define functions in JavaScript. Here we will use arrow functions, which are described in a newer version of JavaScript known as ECMAScript 6, also called ES6.
Because the function consists of only a single expression we have used a shorthand, which represents this piece of code:
| original shorthand | long form |
|---|---|
|
|
Notice the return and curly braces instead of parenthesis! In other words, the function returns the value of the expression.
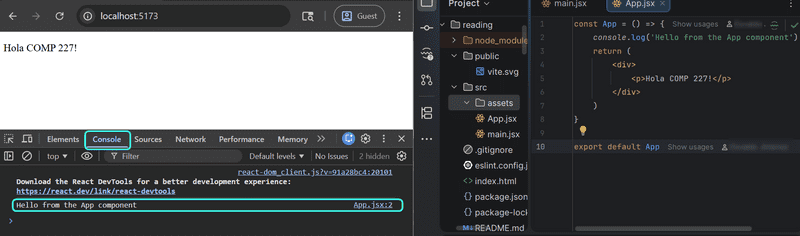
The function defining the component may contain any kind of JavaScript code. Modify your component to be as follows and observe what happens in the developer tool's console: (I'll refer to this as the console from here on out.)
const App = () => {
  console.log('Hello from the App component')
  return (
    <div>
      <p>Hola COMP 227!</p>
    </div>
  )
}

export default App
and observe what happens in the browser console
The first rule of frontend web development:
keep the console open all the time
Let us repeat this together: I promise to keep the console open all the time when you are doing web development.
It is also possible to render dynamic content inside of a component.
Modify the component as follows:
const App = () => {
  const now = new Date()
  const a = 18
  const b = 24

  return (
    <div>
      <p>Hola COMP 227! It is {now.toString()}</p>
      <p>
        {a} plus {b} is {a + b}
      </p>
    </div>
  )
}
Any JavaScript code within the curly braces is evaluated and that result is embedded into the HTML where the curly braces once were.
Notice that you should not remove the line at the bottom of the component
export default AppThe export is not shown in most of the examples of the course material. Without the export, the application breaks.
What was printed out in the console? Did you keep it open?
JSX
It seems like React components are returning HTML markup. However, this is not the case. The layout of React components is mostly written using JSX. Although JSX looks like HTML, we are dealing with a way to write JavaScript. Under the hood, JSX returned by React components is compiled into JavaScript.
After compiling, our application looks like this:
const App = () => {
  const now = new Date()
  const a = 18
  const b = 24
  return React.createElement(
    'div',
    null,
    React.createElement(
      'p', null, 'Hola COMP 227! It is ', now.toString()
    ),
    React.createElement(
      'p', null, a, ' plus ', b, ' is ', a + b
    )
  )
}
The compilation is handled by Babel. Projects created with Vite are configured to compile automatically. We will learn more about this topic in part 7 of this course.
It is also possible to write React as "pure JavaScript" without using JSX. Just like it's possible to take an old programming project of yours and translate it to assembly. While it "builds character", at this stage, I wouldn't recommend it.
In practice, JSX is much like HTML with the distinction that with JSX you can easily embed dynamic content by writing appropriate JavaScript within curly braces. The idea of JSX is quite similar to other templating languages, such as Thymeleaf and Java Spring, which are used on servers.
JSX is "XML-like", which means that every tag needs to be closed. For example, a newline is an empty element, which in HTML can be written as follows:
<br>Notice the absence of a closing tag with HTML.
However, when writing JSX, the tag needs to be closed with a /:
<br />This is also referred to as a self-closing tag.
Multiple components
Let's modify App.jsx as follows:
const Greet = () => {  return (    <div>      <p>Hola COMP 227!</p>    </div>  )}
const App = () => {
  return (
    <div>
      <h1>Greetings</h1>
      <Greet />    </div>
  )
}
Pertinent:
exportat the bottom will be left out of any future examples. We still needexportfor the code to work.
We have defined a new component Greet and used it inside the component App.
Naturally, a component can be used multiple times:
const App = () => {
  return (
    <div>
      <h1>Greetings</h1>
      <Greet />
      <Greet />      <Greet />    </div>
  )
}
Writing components with React is easy, and by combining components, even a more complex application can be kept fairly maintainable. Indeed, a core philosophy of React is composing applications from many specialized reusable components.
Another strong convention is the idea of a root component called App at the top of the component tree of the application.
Nevertheless, as we will learn in part 6,
there are situations where the component App is not exactly the root, but is wrapped within an appropriate utility component.
props: passing data to components
It is possible to pass data to components using so-called props.
Let's modify the component Greet as follows:
const Greet = (props) => {  return (
    <div>
      <p>Hey {props.name}!</p>    </div>
  )
}
Now the function defining the component has the parameter props. As an argument, the parameter receives an object, which has fields corresponding to all the "props" the user of the component defines.
The props are defined as follows:
const App = () => {
return (
<div>
<h1>Greetings</h1>
<Greet name='Luna' /> <Greet name='Jordan' /> </div>
)
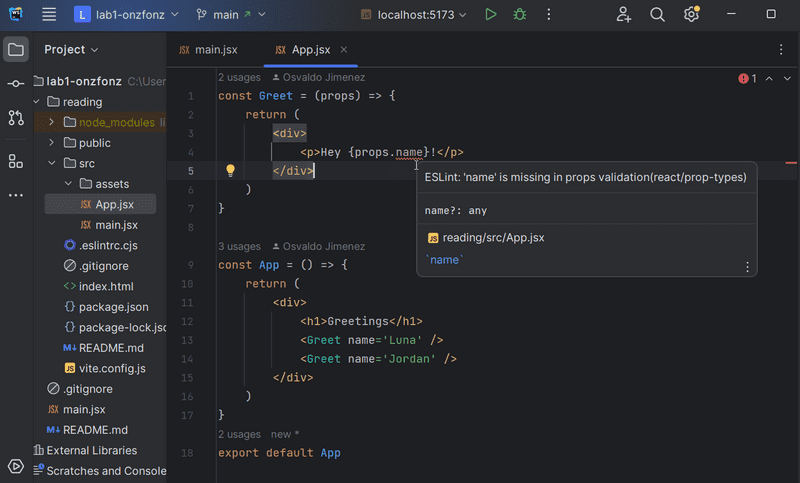
}FYI Possible error message
If your project has React version 18 or earlier installed, you may receive the following error message at this point:
It's not an actual error, but a warning caused by the ESLint tool. You can silence the warning
react/prop-typesby adding the following to the file eslint.config.js:export default [ { ignores: ['dist'] }, { files: ['**/*.{js,jsx}'], languageOptions: { ecmaVersion: 2020, globals: globals.browser, parserOptions: { ecmaVersion: 'latest', ecmaFeatures: { jsx: true }, sourceType: 'module', }, }, settings: { react: { version: '22.21' } }, plugins: { react, 'react-hooks': reactHooks, 'react-refresh': reactRefresh, }, rules: { ...js.configs.recommended.rules, ...react.configs.recommended.rules, ...react.configs['jsx-runtime'].rules, ...reactHooks.configs.recommended.rules, 'react/jsx-no-target-blank': 'off', 'react-refresh/only-export-components': [ 'warn', { allowConstantExport: true }, ], 'react/prop-types': 0, }, }, ]We will get to know ESLint in more detail in part 3.
Multiple props
There can be an arbitrary number of props and their values can be hard-coded strings or the results of JavaScript expressions. If the value of the prop is achieved using JavaScript it must be wrapped with curly braces.
Let's modify the code so that the component Greet uses two props:
const Greet = (props) => {
  return (
    <div>
      <p>
        Hey {props.name}, you are {props.age} years old      </p>
    </div>
  )
}

const App = () => {
  const name = 'Buddy'  const age = 10
  return (
    <div>
      <h1>Greetings</h1>
      <Greet name='Bailey' age={7 + 14} />      <Greet name={name} age={age} />    </div>
  )
}
The props sent by the component App are the values of the variables, the result of the evaluation of the sum expression and a regular string.
Some tips
React, ESLint, & WebStorm generate helpful error messages. Despite this, you should, at least in the beginning, advance in very small steps and make sure that every change works as desired.
The console should always be open. You should also have the problems area view in WebStorm open as well (Alt-6). The arrows in the image below also point you to line numbers, as those can be helpful as well. If the browser reports errors, don't continue writing more code, hoping for miracles. Instead, try to understand the cause of the error and, for example, go back to the previous working state:
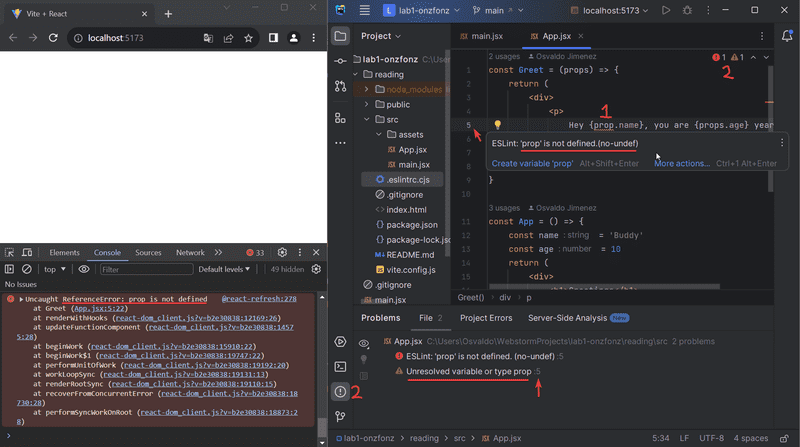
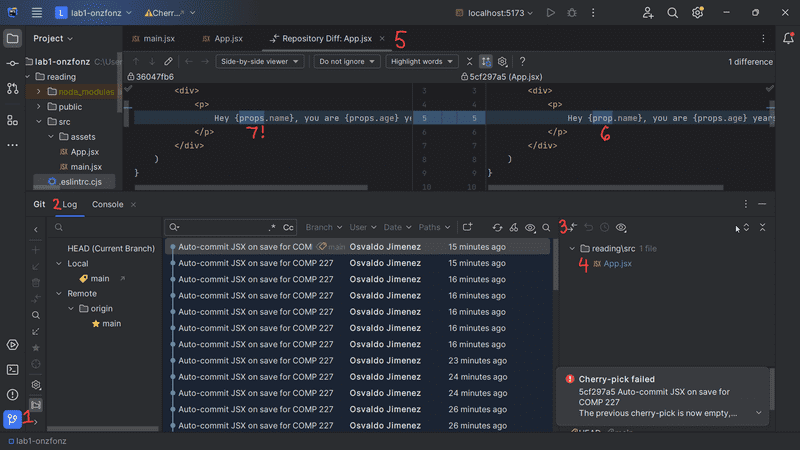
While using undo (Ctrl-Z) and redo (Ctrl-Y) is great, Because we have the file watcher setup, looking at changes becomes even easier, as you can always look at the previously recorded changes on any line using the git log window. (Alt-9)
When you fix a component, you may notice that the page itself comes back to life, rendering what you expect.
Also, keep in mind that React component names must be capitalized. If you try defining a component like this:
const footer = () => {
  return (
    <div>
      greeting app created by <a href='https://github.com/onzfonz'>onzfonz</a>
    </div>
  )
}
and use it like this
const App = () => {
  return (
    <div>
      <h1>Greetings</h1>
      <Greet name='Bailey' age={7 + 14} />
      <footer />    </div>
  )
}
the page is not going to display the content defined within the footer component,
and instead React only creates an empty footer element,
i.e. the built-in HTML element instead of the custom React element of the same name.
If you change the first letter of the component name to a capital letter,
then React creates a div element defined in the Footer component, which is rendered on the page.
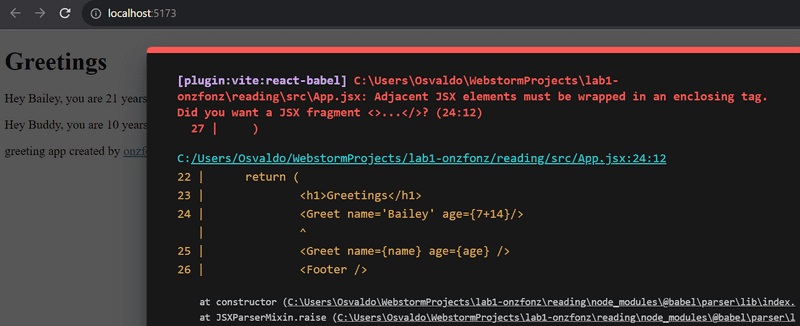
Notice that the content of a React component (usually) needs to contain one root element.
If we, for example, try to define the component App without the outermost div element (which is the root element):
const App = () => {
  return (
    <h1>Greetings</h1>
    <Greet name='Bailey' age={7 + 14} />
    <Greet name={name} age={age} />
    <Footer />
  )
}
the result is an error message.
Using a root element (like an outermost <div>) is not the only working option.
An array of components is also a valid solution:
const App = () => {
  return [
    <h1>Greetings</h1>,
    <Greet name='Bailey' age={7 + 14} />,
    <Greet name={name} age={age} />,
    <Footer />
  ]
}
However, when defining the root component of the application this is not a particularly wise thing to do, and it makes the code look a bit ugly.
Because the root element is stipulated, we have "extra" div elements in the DOM tree.
This can be avoided by using fragments,
i.e. by wrapping the elements to be returned by the component with an empty element <>:
const App = () => {
  const name = 'Buddy'
  const age = 10

  return (
    <>
      <h1>Greetings</h1>
      <Greet name='Bailey' age={7 + 14} />
      <Greet name={name} age={age} />
      <Footer />
    </>
  )
}
It now compiles successfully, and the DOM generated by React no longer contains the extra div element.
Do not render objects
Consider an application that prints the names and ages of some of our friends on the screen. Imagine this is the code that you wrote:
const App = () => {
  const friends = [
    { name: 'Monica', age: 24 },
    { name: 'Joey', age: 25 },
  ]

  return (
    <div>
      <p>{friends[0]}</p>
      <p>{friends[1]}</p>
    </div>
  )
}

export default App
However, once you try running the code, nothing appears on the screen. You try to find a problem in the code for 15 minutes, but you can't figure out where the problem could be.
All of a sudden, you remember the promise we made:
I promise to keep the console open all the time during this course, and for the rest of my life when I'm doing web development
The developer console throws a few errors.
Pertinent: At this point, your developer console may be filled with a load of errors. This is because the console does not clear fixed errors automatically. To have the console show the latest relevant errors, you need to clear the console by clicking on the 🚫 icon in the developer tools. Then refresh the browser (F5) so that the newest relevant errors re-appear
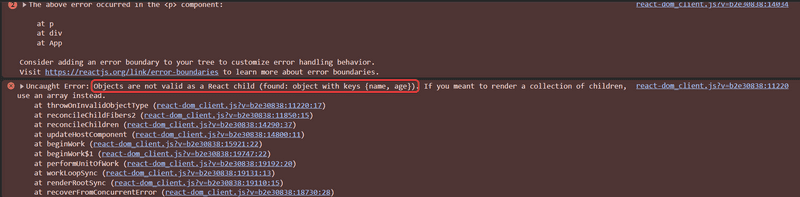
The core of the problem is Objects are not valid as a React child, i.e. the application tries to render objects and it fails again.
The console also points to where the error occurred, which can be traced to this code:
<p>{friends[0]}</p>and this causes a problem because the item to be rendered in the braces is an object.
{ name: 'Monica', age: 24 }In React, the individual items rendered in braces must be primitive values, such as numbers or strings.
Here's the fix:
const App = () => {
  const friends = [
    { name: 'Monica', age: 24 },
    { name: 'Joey', age: 25 },
  ]

  return (
    <div>
      <p>{friends[0].name} {friends[0].age}</p>      <p>{friends[1].name} {friends[1].age}</p>    </div>
  )
}

export default App
So now our first friend's name is rendered separately inside the curly braces
{friends[0].name}as Monica and her age
{friends[0].age}as 24.
React also allows arrays to be rendered if the array contains values that are eligible for rendering (such as numbers or strings). So the following program would work, although the result might not be what we want:
const App = () => {
  const friends = [ 'Monica', 'Joey']

  return (
    <div>
      <p>{friends}</p>
    </div>
  )
}
In this part, it is not even worth trying to use the direct rendering of the tables, we will come back to it in the next part.