d
Validation and ESLint
Typically, we want to constrain the data we store in our application's database.
For example, we shouldn't store nor even accept tasks that have a missing or empty content property.
The validity of the task is checked in the route handler:
app.post('/api/tasks', (request, response) => {
  const body = request.body
  if (!body.content) {    return response.status(400).json({ error: 'content missing' })  }
  // ...
})
If the task does not have the content property, we respond to the request with the status code 400 bad request.
One smarter way of validating the format of the data before it is stored in the database is to use the validation functionality available in Mongoose.
We can define specific validation rules for each field in the schema in mongo.js:
const taskSchema = new mongoose.Schema({
  content: {    type: String,    minLength: 5,    required: true  },  date: {     type: Date,    required: true  },  important: Boolean
})
The content field is now required to be at least five characters long.
The date field is set as required, meaning that it can not be missing.
The same constraint is also applied to the content field since the minimum length constraint allows the field to be missing.
We have not added any constraints to the important field, so its definition in the schema has not changed.
The minLength and required validators are built-in and provided by Mongoose.
The Mongoose custom validator functionality
allows us to create new validators if none of the built-in ones cover our needs.
If we try to store an object in the database that breaks one of the constraints, the operation will throw an exception. Let's change our handler for creating a new task so that it passes any potential exceptions to the error handler middleware:
app.post('/api/tasks', (request, response, next) => {  const body = request.body

  const task = new Task({
    content: body.content,
    important: Boolean(body.important) || false,
    date: new Date().toISOString(),
  })

  task.save()
    .then(savedTask => {
      response.json(savedTask)
    })
    .catch(error => next(error))})
Let's expand the error handler to deal with these validation errors:
const errorHandler = (error, request, response, next) => {
  console.error(error.message)

  if (error.name === 'CastError') {
    return response.status(400).send({ error: 'malformatted id' })
  } else if (error.name === 'ValidationError') {    return response.status(400).json({ error: error.message })  }

  next(error)
}
When validating an object fails, we return the following default error message from Mongoose:

Deploying the database backend to production
The application should work almost as-is in Render. We do have to generate a new production build of the frontend since changes thus far were only on our backend.
Render does a nice job of allowing us to keep the environment variables that we want to pull in from production so that it keeps the same structure as our dev environment. With the secret file, the environment variables we define will be used, so we can try our best to mirror both what is on Render and what we have on our machine.
The application should now work.
Sometimes things don't go according to plan. If there are problems, looking at Render's logs, which are in the left-hand navigation of your web service will help. As I was going through and working on this, my own application didn't work after making some changes. Here's what render's logs showed:

In my case, after scrolling through the logs, I noticed that my URL was not defined. Then I realized that I forgot to save the secret file that I took screenshots of from earlier in this part. 😔
With many of our problems, when we are learning material we sometimes get to problems that feel catastrophic. Do not despair and stay cool. Most of the time, there are simple reasons for our programs behaving in ways that we were hoping wouldn't occur. Your logs are vital to helping you analyze what could potentially be awry.
You can find the code for our current application in its entirety in the part3-6 branch of our backend repo.
Exercises 3.19-3.21
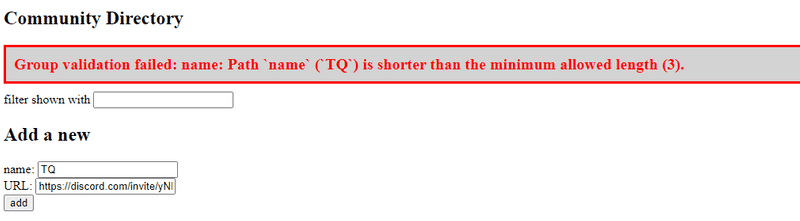
3.19*: Communities database, Step 7
Expand the validation so that the name stored in the database has to be at least three characters long.
Expand the frontend so that it displays some form of error message when a validation error occurs.
Error handling can be implemented by adding a catch block as shown below:
groupService
    .create({ ...
})
    .then(createdGroup => {
      // ...
    })
    .catch(error => {
        // this is the way to access the error message
        console.log(error.response.data.error)
    })
You can display the default error message returned by Mongoose, even though they are not as readable as they could be:
Pertinent: On update operations, mongoose validators are
offby default. Read the documentation to determine how to enable them.
3.20*: Communities database, Step 8
Add validation to your communities application, which will make sure that community links are of the correct form.
A community link must
- start with
https://and then either have discord.com/invite or discord.gg as part of its URL. -
end with 6-10 more letters (both upper case and lowercase) or numbers, but not more than 10 of them.
- e.g. https://discord.com/invite/yNhmmsPBT8 and and https://discord.gg/9BXyDG are valid community links
- e.g. discord.gg/9BXyDG, https://reddit.com and https://something.discord.gg/9BXyDG are invalid
Use a Custom validator to implement the second part of the validation.
If an HTTP POST request tries to add a name that is already in the communities app, the server must respond with an appropriate status code and error message.
3.21 Deploying the database backend to production
Generate a new "comp227" version of the application by creating a new production build of the frontend, and copying it to the backend directory. Verify that everything works locally by using the entire application from the address http://localhost:3001/.
Push the latest version to Render and verify that everything works there as well.
Remember: you should deploy the backend to the cloud service. Make sure that your backend is at the root of your repository.
You shall NOT be deploying the frontend directly at any stage for this part. It is just backend repository that is deployed throughout part 3 and described in the section Serving static files from the backend.
Lint
Before we move on to the next part, we will take a look at an important tool called lint. Wikipedia says the following about lint:
Generically, lint or a linter is any tool that detects and flags errors in programming languages, including stylistic errors. The term lint-like behavior is sometimes applied to the process of flagging suspicious language usage. Lint-like tools generally perform static analysis of source code.
In compiled statically typed languages like Java, IDEs like NetBeans can point out errors in the code, even ones that are more than just compile errors. Additional tools for performing static analysis like checkstyle, can be used for expanding the capabilities of the IDE to also point out problems related to style, like indentation.
In the JavaScript universe, the current leading tool for static analysis (AKA "linting") is ESlint.
Let's install ESlint as a development dependency to the backend project with the command:
npm i -D eslint @eslint/jsDevelopment dependencies are tools that are only needed during the development of the application, and not used in production (like testing).
The contents of the package.json file will change as follows:
{
  //...
  "dependencies": {
    "dotenv": "^16.4.7",
    "express": "^5.1.0",
    "mongoose": "^8.11.0"
  },
  "devDependencies": {    "@eslint/js": "^9.22.0",    "eslint": "^9.22.0"  }
}
The command added a devDependencies section to the file and included the packages eslint and @eslint/js, and installed the required libraries into the node_modules directory.
After this we can initialize a default ESlint configuration with the command:
npx eslint --initWe will answer all of the questions:
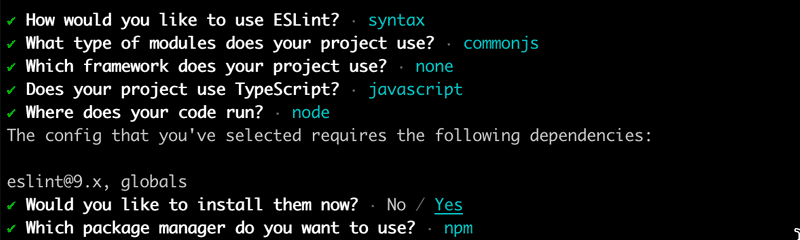
The configuration will be saved in the generated eslint.config.mjs file.
Formatting the Configuration File
Let's reformat the configuration file eslint.config.mjs from its current form to the following:
import globals from 'globals'

export default [
  {
    files: ['**/*.js'],
    languageOptions: {
      sourceType: 'commonjs',
      globals: { ...globals.node },
      ecmaVersion: 'latest',
    },
  },
]
So far, our ESLint configuration file defines the files option with `["\*/*.js"]*, which tells ESLint to look at all JavaScript files in our project folder.
ThelanguageOptionsproperty specifies options related to language features that ESLint should expect, in which we defined thesourceTypeoption ascommonjs`.
This indicates that the JavaScript code in our project uses the CommonJS module system, allowing ESLint to parse the code accordingly.
The globals property specifies global variables that are predefined.
The spread operator applied here tells ESLint to include all global variables defined in the globals.node settings such as the process.
In the case of browser code we would define here globals.browser to allow browser specific global variables like window, and document.
Finally, the ecmaVersion property is set to latest.
This sets the ECMAScript version to the latest available version, meaning ESLint will understand and properly lint the latest JavaScript syntax and features.
We want to make use of ESLint's recommended settings along with our own. The @eslint/js package we installed earlier provides us with predefined configurations for ESLint. We'll import it and enable it in the configuration file:
import globals from 'globals'
import js from '@eslint/js'// ...

export default [
  js.configs.recommended,  {
    // ...
  },
]
We've added the js.configs.recommended to the top of the configuration array, this ensures that ESLint's recommended settings are applied first before our own custom options.
Let's continue building the configuration file. Install a plugin that defines a set of code style-related rules:
npm install --save-dev @stylistic/eslint-pluginImport and enable the plugin, and add these four code style rules:
import globals from 'globals'
import js from '@eslint/js'
import stylisticJs from '@stylistic/eslint-plugin'
export default [
  {
    // ...
    plugins: {       '@stylistic/js': stylisticJs,    },    rules: {       '@stylistic/js/indent': ['error', 4],      '@stylistic/js/linebreak-style': ['error', 'unix'],      '@stylistic/js/quotes': ['error', 'double'],      '@stylistic/js/semi': ['error', 'never'],    },   },
]
The plugins property provides a way to extend ESLint's functionality
by adding custom rules, configurations, and other capabilities that are not available in the core ESLint library.
We've installed and enabled the @stylistic/eslint-plugin, which adds JavaScript stylistic rules for ESLint.
In addition, rules for indentation, line breaks, quotes, and semicolons have been added.
These four rules are all defined in the Eslint styles plugin.
Notice for Windows users: The linebreak style is set to unix in the style rules.
It is recommended to use Unix-style linebreaks (\n) regardless of your operating system,
as they are compatible with most modern operating systems and facilitate collaboration when multiple people are working on the same files.
If you are using Windows-style linebreaks, ESLint will produce the following errors: Expected linebreaks to be 'LF' but found 'CRLF'.
In this case, configure WebStorm to use Unix-style linebreaks via Settings.
Running the Linter
Inspecting and validating a file like index.js can be done with the following command:
npx eslint index.jsThough you may have also noticed a lot of warnings and errors by visiting index.js from within WebStorm, we'll configure lint with WebStorm in the next section
It is recommended to create separate npm scripts for linting:
{
  // ...
  "scripts": {
    "start": "node index.js",
    "dev": "node --watch index.js",
    "test": "echo \"Error: no test specified\" && exit 1",
    "lint": "eslint ."    // ...
  },
  // ...
}
Now the npm run lint command will check every file in the project, while npm run lint:fix can automatically go through and fix all of the errors.
Also, the files in the dist directory get checked when the command is run.
We do not want this to happen, and we can accomplish this by adding an object with the ignores property
that specifies an array of directories and files we want to ignore.
// ...
export default [
  js.configs.recommended,
  {
    files: ['**/*.js'],
    // ...
  },
  // highlight-start
  {
    ignores: ['dist/**'],
  },
  // highlight-end
]
This causes the entire dist directory to not be checked by ESlint.
Lint has quite a lot to say about our code, much of which can be easily fixed.
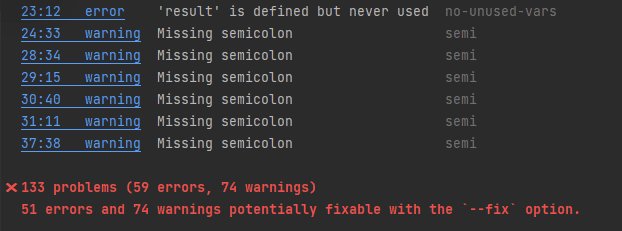
Let's not fix these issues just yet.
Configure WebStorm with ESLint
I like having the lint:fix option to go through and problems ESlint can fix by itself (like semicolons, line endings and spacing),
but a convenient alternative to the command line is to configure WebStorm to use ESLint so that you run the linter continuously.
By using WebStorm you will see errors in your code immediately.
Let's turn that on now by going to Settings (Ctrl-Alt-S) and typing lint,
which should take you to the Page Languages & Frameworks->JavaScript->Code Quality Tools->ESLint
Once you are in the ESLint setting select the Automatic ESLint configuration option and mark the checkbox below that says Run eslint --fix on save.
Notice that these settings we just selected are for this project only! It really makes sense for us to apply it to all future new projects, so I will have you do on more thing and change some settings for new projects. To do so, you'll need to go to File->New Projects Setup->Settings for New Projects. Once that window opens, then select Languages & Frameworks->Javascript->Code Quality Tools->ESLint. Here you'll see a window similar to what we just configured, so again select Automatic ESLint configuration and mark the Run eslint --fix on save checkbox. Also, while we are in the New Project settings, please ensure that the node interpreter from part 0 is selected as the node interpreter. *You can reach that option by typing node in the search bar, it will be under Languages & Frameworks->Node.js.
Once you click OK, WebStorm will underline style violations with a red line and will highlight other problems as well.
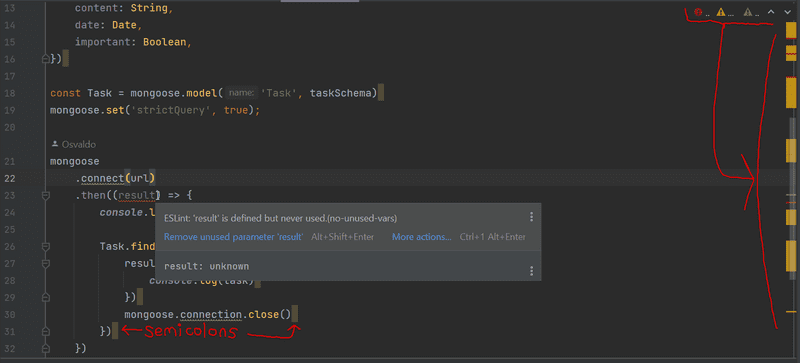
Some of those can be solved merely by saving the file (if we checked the Run eslint --fix on save option). Here's how it looks after I added I pressed Spacebar and then saved via Ctrl-S.
Any errors like the missing semicolon will be applied by ESlint. This makes the other errors easy to spot and fix right away.
ESlint has a vast array of rules that are easy to take into use by editing the .eslint.config.mjs file.
Let's add the eqeqeq rule that warns us if equality is checked with anything other than === (like ==).
The rule is added under the rules field in the configuration file.
export default [
  // ...
  rules: {
    // ...
   eqeqeq: 'error',  },
  // ...
]
While we're at it, let's make a few other changes to the rules.
Let's prevent unnecessary trailing spaces at the ends of lines, require that there is always a space before and after curly braces, and demand a consistent use of whitespace in the function parameters of arrow functions.
export default [
  // ...
  rules: {
    // ...
    eqeqeq: 'error',
    'no-trailing-spaces': 'error',    'object-curly-spacing': ['error', 'always'],    'arrow-spacing': ['error', { before: true, after: true }],  },
]
Our default configuration takes a bunch of predefined rules into use from:
// ...

export default [
  js.configs.recommended,
  // ...
]
This includes a rule that warns about console.log commands.
Disabling a rule can be accomplished by
defining its "value" as 0 or off in the configuration file.
Let's do this for the no-console and no-debugger rules in the meantime,
since we are learning and not intending to ship anything just yet.
[
  {
    // ...
    rules: {
      // ...
      eqeqeq: 'error',
      'no-trailing-spaces': 'error',
      'object-curly-spacing': ['error', 'always'],
      'arrow-spacing': ['error', { before: true, after: true }],
      'no-console': 'off',      'no-debugger': 'off'    },
  },
]
Disabling the no-console rule will allow us to use console.log statements without ESLint flagging them as issues.
This can be particularly useful during development when you need to debug your code.
Here's the complete configuration file with all the changes we have made so far:
import globals from 'globals'
import js from '@eslint/js'
import stylisticJs from '@stylistic/eslint-plugin'
export default [
js.configs.recommended,
{
files: ['**/*.js'],
languageOptions: {
sourceType: 'commonjs',
globals: { ...globals.node },
ecmaVersion: 'latest',
},
plugins: {
'@stylistic/js': stylisticJs,
},
rules: {
'@stylistic/js/indent': ['error', 4],
'@stylistic/js/linebreak-style': ['error', 'unix'],
'@stylistic/js/quotes': ['error', 'double'],
'@stylistic/js/semi': ['error', 'never'],
eqeqeq: 'error',
'no-trailing-spaces': 'error',
'object-curly-spacing': ['error', 'always'],
'arrow-spacing': ['error', { before: true, after: true }],
'no-console': 'off',
'no-debugger': 'off',
},
},
{
ignores: ['dist/**'],
},
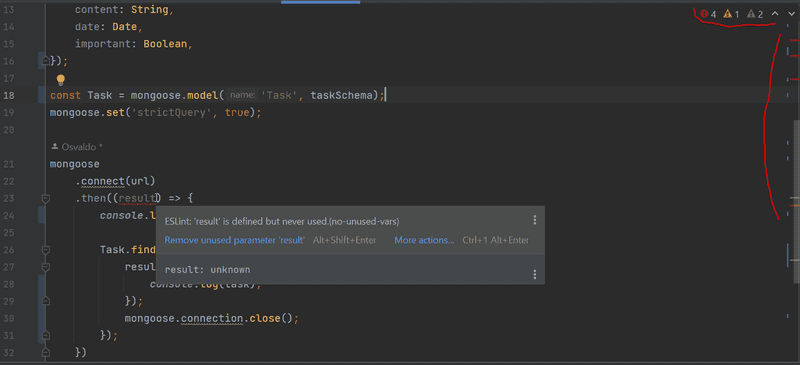
]To fix the remaining issues in the code, you can leverage WebStorm's support by clicking at the more actions link in the error. You can also use the keyboard shortcut shown to see a list of options for fixing the error.
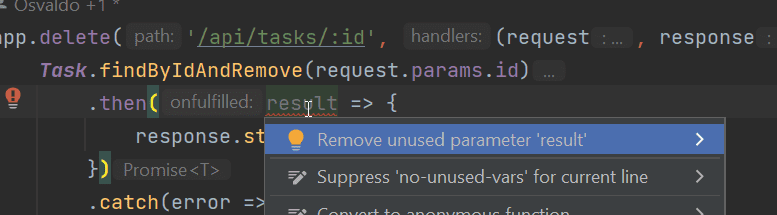
Just pay careful attention as you go through and fix some of the errors to ensure that your program still works.
Suppressing warnings and other tweaks
While ESlint and WebStorm are great, sometimes WebStorm or ESlint may not have a good solution for you either, as it has with us complaining about using the variable process.
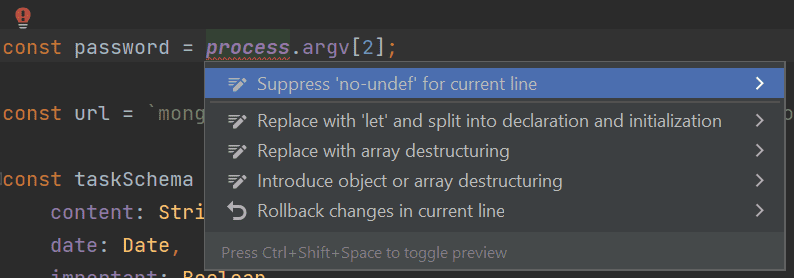
In those cases, you may be tempted to use Suppress 'no-undef' for current line. Doing so leads to having a line for ESlint that looks like this just above the line.
// eslint-disable-next-line no-undefconst password = process.env.PORT || 3001;If you use that suppression a lot, you'll end up for the file if it ends up generating too many comments for your file that deal with disabling ESlint rules. At this point, you may end up thinking that you should use ESLint's rule to suppress the errors for the entire file to remove all those comments, but now that could also leave you more exposed. It's important with ESlint (and other tests) to be mindful of the errors so that you continue to have faith in seeing ESlint as informative, instead of a hindrance. You also want to make sure you have faith that ESlint will catch errors for you. You need to keep a close balance between seeing it as being a hindrance and improving your code by maintaining a consistent style. In this case, a better option than suppressing error messages (which you really should avoid at this point in your learning journey) is to search for any potential ways to resolve this. It turns out that the best solution is not to do any suppression but to add this line to the top of your eslintrc.js file.
"env": {
        "node": true,        "browser": true,
Enabling node means that ESlint knows that we can use the process variable,
and allows you to rely on a system that has helped countless developers with similar situations who have come before you.
Remember: when you make changes to the .estlintrc.js file, play close attention to errors in there as well! WebStorm will highlight issues. If there are, WebStorm will report the issues to you, and you can look at the terminal output to see more details about it.
FYI: Our over eager file watcher may also give us warnings up top. If you merely type a character and then delete it quickly, it should go away.

Many companies define coding standards that are enforced throughout the organization through the ESlint configuration file. It is not recommended to keep reinventing the wheel over and over again, and it can be a good idea to adopt a ready-made configuration from someone else's project into yours. Recently many projects have adopted the Airbnb Javascript style guide by taking Airbnb's ESlint configuration into use.
You can find the code for our current application in its entirety in the part3-7 branch of our backend repo.