b
Deploying app to internet
Next, let's connect the frontend we made in part 2 to our newly built backend. Start up both frontend and backend via different terminal windows.
In the previous part, the frontend could ask for the list of tasks from the json-server we had as a backend, from the address http://localhost:3001/tasks.
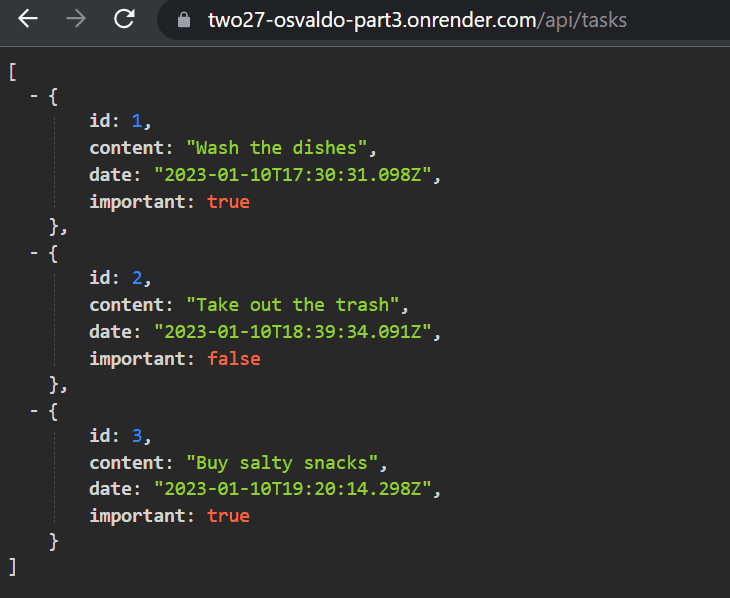
Our backend has a slightly different URL structure now, as the tasks can be found at http://localhost:3001/api/tasks.
Let's change the attribute baseUrl in the frontend tasks app at src/services/tasks.js like so:
import axios from 'axios'
const baseUrl = 'http://localhost:3001/api/tasks'
const getAll = () => {
const request = axios.get(baseUrl)
return request.then(response => response.data)
}
// ...
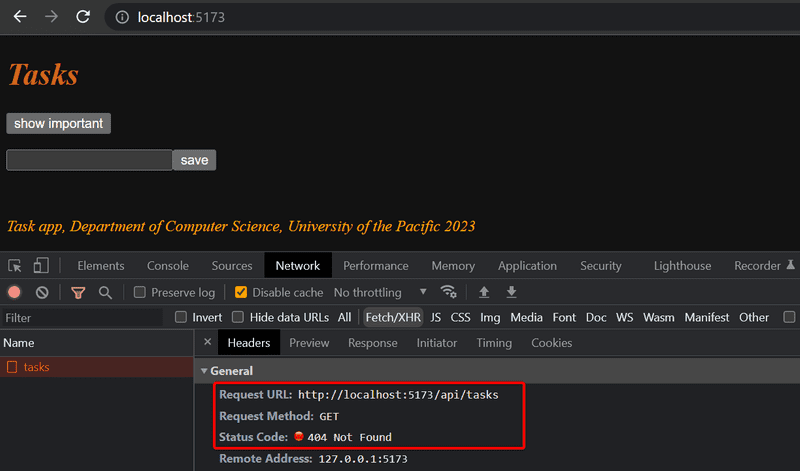
export default { getAll, create, update }Now frontend's GET request to http://localhost:3001/api/tasks does not work for some reason:
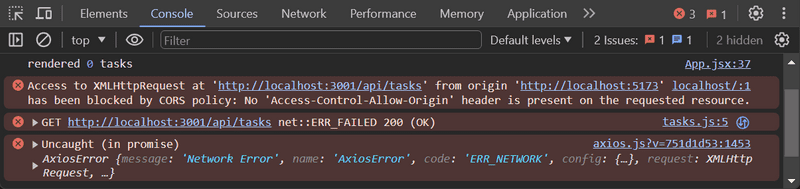
What's going on here? We can access that same backend URL from a browser and Postman without any problems! 😤
Same origin policy and CORS
The issue lies with a concept called: same origin policy. A URL's origin is defined by the combination of three things:
- protocol (AKA scheme)
- hostname
- port
Take this example URL to see how it's broken down:
URL: http://example.com:80/index.html

protocol: http
host: example.com
port: 80
When you visit a website (i.e https://homestarrunner.com/), the browser issues a request to the server on which the website (homestarrunner.com) is hosted. The response sent by the server is an HTML file that may contain one or more references to external assets/resources hosted either on:
- the same server that
homestarrunner.comis hosted on - a different website.
When the browser sees reference(s) to a URL in the source HTML, it issues a request. If the request is issued using the URL that the source HTML was fetched from, then the browser processes the response without any issues. 😎
However, *if the resource is fetched using a URL that doesn't share the same origin(scheme, host, port) as the source HTML*,
the browser will have to check the Access-Control-Allow-origin response header. 😔
If it contains a * or the URL of the source HTML, the browser will process the response. 😎
Otherwise, the browser will refuse to process it and throw an error. 😭
The same-origin policy is a security mechanism implemented by browsers to prevent session hijacking among other security vulnerabilities.
To enable legitimate cross-origin requests (requests to URLs that don't share the same origin), W3C came up with a mechanism called CORS (Cross-origin Resource Sharing). According to Wikipedia:
Cross-origin resource sharing (CORS) is a mechanism that allows restricted resources (e.g. fonts) on a web page to be requested from another domain outside the domain from which the first resource was served. A web page may freely embed cross-origin images, stylesheets, scripts, iframes, and videos. Certain "cross-domain" requests, notably Ajax requests, are forbidden by default by the same-origin security policy.
The problem is that, by default, the JavaScript code in a browser application can only communicate with a server in the same
origin.
*Because our server is in localhost port 3001, while our frontend is in localhost port 5173, they do not have the same origin*.
Keep in mind, that same-origin policy and CORS are not specific to React or Node. They are universal principles regarding the safe operation of web applications.
We can allow requests from other origins by using Node's cors middleware.
In your backend repository, install cors with the command
npm i corsUse the middleware in your backend's index.js to allow requests from all origins:
const cors = require('cors')

app.use(cors())
FYI: When you are enabling cors, you should think about how you want to configure it. In the case of our application, since the backend is not expected to be visible to the public in the production environment, it may make more sense to only enable cors from a specific origin (e.g. the front end).
And the frontend works*!
* While we can now see the tasks on the frontend, changing the task's importance does not work, as we have yet to implement that on the backend.
You can read more about CORS from Mozilla's page.
The setup of our app now looks as follows:
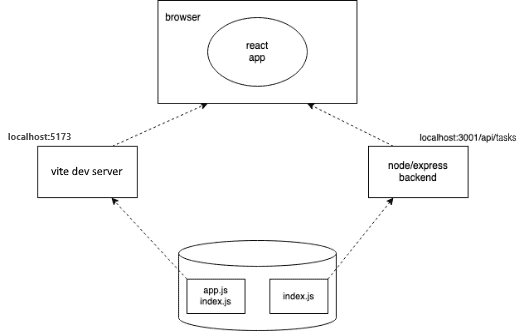
The react app running in the browser now fetches the data from node/express-server that runs in localhost:3001.
Application to the Internet
Now that the whole stack communicates with one another, let's move our application to the Internet! Before we can do that though, we'll need to set up a few things.
Some backstory
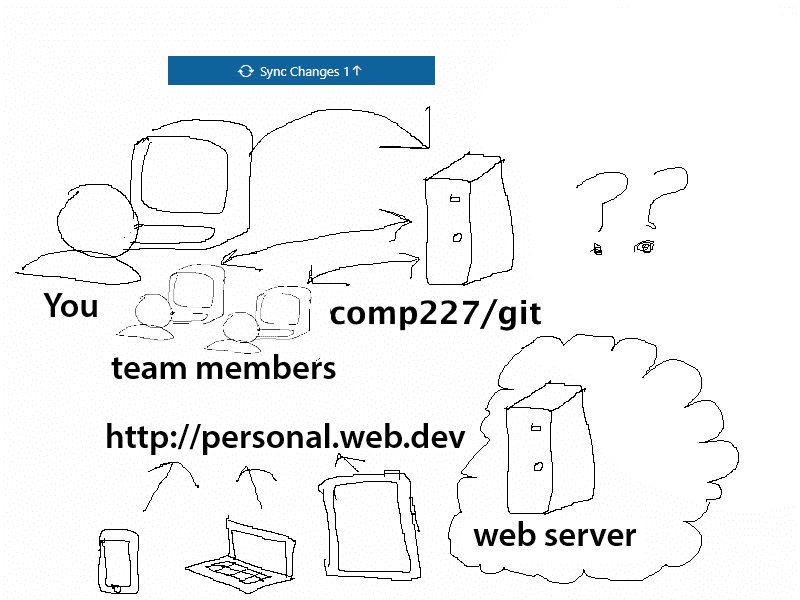
Imagine your business has a live website, and you want to develop a new feature with your co-workers. However, you need time to develop that feature and yet your existing site still needs to function. Your business, like most others, needs to be able to separate working on code from deploying those features to a live web server that serves your customers. For us to have a separate place that is "live", we will need to create a separate deploy staging area between uploading changes to a shared repository that everyone can see. To better illustrate this, let me present to you this dreadful drawing of what we have so far.
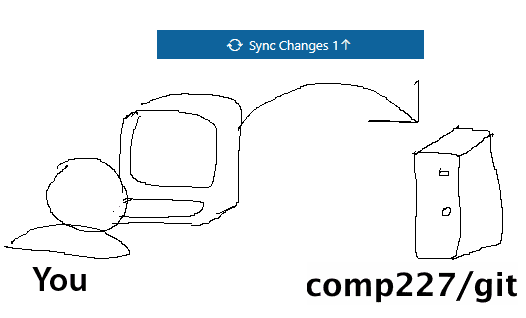
In this diagram, the term "You" represents the work that is on your computer in WebStorm,
while comp227/git is your lab repo on GitHub that has your handle name.
When you click Sync changes, in WebStorm, that causes your changes to be synced with this repository that is on comp 227.
That repo can be shared across different folks and devices.
Think of a shared repository as something that ends up storing your work, like a google drive,
but with a way of better keeping track of different versions of your code.
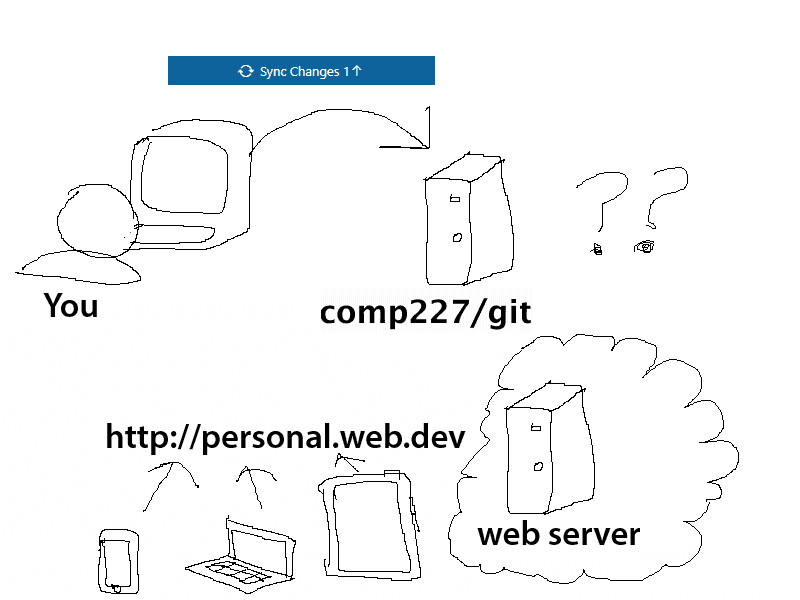
What we need then, is a way of uploading that code to an actual server that will serve web pages. Something that is accessible by the rest of the internet, so that other folks can see the actual webpage, rather than just the assortment of files that are in your repo. So what we need to figure out is something like this.
While we could create something that auto-magically uploads our changes from git to the web server (which would be awesome), we run into another small issue. How do we differentiate between sharing code with folks (or even with ourselves as we are working on it) versus having something that we want to deploy to the outside world?
We can't just have an automatic link between the GitHub server and the web server, since we may want to share something on the GitHub server with our team members but do not want to share it with the world just yet. Instead, we'll need to have a separate deploy step that involves us deploying the code to the web. While there are many ways to separate these two systems, we are going to follow a workflow that fits with our permissions and circumstances. What we are going to do is to have a fork of our comp227 repo that we will place into our personal account. This fork will merely exist to connect to a web server. DO NOT push any code to your personal repo. We will only use the personal fork for deployment. That way, we can still share code and yet have a one-click way of deploying our code to the web. So what our final diagram will look like is something like this.
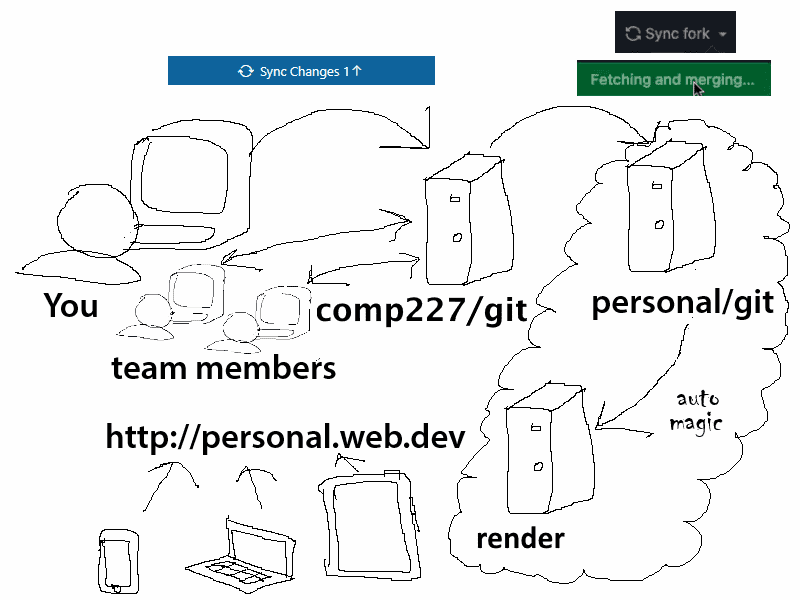
So that is what we are going to set up next.
Setting up the fork of our project
Here we are going to go to GitHub to set up a fork. Remember that the fork's job is merely to interact with the web server. We will never commit code directly to this personal fork. The fork though can sync with your repo in 227 and when it does sync, the web server will be updated magically. Up until this point we have not talked about forks or your repos, as we want to make sure that you set up and commit code to the 227 repo from WebStorm.
To set up a fork, visit the webpage for your comp227 repo on GitHub.
This can be accessed if you go to github.com/comp227/lab3-yourusername
Once there, you will see a fork button at the upper right, with a picture similar to this:

Once you click Fork, you'll be presented with another intermediate page.
I would change the name of the repo so that it has the word deploy and confirm the fork will be in your personal account.
Once you're ready, click the Create fork button at the bottom.

Notice that your fork will be out of your own GitHub handle and not be from 227. Remember that when you make changes to your repo, if you'd like to deploy them, you'll only ever visit your fork on GitHub and sync the changes once everything is connected.

Our rationale for using Render
There are an ever-growing number of services that can be used to host an app on the internet. The developer-friendly services like PaaS (i.e. Platform as a Service) take care of installing the execution environment (e.g. Node.js) and could also provide various services such as databases.
For a decade, Heroku was dominating the PaaS scene. Unfortunately, Heroku's free tier ended on 11/27/2022. This is very unfortunate for many developers, especially students. They do have a student program that provides some free credits, but I would advise against it.
While there are replacements for Heroku that could work with this course like:
We will be using Render in this class, because:
- They have a free option
- They do not require a credit card
One downside that we have with Render is that we'll need to create an extra step to make it work.
So let's get ourselves started in using Render
Using Render
To start, go to the Render website and create an account. When creating an account you can either connect it automatically to your GitHub or you can provide them with an email. Connecting an account that is linked to your GitHub profile removes one step later on about authenticating. For now, I'll assume you are using an email - in that case you'll need to confirm your email address.
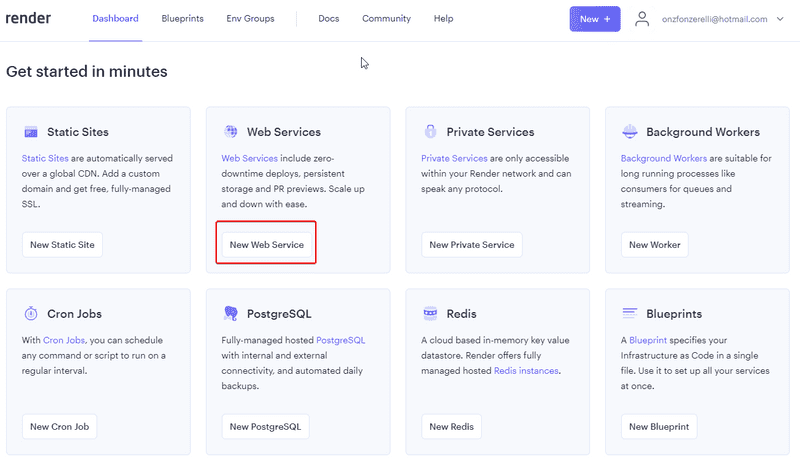
Once you confirm and successfully create your account, go to http://dashboard.render.com.
From the dashboard, you'll create a New Web Service.
If you created your account with an email, at this point, you'll select the option to connect a GitHub account. You'll then go through a series of pages that prompt you to authorize Render to access your GitHub account, including entering your GitHub password. Once you get back to Render, if you linked your account correctly, you should see your repos with a purple connect button alongside each one.
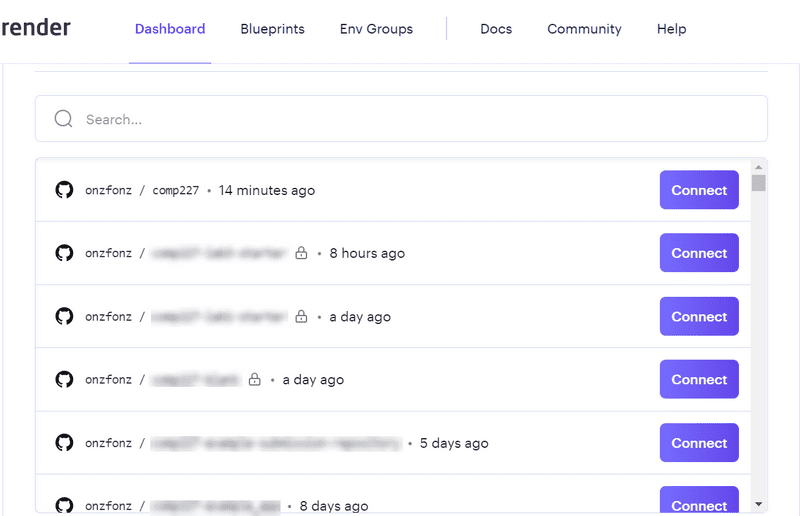
Click the connect button for your forked repo.
You'll then be taken to a page to place all of your options to deploy the page.
Here's the changes I made, since the Branch should be main, and environment should be node.
name: comp227-osvaldo-part3

Build Command: npm i
Start Command: npm start
Then scroll all the way down to the bottom and click Create Web Service. At that point, go take a walk outside and then come back. Once it's deployed, you'll see your link for your live site.
Render recently changed their pricing model, but has a limit on the number of build minutes, so it will be important not to keep deploying every time you make a change and to treat it like many web servers do (thoroughly checking and testing things)
Also, you are given build minutes to have one web service up at a time. There is an option to suspend a web service by clicking on it from the dashboard.
For many PaaS services, we need to change the definition of the port our application uses at the bottom of the index.js file like so:
const PORT = process.env.PORT || 3001app.listen(PORT, () => {
  console.log(`Server running on port ${PORT}`)
})
Now we are using the port defined in the environment variable PORT or port 3001 if the environment variable PORT is undefined.
Many cloud services configure the application port based on that environment variable.
If you run into problems with the first run through, you may have to select Manual Deploy and try it again. Realize that this part of the course is the most unstable at this point. Please ask for help on Discord!
If your build keeps failing due to unhealthy checks, make sure that you have changed the bottom of the index.js file like so:
const PORT = process.env.PORT || 3001app.listen(PORT, () => {
  console.log(`Server running on port ${PORT}`)
})
Don't forget to add your cors package to dependencies in package.json
and you might need to remove the morgan code from the server application.
If everything went well, the application works:
The frontend can also work with the backend on Render!
You can check this by changing the backend's address on the frontend to be the backend's address in Render instead of localhost:3001.
The next question is, how do we deploy the frontend to the Internet? We have multiple options. Let's go through one of them next.
Frontend production build
So far we have been running React code in development mode. In development mode the application is configured to give clear error messages, immediately render code changes to the browser, and so on.
When the application is deployed, we must create a production build or a version of the application that is optimized for production.
A production build for applications created with Vite can be created with the command
npm run build.
Let's run this command from the base folder of the frontend project (reading) that we developed in Part 2.
This creates a directory called dist (which contains the only HTML file of our application, index.html ) and the directory assets. The minified version of our application's JavaScript code will be generated in the dist directory. Even though the application code is in multiple files, all of the JavaScript will be minified into one file. All of the code from all of the application's dependencies will also be minified into this single file.
The minified code is not very readable. Here's what part of the code looks like (with a few line breaks added):
function Qf(e){return ko.call(Cu,e)?!0:ko.call(xu,e)?!1:Wf.test(e)?Cu[e]=!0:(xu[e]=!0,!1)}
function Kf(e,t,n,r){if(n!==null&&n.type===0)return!1;switch(typeof t){case"function":case"symbol":return!0;case"boolean":return r?!1:n!==null?!n.acceptsBooleans:(e=e.toLowerCase().slice(0,5),e!=="data-"&&e!=="aria-");default:return!1}}
function Xf(e,t,n,r){if(t===null||typeof t>"u"||Kf(e,t,n,r))return!0;if(r)return!1;if(n!==null)switch(n.type){case 3:return!t;case 4:return t===!1;case 5:return isNaN(t);case 6:return isNaN(t)||1>t}return!1}
function fe(e,t,n,r,l,o,i){this.acceptsBooleans=t===2||t===3||t===4,this.attributeName=r,this.attributeNamespace=l,this.mustUseProperty=n,this.propertyName=e,this.type=t,this.sanitizeURL=o,this.removeEmptyString=i}
Serving static files from the backend
There are many options for deploying the frontend. Nonetheless, we will:
- copy the production build (that dist directory) from frontend
- paste it in the root of the backend repository and
- configure the backend to show the frontend's main page (the file dist/index.html) as the backend's main page.
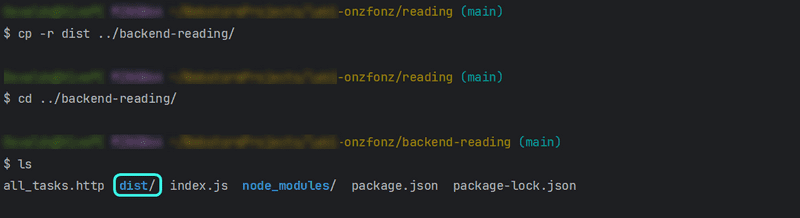
We begin by copying the production build of the frontend to the root of the backend. The copying can be done from the frontend directory by opening up the terminal in WebStorm from the frontend's project and then typing:
cp -r dist ../tasks-backend_OR_NAME_OF_YOUR_BACKEND_DIR*Make sure you spam Tab as you are typing the folder path to ensure you have written it correctly!
Otherwise, simply copy and paste.
The backend directory should now look as follows:
To make Express show static content, the page index.html and the JavaScript, etc., it fetches, we need a built-in middleware from express called static.
Then we add the following amidst the declarations of middleware in index.js:
app.use(express.static('dist'))Whenever Express gets an HTTP GET request it will first check if the dist directory contains a file corresponding to the request's address.
If a correct file is found, express will return it.
Now HTTP GET requests to the address www.serversaddress.com/index.html or www.serversaddress.com will show the React frontend.
GET requests to the address www.serversaddress.com/api/tasks will be handled by the backend's code.
Because of our situation, both the frontend and the backend are at the same address,
we can declare baseUrl in the frontend's services/tasks.js as a relative URL.
This means we can leave out the part declaring the server.
import axios from 'axios'
const baseUrl = '/api/tasks'
const getAll = () => {
  const request = axios.get(baseUrl)
  return request.then(response => response.data)
}

// ...
If you still have the non-existing error that we created previously, you can remove that and update your code to the
getAllfunction from above
After the change, we have to:
- create a new production build of the frontend
- copy it to the root of the backend repository.
The application can now be used from the backend address http://localhost:3001:
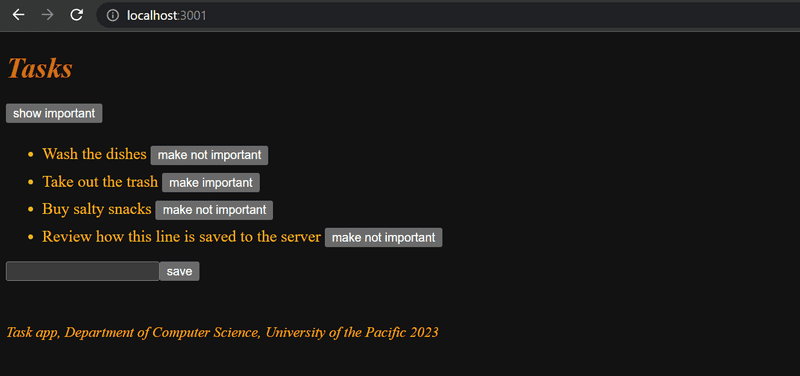
Our application now works exactly like the single-page app example application we studied in part 0.
When we use a browser to go to the address http://localhost:3001, the server returns the index.html file from the dist directory. The contents of the file are:
<!doctype html>
<html lang="en">
  <head>
    <meta charset="UTF-8" />
    <link rel="icon" type="image/svg+xml" href="/vite.svg" />
    <meta name="viewport" content="width=device-width, initial-scale=1.0" />
    <title>Vite + React</title>
    <script type="module" crossorigin src="/assets/index-HCaidufQ.js"></script>
    <link rel="stylesheet" href="/assets/index-0nvTxTIw.css">
  </head>
  <body>
    <div id="root"></div>

  </body>
</html>
The file contains instructions to fetch a CSS stylesheet defining the styles of the application,
and one script tag that instructs the browser to fetch the JavaScript code of the application - the actual React application.
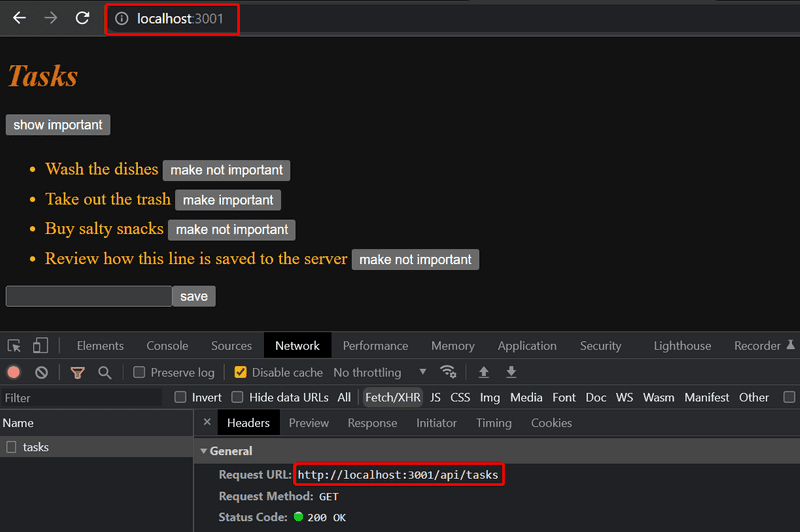
The React code fetches tasks from the server address http://localhost:3001/api/tasks and renders them to the screen. The communication between the server and the browser can be seen in the Network tab of the developer console:
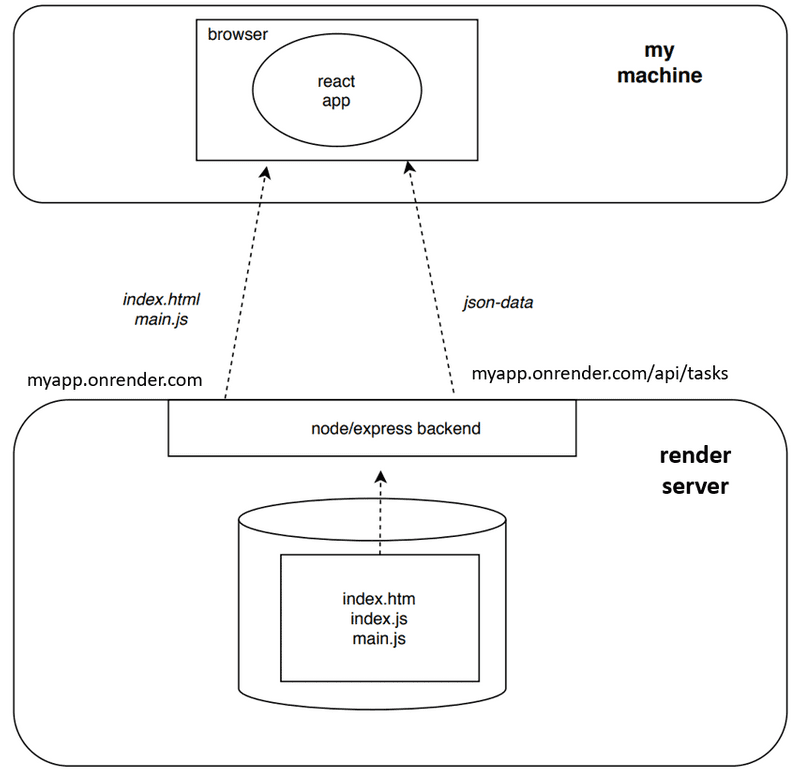
Below is a diagram of what the deployment-ready react app looks like:

Unlike when running the app in a development environment, everything is now in the same node/express-backend that runs in localhost:3001. When the browser goes to the page, the file index.html is rendered. That causes the browser to fetch the production version of the React app. Once it starts to run, it fetches the JSON data from the address localhost:3001/api/tasks.
The whole app to the internet
You are ready to deploy after ensuring:
- the production version of the application works locally
- the production build of the frontend has been added to the backend repository
- the repository has been pushed to the server
To deploy, visit your personal fork's code repository page, and click the Sync Fork button.
Remember: if the automatic deployment does not work, you may need to select the Manual Deploy from the Render dashboard.
The application, (aside than being slow), works perfectly, except we haven't added the functionality for changing the importance of a task to the backend yet.
Our application saves the tasks to a variable. If the application crashes or is restarted, all of the data will disappear.
The application needs a database. Before we introduce one, let's go through a few things.
Study our updated diagram of our application:
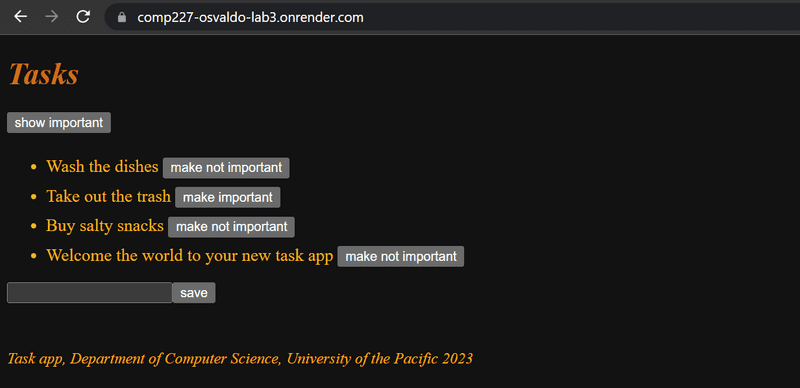
The node/express-backend now resides in the Render server. When the root address that is of the form https://comp227-osvaldo-lab3.onrender.com/ is accessed, the browser loads and executes the React app that fetches the JSON data from the Render server.
Streamlining deploying of the frontend
To create a new production build of the frontend without some of the extra manual work, let's add some npm scripts to the backend's package.json.
{
    "scripts": {
        //...
    "build:ui": "rm -rf dist && cd ../reading/ && npm run build && cp -r dist ../backend-reading",
    "deploy": "npm run build:ui && git add . && git commit -m npm_generated_rebuild_of_the_UI && git push",
  }
}
Notice for Windows users
Back in part 0, I mentioned that you should work exclusively using git bash as your terminal of choice. This is because Windows most popular terminal options Command Prompt and Powershell, do not natively support Linux-like commands. This means that standard shell commands in
build:uiwould not work in Powershell. To get the script to work in Powershell, it would have to be rewritten as:"build:ui": "@powershell Remove-Item -Recurse -Force build && cd ../frontend && npm run build && @powershell Copy-Item build -Recurse ../backend",Let's not rewrite all our shell scripts and stick to using git bash.
Re-examine the text above. Make sure to modify the names of your directories to match your repos.
The script npm run build:ui builds the frontend and copies the production version under the backend repository.
npm run deploy releases the current backend and pushes it to GitHub.
You'll just need the final step of syncing your personal fork with what is in COMP 227 to get it to upload to Render.
Notice that the directory paths in the script build:ui depend on the location of repositories in the file system.
Proxy
Changes on the frontend have caused it to no longer work in development mode (when started with command npm run dev),
as the connection to the backend does not work,
which you'll also have to start as well.
This is due to changing the backend address to a relative URL:
const baseUrl = '/api/tasks'Because in development mode the frontend is at the address localhost:5173, the requests to the backend go to the wrong address localhost:5173/api/tasks. The backend is at localhost:3001.
If the project was created with Vite, this problem is easy to solve. It is enough to add the following declaration to the frontend's vite.config.js file.
import { defineConfig } from 'vite'
import react from '@vitejs/plugin-react'

// https://vitejs.dev/config/
export default defineConfig({
  plugins: [react()],
  server: {    proxy: {      '/api': {        target: 'http://localhost:3001',        changeOrigin: true,      },    }  },})
After restarting, the React development environment will act as proxy. If the React code makes an HTTP request to a path starting with http://localhost:5173/api, the request will be forwarded to the server at http://localhost:3001. Requests to other paths will be handled normally by the development server.
Now the frontend is also working correctly.
It functions both in development mode and in production mode together with the server.
Since from the frontend's perspective all requests are made to http://localhost:5173, which is the single origin,
there is no longer a need for the backend's cors middleware.
Therefore, we can remove references to the cors library from the backend's index.js file and remove cors from the project's dependencies:
npm remove corsWe have now successfully deployed the entire application to the internet. There are many other ways to implement deployments. For example, deploying the frontend code as its own application may be sensible in some situations, as it can facilitate the implementation of an automated deployment pipeline. A deployment pipeline is an automated and controlled way to move the code from the computer of the developer through different tests and quality checks before being deployed to the production environment.
You can find the code for our current backend in the part3-3 branch of our backend repo. The changes in frontend code are in part3-3 branch of the frontend repository.
Exercises 3.9-3.11
The following exercises don't require many lines of code. They can however be challenging, because you must understand exactly what is happening and where, and the configurations must be just right.
3.9: Communities backend, Step 9
Make the backend work with the communities frontend from the exercises of the previous part. Do not implement the functionality for making changes to the URLs yet, that will be implemented in exercise 3.17.
You will probably have to do some small changes to the frontend, at least to the URLs for the backend.
Remember to keep the developer console open in your browser.
If some HTTP requests fail, you should check from the Network tab what is going on.
Keep an eye on the backend's console as well.
If you did not do the previous exercise, it is worth it to print the request data or request.body to the console in the event handler responsible for POST requests.
3.10: Communities backend, Step 10
Deploy the backend to the internet. You shall NOT be deploying the frontend directly at any stage of this part. It is just backend repository that is deployed throughout the whole part, nothing else.
Test the deployed backend with a browser and Postman or REST client to ensure it works.
TIP: When you deploy your application to the cloud, it is worth it to at least in the beginning keep an eye on the logs in render.
One such problem that you'll see arises is that npm will complain that it cannot find application dependency express:
The reason would be that the express package has not been installed with the
npm i expresscommand, so information about the dependency was not saved to the file package.json.Another typical problem is that the application is not configured to use the port set to the environment variable
PORT.Create a README.md at the root of your repository, and add a link to your online application to it.
Also, make sure that the frontend still works locally (in development mode when started with command
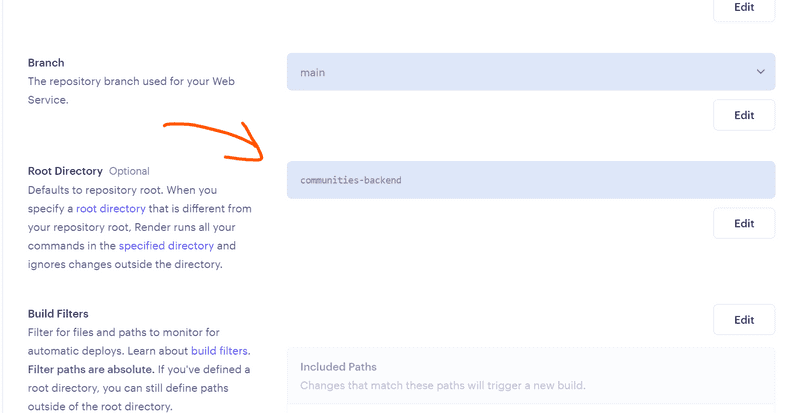
npm run dev).The last reason that I'll mention is forgetting to set the optional Root Directory for your repositories. I've included this mostly due to students mentioning this to me personally as causing them issues. You may need to change your Root Directory in Render to match your particular repository folder structure, like this particular image shows:
Also Remember: Do not forget to create the commit and push!
3.11 Communities full stack
Generate a production build of your frontend, and add it to the internet application using the method introduced in this part.
Remember: Make sure the directory dist is not gitignored. You may need to remove the comment from line 83 of your
.gitignorefile so that thedistfolder will be added to your project.
Also, make sure that the frontend still works locally (in development mode when started with command npm start).
CAUTION: You shall NOT be deploying the frontend directly at any stage of this part. Only the backend repository is deployed throughout the whole part. The frontend production build is added to the backend repository, and the backend serves it as described in the section Serving static files from the backend.
If you have problems getting the app working make sure that your directory structure matches the example app.