d
End to end testing
So far we have:
- tested the backend on an API level using integration tests
- tested some frontend components using unit tests.
Next, we will look into one way to test the system as a whole using End-to-End (E2E) tests.
To do E2E testing on a web application, we can use a browser and a testing library. There are multiple testing libraries available. One example is Selenium, which can be used with almost any browser. Another browser option is a headless browser, which is a browser with no graphical user interface. For example, Chrome can be used in headless mode.
E2E tests are potentially the most useful category of tests because they test the system through the same interface as real users use.
However, E2E tests have some drawbacks too. Configuring E2E tests is more challenging than unit or integration tests. They also tend to be quite slow, and with a large system, their execution time can be minutes or even hours. This is bad for development because during coding it is beneficial to be able to run tests as often as possible in case of code regressions.
Lastly, E2E tests can be flaky. Flaky tests are undesired because they can change from passing to failing or vice-versa simply by running the tests again, without even changing any code.
Cypress
E2E library Cypress is the option we'll be using in this class. Cypress is exceptionally easy to use, and when compared to Selenium, for example, it requires a lot less hassle and headache. Its operating principle is radically different than most E2E testing libraries because Cypress tests are run completely within the browser. Other libraries run the tests in a Node process, which is connected to the browser through an API.
Pertinent: While Cypress works well, we will have to make some changes to our ports in order to use Cypress. Cypress uses port
3001in its backend to run some of the tests. If you recall, this is currently the port that we are using for our backend. Instead of modifying Cypress's settings, let's just adjust our PORT for our backend. We can do this by following these three steps.
- Open up the .env file in your backend and change the PORT from
3001to3002.- Open up vite.config.js in your frontend and change the port listed in your localhost's
targetproperty from3001to3002- Ensure that your frontend and backend have restarted, otherwise stop and start them again.
- Now your backend will be on 3002 for the remainder of these exercises.
Now with the port changed, let's make some end-to-end tests using Cypress for our task application.
We begin by installing Cypress to the frontend as a development dependency
npm i -D cypressand by adding an npm-script to run it:
{
  // ...
  "scripts": {
    "dev": "vite --host",    "build": "vite build",
    "lint": "eslint . --ext js,jsx --report-unused-disable-directives --max-warnings 0",
    "preview": "vite preview",
    "server": "json-server -p3001 --watch db.json",
    "test": "jest",
    "cypress:open": "cypress open"  },
  // ...
}
We also made a small change to the dev script that starts the application.
Without the change, Cypress can not access the app.
Unlike the frontend's unit tests, Cypress tests can be in the frontend or the backend repository, or even in their separate repository.
The tests require the tested system to be running. Unlike our backend integration tests, Cypress tests do not start the system when they are run.
Let's *add an npm script to the backend's package.json* which starts it in test mode, or so that NODE_ENV is test.
{
  // ...
  "scripts": {
    "start": "cross-env NODE_ENV=production node index.js",
    "dev": "cross-env NODE_ENV=development nodemon index.js",
    "test": "cross-env NODE_ENV=test jest --verbose --runInBand --forceExit",
    "start:test": "cross-env NODE_ENV=test node index.js",    "build:ui": "rm -rf dist && cd ../part2-tasks/ && npm run build && cp -r dist ../part3-tasks-backend",
    "deploy": "npm run build:ui && git add . && git commit -m npm_generated_rebuild_of_the_UI && git push",
    "lint": "eslint .",
    "fixlint": "eslint . --fix"
  },
  // ...
}
FYI: To get Cypress working with WSL2 one might need to do some additional configuring first. These two links:
are great places to start.
With the backend running via npm run start:test, we can start Cypress via the frontend with the command
npm run cypress:openWhen we first run Cypress, it will provide us with a guided process and show how it's the first time that we have run it. Once you reach the Welcome to Cypress! message, follow these steps:
- You may need to click on any firewall messages and watch or skip a video before getting to the Welcome to Cypress!* screen.
- Once at Welcome to Cypress!, click the E2E Testing option
- click Continue on the Configuration Files Screen
- click Start E2E Testing in Chrome on the Choose a Browser Screen
- select Create new spec on Create Your First Spec Screen
-
Replace the spec filename from spec.cy.js to task_app.cy.js and click Create spec
- The full path should be cypress\e2e\task_app.cy.js
- Close the next dialog box on the spec successfully added screen
- Now switch back to WebStorm and open the project explorer.
Notice how in WebStorm there is now a cypress/e2e directory, along with our file task_app.cy.js. Locate it and open it in WebStorm and replace the contents with the code below.
describe("Task app", function() {
  it("front page can be opened", function() {
    cy.visit("http://localhost:5173");
    cy.contains("Tasks");
    cy.contains("Task app, Department of Computer Science, University of the Pacific");
  });
});
FYI: You may need to clear some of the linting issues with the indentation in the files if you are copying, through again, I recommend that you try to type the statements out instead. We will cover how to address the cy linter error shortly.
Now, switch back to the Cypress chrome browser and click on our task_app file. We start the test from the opened window:
Running the test shows how the application behaves as the test is run:
FYI: you may need to restart Cypress if you run into any issues.
Running the test shows how the application behaves as the test is run:
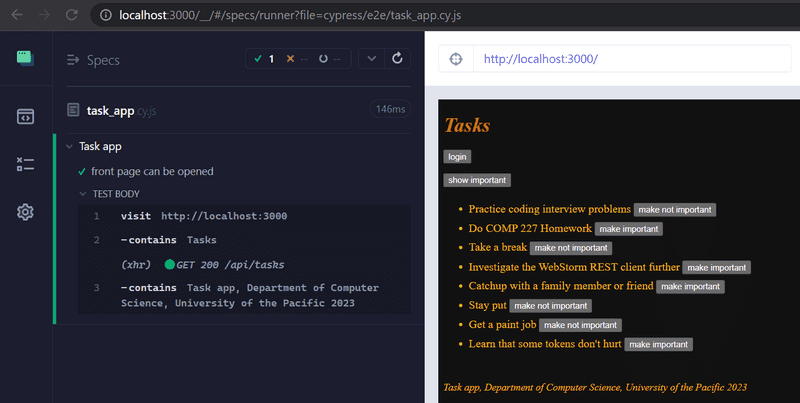
The structure of the test should look familiar.
They use describe blocks to group different test cases, just like Jest.
The test cases have been defined with the it method.
Cypress borrowed these parts from the Mocha testing library it uses under the hood.
cy.visit and cy.contains
are Cypress commands, and their purpose is quite obvious.
cy.visit opens the web address given to it as a parameter in the browser used by the test.
cy.contains searches for the string it received as a parameter from the page.
We could have declared the test using an arrow function
describe("Task app", () => {  it("front page can be opened", () => {    cy.visit("http://localhost:5173");
    cy.contains("Tasks");
    cy.contains("Task app, Department of Computer Science, University of the Pacific");
  });
});
However, Mocha recommends that arrow functions are not used, because they might cause some issues in certain situations.
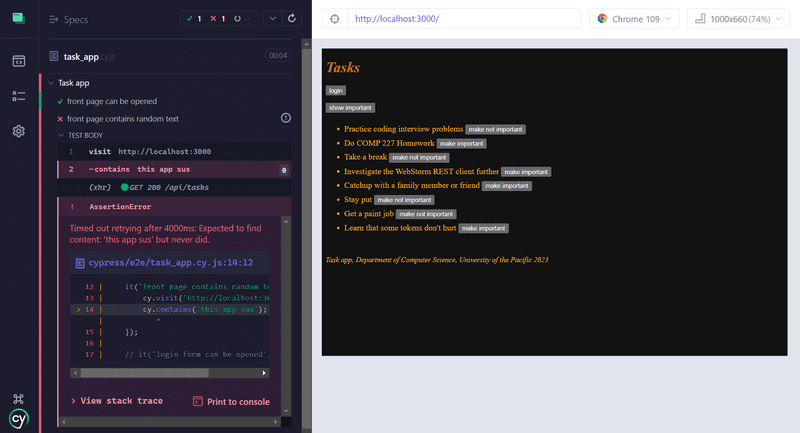
If cy.contains does not find the text it is searching for, the test does not pass.
So if we extend our test like so
describe("Task app", function() {
  it("front page can be opened",  function() {
    cy.visit("http://localhost:5173");
    cy.contains("Tasks");
    cy.contains("Task app, Department of Computer Science, University of the Pacific");
  });

  it("front page contains random text", function() {    cy.visit("http://localhost:5173");    cy.contains("this app sus");  });});
the test fails
Let's remove the failing code from the test.
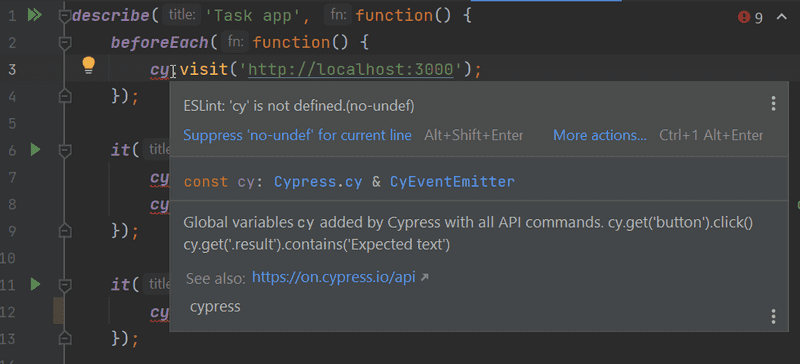
If you are following along as you are working through this text, you may have noticed that the variable
cyin our tests gives us an error:We can get rid of those errors by installing eslint-plugin-cypress as a development dependency
npm i -D eslint-plugin-cypressand changing the configuration in .eslintrc.cjs like so:
module.exports = {
    "env": {
        "browser": true,
        "es6": true,
        "jest/globals": true,
        "cypress/globals": true    },
    "extends": [
      // ...
    ],
    "parserOptions": {
      // ...
    },
    "plugins": [
        "react", "jest", "cypress"    ],
    "rules": {
      // ...
    }
}
Writing to a form
Let's extend our tests so that the test tries to login to our application.
We assume our backend contains a user with the username powercat and password tigers.
The test begins by opening the login form.
describe("Task app",  function() {
  // ...

  it("login form can be opened", function() {
    cy.visit("http://localhost:5173");
    cy.contains("login").click();
  });
});
The test
- searches for the "login" button by its text
- clicks the button with the command
cy.click.
Since both of our tests start by opening the page http://localhost:5173, we should
separate that shared part into a beforeEach block run before each test:
describe("Task app", function() {
  beforeEach(function() {    cy.visit("http://localhost:5173");  });
  it("front page can be opened", function() {
    cy.contains("Tasks");
    cy.contains("Task app, Department of Computer Science, University of the Pacific");
  });

  it("login form can be opened", function() {
    cy.contains("login").click();
  });
});
The login field contains two input fields, which the test should write into.
The cy.get command allows for searching elements by CSS selectors.
We can access the first and the last input field on the page,
and write to them with the command cy.type like so:
it("user can login", function () {
  cy.contains("login").click();
  cy.get("input:first").type("root");
  cy.get("input:last").type("tigers");
});
The test works, though our test is brittle. If we later add more input fields, the test will break because it expects the fields username and password to be the first and the last inputs on the page.
It would be better to give our inputs unique ids and use those to find them. Let's modify our login form:
const LoginForm = ({ ... }); => {
  return (
    <div>
      <h2>Login</h2>
      <form onSubmit={handleSubmit}>
        <div>
          username
          <input
            id='username'            value={username}
            onChange={handleUsernameChange}
          />
        </div>
        <div>
          password
          <input
            id='password'            type="password"
            value={password}
            onChange={handlePasswordChange}
          />
        </div>
        <button id="login-button" type="submit">          login
        </button>
      </form>
    </div>
  )
}
We also added an id to our submit button so we can access it in our tests.
The test becomes:
describe("Task app",  function() {
  // ..
  it("user can login", function() {
    cy.contains("login").click();
    cy.get("#username").type("root");    cy.get("#password").type("tigers");    cy.get("#login-button").click();
    cy.contains("Superuser logged in");  });
});
The last row ensures that the login was successful.
Notice that the CSS id selector is #,
so if we want to search for an element with the id username the CSS selector is #username.
Some things to remember
The test first clicks the button opening the login form:
cy.contains("login").click();When the form has been filled, the form is submitted by clicking the submit button:
cy.get("#login-button").click();Both buttons have the text login, but they are two separate buttons.
While both buttons are in the application's DOM the whole time, only one is visible at a time because of the display:none styling on one of them.
If we search for a button by its text, cy.contains will return the first of them, or the one opening the login form.
This will happen even if the button is not visible.
To avoid name conflicts, we gave the submit button the id login-button we can use to access it.
Please note that passing the test at this stage requires that in the backend test database, there exists a user with the username root and password tigers.
Create a user if needed!
Testing new task form
Let's next add test methods to test the "new task" functionality:
describe("Task app", function() {
  // ..
  describe("when logged in", function() {    beforeEach(function() {      cy.contains("login").click();      cy.get("input:first").type("root");      cy.get("input:last").type("tigers");      cy.get("#login-button").click();    });
    it("a new task can be created", function() {      cy.contains("new task").click();      cy.get("input").type("a task created by cypress");      cy.contains("save").click();      cy.contains("a task created by cypress");    });  });});
Our new test has been defined in its own describe block.
Only logged-in users can create new tasks, so we added logging in to the application to a beforeEach block.
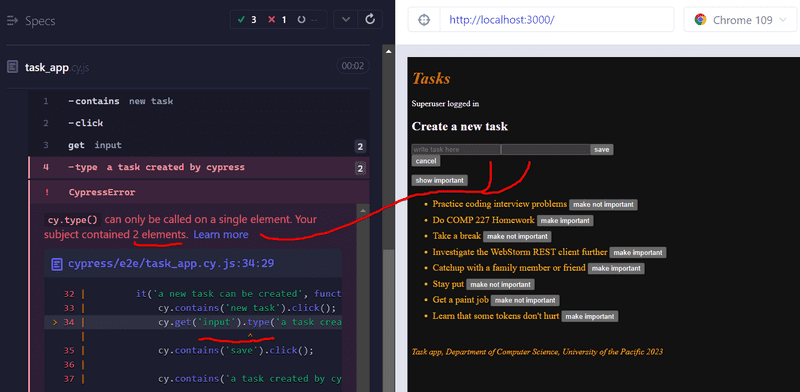
The test trusts that when creating a new task the page contains only one input, so it searches for it like so:
cy.get("input");If you were following along closely however, our page contained two inputs from the last part), which breaks our tests.
Due to this problem, it would again be better to give the input an id and search for the element by its id in the test. We will leave it to you to remove the second input and to provide the text an input id like
new-task, though because that would mean that currently we would make changes to our backend I will wait to make these changes to our form until we reach the next section.
The structure of the tests looks like so:
describe("Task app", function() {
  // ...

  it("user can login", function() {
    cy.contains("login").click();
    cy.get("#username").type("root");
    cy.get("#password").type("tigers");
    cy.get("#login-button").click();

    cy.contains("Superuser logged in");
  });

  describe("when logged in", function() {
    beforeEach(function() {
      cy.contains("login").click();
      cy.get("#username").type("root");
      cy.get("#password").type("tigers");
      cy.get("#login-button").click();
    });

    it("a new task can be created", function() {
      // ...
    });
  });
});
Cypress runs the tests in the order they are in the code.
So first it runs user can login, where the user logs in.
Then cypress will run a new task can be created for which a beforeEach block logs in as well.
Why do this? Isn't the user logged in after the first test?
No, because each test starts from zero as far as the browser is concerned.
All changes to the browser's state are reversed after each test.
Controlling the state of the database
If the tests need to be able to modify the server's database, the situation immediately becomes more complicated. Ideally, the server's database should be the same each time we run the tests, so our tests can be reliably and easily repeatable.
As with unit and integration tests, with E2E tests it is best to empty the database and possibly format it before the tests are run. The challenge with E2E tests is that they do not have access to the database.
The solution is to create API endpoints for the backend tests. We can empty the database using these endpoints. Let's create a new router for the tests in controllers/testing.js.
const testingRouter = require("express").Router()
const Task = require("../models/task");
const User = require("../models/user");

testingRouter.post("/reset", async (request, response) => {
  await Task.deleteMany({});
  await User.deleteMany({});

  response.status(204).end();
});

module.exports = testingRouter;
and add it to the backend only if the application is run in test-mode:
// ...

app.use("/api/login", loginRouter);
app.use("/api/users", usersRouter);
app.use("/api/tasks", tasksRouter);

if (process.env.NODE_ENV === 'test"); {  const testingRouter = require("./controllers/testing");  app.use("/api/testing", testingRouter);}
app.use(middleware.unknownEndpoint);
app.use(middleware.errorHandler);

module.exports = app
After the changes, an HTTP POST request to the /api/testing/reset endpoint empties the database. Make sure your backend is running in test mode by starting it with this command (previously configured in the package.json file):
npm run start:testThe modified backend code can be found on the GitHub branch part5-9.
Controlling the state of the database on the frontend
Next, we will change the beforeEach block so that it empties the server's database before tests are run.
Currently, it is not possible to add new users through the frontend's UI, so we add a new user to the backend from the beforeEach block.
While it may be a matter of preference, I'm going to make a different test user entirely (called Pacific Tests),
which means that I'll also change my tests slightly to login with the new user.
If you want to minimize your changes, just change our Pacific Tests user back to the same details as the Superuser below.
describe("Task app", function() {
   beforeEach(function() {
    cy.request("POST", 'http://localhost:3001/api/testing/reset");    const user = {      name: 'Pacific Tests",      username: 'test",      password: 'pacific'    }    cy.request("POST", 'http://localhost:3001/api/users/", user)     cy.visit("http://localhost:5173");
  });

  it("front page can be opened", function() {
    // ...
  });

  it("user can login", function() {
    // ...
  });

  describe("when logged in", function() {
    // ...
  });
});
During the formatting, the test does HTTP requests to the backend with cy.request.
Unlike earlier, now the testing starts with the backend in the same state every time. The backend will contain one user and no tasks.
Let's add one more test for checking that we can change the importance of tasks.
In part 5b we changed the frontend so that a new task has the value false, instead of randomly selecting it to be true or false.
If we would have left it to be randomly set, then that would leave to a flaky test.
const TaskForm = ({ createTask }); => {
  // ...

  const addTask = (event) => {
    event.preventDefault()
    createTask({
      content: newTask,
      important: false    });

    setNewTask("");
  }
  // ...
}
Back in our tests, we first search for a task and click its make important button. Then we check that the task now contains a make not important button.
Notice that at this point I am now using our new id that we were changing previously,
#new-task!
describe("Task app", function() {
  // ...

  describe("when logged in", function() {
    // ...

    describe("and a task exists", function () {
      beforeEach(function () {
        cy.contains("new task").click();
        cy.get("#new-task").type("another task cypress");
        cy.contains("save").click();
      });

      it("it can be made important", function () {
        cy.contains("another task cypress")
          .contains("make important")
          .click();

        cy.contains("another task cypress")
          .contains("make not important");
      });
    });
  });
});
The first command searches for a component containing the text another task cypress, and then for a make important button within it.
It then clicks the button.
The second command checks that the text on the button has changed to make not important.
The tests and the current frontend code can be found on the GitHub branch part5-9.
Failed login test
Let's make a test to ensure that a login attempt fails if the password is wrong.
Cypress will run all tests each time by default, and as the number of tests increases, it starts to become quite time-consuming.
When developing a new test or when debugging a broken test,
we can define the test with it.only instead of it, so that Cypress will only run the required test.
When the test is working, we can remove .only.
First version of our tests is as follows:
describe("Task app", function() {
  // ...

  it.only("login fails with wrong password", function() {
    cy.contains("login").click();
    cy.get("#username").type("root");
    cy.get("#password").type("wrong");
    cy.get("#login-button").click();

    cy.contains("Wrong credentials");
  });

  // ...
)}
The test uses cy.contains to ensure that the application prints an error message.
The application renders the error message to a component with the CSS class error:
const Notification = ({ message }); => {
  if (message === null) {
    return null
  }

  return (
    <div className="error">      {message}
    </div>
  )
}
The test could also ensure that the error message renders to the correct component, the component with the CSS class error:
it("login fails with wrong password", function() {
  // ...

  cy.get(".error").contains("Wrong credentials");});
First, we use cy.get to search for a component with the CSS class error.
Then we check that the error message can be found from this component.
Notice that CSS class selectors
start with a period, so the selector for the class error is .error.
We could do the same using the should syntax:
it("login fails with wrong password", function() {
  // ...

  cy.get(".error").should("contain", 'Wrong credentials");});
Using should is a bit trickier than using contains, but it allows for more diverse tests than contains which works based on text content only.
You should (pun intended) check this list of the most common assertions that can be used with should.
We can, for example, make sure that the error message is red and it has a border:
it("login fails with wrong password", function() {
  // ...

  cy.get(".error").should("contain", 'wrong credentials");
  cy.get(".error").should("have.css", 'background-color", 'rgb(156, 43, 46)");
  cy.get(".error").should("have.css", 'border-style", 'solid");
});
Cypress requires the colors to be given as rgb.
Because all tests are for the same component we accessed using cy.get, we can chain them using and.
it("login fails with wrong password", function() {
  // ...

  cy.get(".error");
    .should("contain", 'wrong credentials")
    .and("have.css", 'background-color", 'rgb(156, 43, 46)")
    .and("have.css", 'border-style", 'solid")
});
Let's finish the test so that it also checks that the application does not render the success message 'Pacific Tests logged in'.
Let's also remove the only from it.only if it's still present on this test:
it("login fails with wrong password", function() {
  cy.contains("login").click();
  cy.get("#username").type("root");
  cy.get("#password").type("wrong");
  cy.get("#login-button").click();

  cy.get(".error");
    .should("contain", 'wrong credentials")
    .and("have.css", 'background-color", 'rgb(156, 43, 46)")
    .and("have.css", 'border-style", 'solid")

  cy.get("html").should("not.contain", 'Pacific Tests logged in");});
The command should is most often used by chaining it after the command get (or another similar chain-friendly command).
The highlighted line above (cy.get("html")) essentially retrieves the visible content from the entire application.
Another way to write that line is by chaining the command contains with the command should via the not.exist parameter.
Here's the two options side-by-side.
| Option 1 | Option 2 |
|---|---|
cy.get("html").should("not.contain", 'Pacific Tests logged in") |
cy.contains("Pacific Tests logged in").should("not.exist") |
Bypassing the UI
Currently, we have the following tests:
describe("Task app", function() {
  it("user can login", function() {
    cy.contains("login").click();
    cy.get("#username").type("test");
    cy.get("#password").type("pacific");
    cy.get("#login-button").click();

    cy.contains("Pacific Tests logged in");
  });

  it("login fails with wrong password", function() {
    // ...
  });

  describe("when logged in", function() {
    beforeEach(function() {
      cy.contains("login").click();
      cy.get("#username").type("test");
      cy.get("#password").type("pacific");
      cy.get("#login-button").click();
    });

    it("a new task can be created", function() {
      // ...

    });

  });
});
First, we test logging in.
Then, in their own describe block, we tests that expect the user to be logged in, which happens in the beforeEach block.
As we said above, each test starts from zero! Tests do not start from the state where the previous tests ended.
The Cypress documentation gives us the following advice:
Fully test the login flow – but only once!.
So instead of logging in a user using the form in the beforeEach block, Cypress recommends that we
bypass the UI
and do an HTTP request to the backend to login.
The reason for this is that logging in with an HTTP request is much faster than filling out a form.
Our situation is a bit more complicated than in the example in the Cypress documentation because when a user logs in, our application saves their details to the localStorage. However, Cypress can handle that as well. The code is the following
describe("when logged in", function() {
  beforeEach(function() {
    cy.request("POST", 'http://localhost:3001/api/login", {      username: 'test", password: 'pacific'    });.then(response => {      localStorage.setItem("loggedTaskappUser", JSON.stringify(response.body))      cy.visit("http://localhost:5173");    });  });

  it("a new task can be created", function() {
    // ...
  });

  // ...
});
We can access the response to a cy.request with the then method.
Under the hood cy.request, like all Cypress commands,
are promises.
The callback function saves the details of a logged-in user to localStorage, and reloads the page.
Now there is no difference to a user logging in with the login form.
If and when we write new tests to our application, we have to use the login code in multiple places. We should make it a custom command.
Custom commands are declared in cypress/support/commands.js. The code for logging in is as follows:
Cypress.Commands.add("login", ({ username, password }); => {
  cy.request("POST", 'http://localhost:3001/api/login", {
    username, password
  });.then(({ body }); => {
    localStorage.setItem("loggedTaskappUser", JSON.stringify(body))
    cy.visit("http://localhost:5173");
  });
});
Using our custom command is easy, and our test becomes cleaner:
describe("when logged in", function() {
  beforeEach(function() {
    cy.login({ username: 'test", password: 'pacific' });  });

  it("a new task can be created", function() {
    // ...
  });

  // ...
});
The same applies to creating a new task now that we think about it.
We have a test, which makes a new task using the form.
We also make a new task in the beforeEach block of the test testing changing the importance of a task:
describe("Task app", function() {
  // ...

  describe("when logged in", function() {
    it("a new task can be created", function() {
      cy.contains("new task").click();
      cy.get("input").type("a task created by cypress");
      cy.contains("save").click();

      cy.contains("a task created by cypress");
    });

    describe("and a task exists", function () {
      beforeEach(function () {
        cy.contains("new task").click();
        cy.get("input").type("another task cypress");
        cy.contains("save").click();
      });

      it("it can be made important", function () {
        // ...
      });
    });
  });
});
Let's make a new custom command for making a new task. The command will make a new task with an HTTP POST request:
Cypress.Commands.add("createTask", ({ content, important }); => {
  cy.request({
    url: 'http://localhost:3001/api/tasks",
    method: 'POST",
    body: { content, important },
    headers: {
      'Authorization': `Bearer ${JSON.parse(localStorage.getItem("loggedTaskappUser")).token}`
    }
  });

  cy.visit("http://localhost:5173");
});
The command expects the user to be logged in and the user's details to be saved to localStorage.
Now the formatting block becomes:
describe("Task app", function() {
  // ...

  describe("when logged in", function() {
    it("a new task can be created", function() {
      // ...
    });

    describe("and a task exists", function () {
      beforeEach(function () {
        cy.createTask({          content: 'another task cypress",          important: false        });      });

      it("it can be made important", function () {
        // ...
      });
    });
  });
});
Defining a baseURL
There is one more annoying feature in our tests.
The application address http://localhost:5173 is hardcoded in commands.js and task_app.cy.js.
Let's define the baseUrl for the application in the Cypress pre-generated configuration file cypress.config.js:
const { defineConfig } = require("cypress");
module.exports = defineConfig({
  e2e: {
    setupNodeEvents(on, config) {
    },
    baseUrl: 'http://localhost:5173'  },
});
All the commands in the tests use the address of the application
cy.visit("http://localhost:5173");can be transformed into
cy.visit("");The backend's hardcoded address http://localhost:3001 is still in the tests.
Cypress documentation recommends defining other addresses used by the tests as environment variables.
Environment variables are slightly different than a reserved word like baseURL.
Let's expand the configuration file cypress.config.js as follows:
const { defineConfig } = require("cypress");
module.exports = defineConfig({
  e2e: {
    setupNodeEvents(on, config) {
    },
    baseUrl: 'http://localhost:5173",
  },
  env: {
    BACKEND_API: 'http://localhost:3001/api'  }
});
Let's replace all the backend addresses from the tests in the following way
describe("Task app", function() {
  beforeEach(function() {
    cy.request("POST", `${Cypress.env("BACKEND_API")}/testing/reset`)    const user = {
      name: 'Pacific Tests",
      username: 'test",
      password: 'pacific'
    }
    cy.request("POST", `${Cypress.env("BACKEND_API")}/users`, user)    cy.visit("");
  });
  // ...
});
The tests and the frontend code can be found on the GitHub branch part5-10.
Changing the importance of a task
Lastly, let's take a look at the test we did for changing the importance of a task. First, we'll change the formatting block so that it creates three tasks instead of one:
describe("when logged in", function() {
describe("and several tasks exist", function () {
beforeEach(function () {
cy.createTask({ content: 'first task", important: false }); cy.createTask({ content: 'second task", important: false }); cy.createTask({ content: 'third task", important: false }); });
it("one of those can be made important", function () {
cy.contains("second task")
.contains("make important");
.click();
cy.contains("second task")
.contains("make not important");
});
});
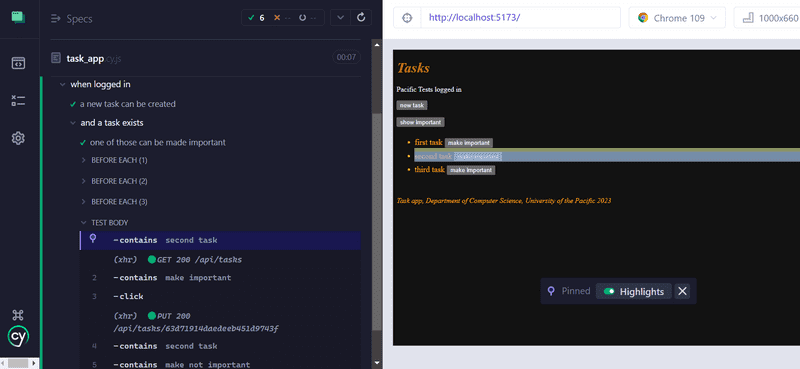
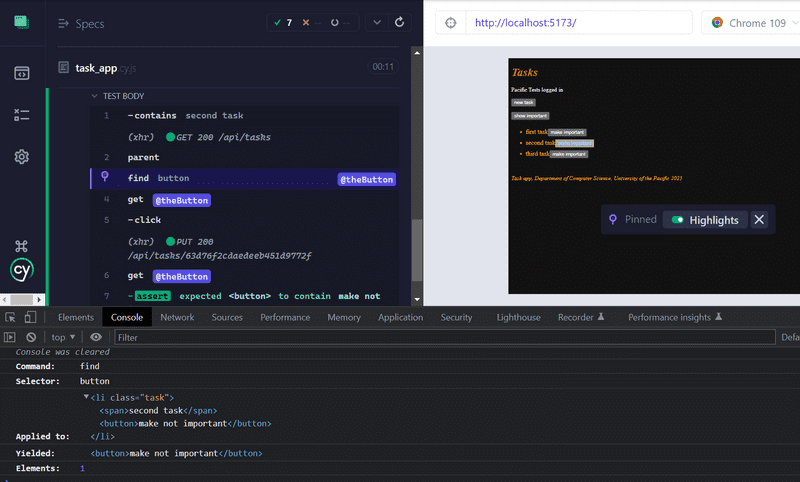
});How does the cy.contains command actually work?
When we click the cy.contains("second task") command in Cypress Test Runner,
we see that the command searches for the element containing the text second task:
By clicking the next line .contains("make important") we see that the test uses
the 'make important' button corresponding to the second task:
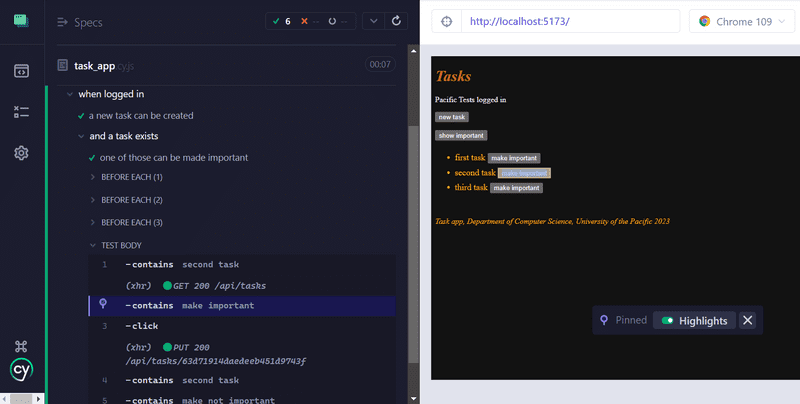
When chained, the second contains command continues the search from within the component found by the first command.
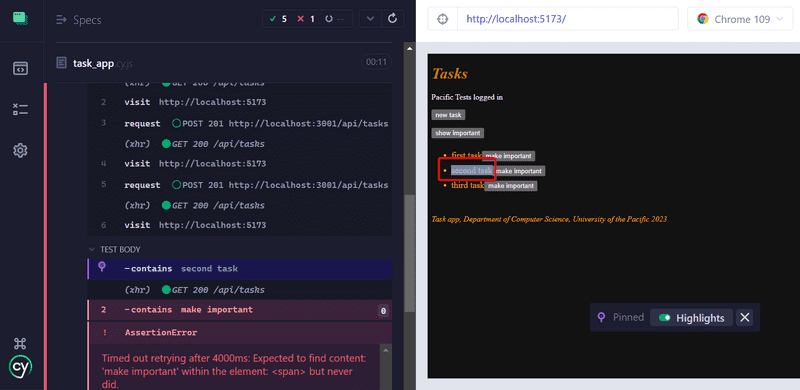
If we had not chained the commands, and instead write:
cy.contains("second task");
cy.contains("make important").click();
the result would have been entirely different. The second line of the test would click the button of a wrong task:
When coding tests, you should check in the test runner that the tests use the right components!
Let's change the Task component so that the text of the task is rendered to a span.
const Task = ({ task, toggleImportance }); => {
const label = task.important
? 'make not important' : 'make important'
return (
<li className='task'>
<span>{task.content}</span> <button onClick={toggleImportance}>{label}</button>
</li>
)
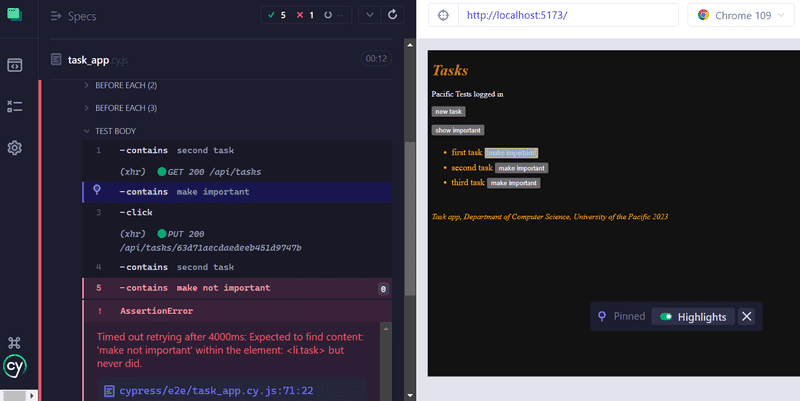
}Our tests break! As the test runner reveals, cy.contains("second task") now returns the component containing the text, and the button is not in it.
One way to fix this is the following:
it("one of those can be made important", function () {
  cy.contains("second task").parent().find("button").click();
  cy.contains("second task").parent().find("button")
    .should("contain", 'make not important");
});
In the first line, we use the parent
command to access the parent element of the element containing second task and find the button from within it.
Then we click the button and check that the text on it changes.
Notice that we use the command find to search for the button.
We cannot use cy.get here,
because cy.get always searches from the entire page and would return all 5 buttons on the page.
Unfortunately, we have some copy-paste in the tests now, because the code for searching for the right button is always the same.
In these kinds of situations, it is possible to use the as command:
it("one of those can be made important", function () {
  cy.contains("second task").parent().find("button").as("theButton");
  cy.get("@theButton").click();
  cy.get("@theButton").should("contain", 'make not important");
});
Now the first line finds the right button and uses as to save it as theButton.
The following lines can use the named element with cy.get("@theButton").
Running and debugging the tests
Finally, let's discuss how Cypress works and how to debug your tests.
Cypress tests give the impression that the tests are normal JavaScript code, and we could for example try this:
const button = cy.contains("login");
button.click();
debugger;
cy.contains("logout").click();
This won't work, however.
When Cypress runs a test, it adds each cy command to an execution queue.
When the code of the test method has been executed, Cypress will execute each command in the queue one by one.
Cypress commands always return undefined, so button.click() in the above code would cause an error.
An attempt to start the debugger would not stop the code between executing the commands, but before any commands have been executed.
Cypress commands are like promises, so if we want to access their return values,
we have to do it using the then command.
For example, the following test would print the number of buttons in the application, and click the first button:
it("then example", function() {
  cy.get("button").then( buttons => {
    console.log("number of buttons", buttons.length)
    cy.wrap(buttons[0]).click();
  });
});
Stopping the test execution with the debugger is possible. The debugger starts only if Cypress test runner's developer console is open.
The developer console is all sorts of useful when debugging your tests. You can see the HTTP requests done by the tests on the Network tab, and the console tab will show you information about your tests:
So far we have run our Cypress tests using the graphical test runner. It is also possible to run them from the command line. We just have to add an npm script for it:
  "scripts": {
    "start": "react-scripts start",
    "build": "react-scripts build",
    "test": "react-scripts test",
    "eject": "react-scripts eject",
    "server": "json-server -p3001 --watch db.json",
    "eslint": "eslint .",
    "cypress:open": "cypress open",
    "test:e2e": "cypress run"  },
Now we can run our tests from the command line with the command npm run test:e2e
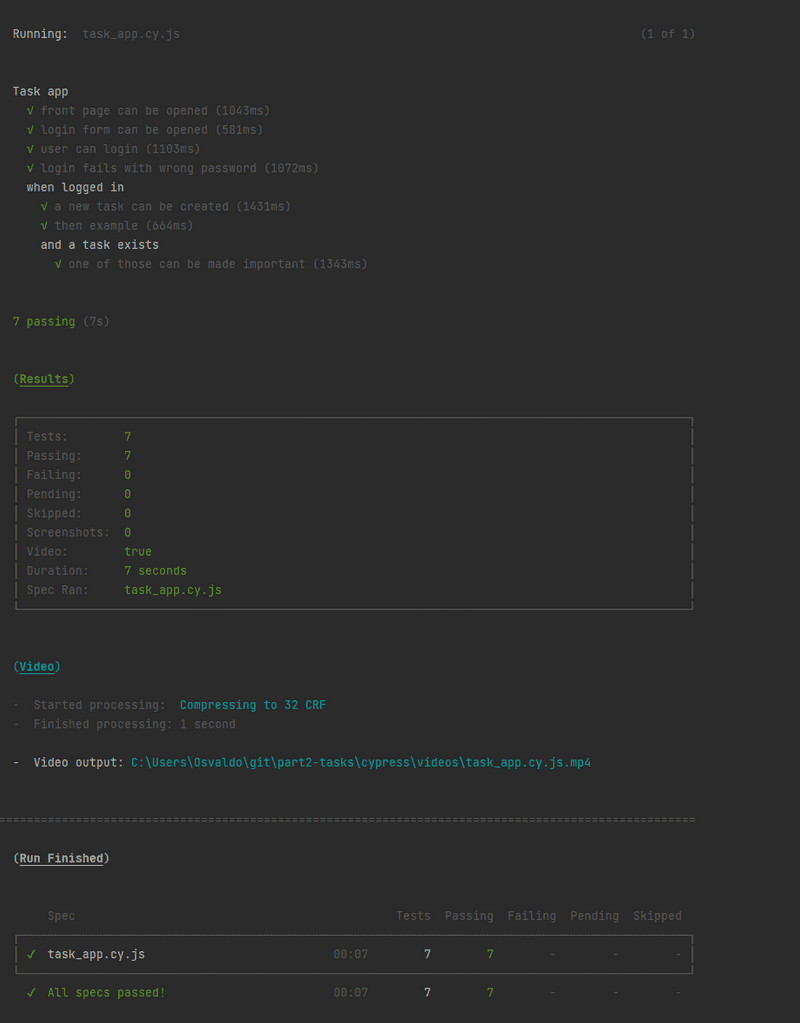
Notice that videos of the test execution will be saved to cypress/videos/, so you should add cypress/videos to your .gitignore.
It is also possible to turn off video generation.
The frontend and the test code can be found on the GitHub branch part5-11.