d
End to end testing: Playwright
So far we have:
- tested the backend on an API level using integration tests
- tested some frontend components using unit tests.
Next, we will look into one way to test the system as a whole using End-to-End (E2E) tests.
To do E2E testing on a web application, we can use a browser and a testing library. There are multiple testing libraries available. One example is Selenium, which can be used with almost any browser. Another browser option is a headless browser, which is a browser with no graphical user interface. For example, Chrome can be used in headless mode.
E2E tests are potentially the most useful category of tests because they test the system through the same interface as real users use.
However, E2E tests have some drawbacks too. Configuring E2E tests is more challenging than unit or integration tests. They also tend to be quite slow, and with a large system, their execution time can be minutes or even hours. This is bad for development because during coding it is beneficial to be able to run tests as often as possible in case of code regressions.
Lastly, E2E tests can be flaky. Flaky tests are undesired because they can change from passing to failing or vice-versa simply by running the tests again, without even changing any code.
Perhaps the two easiest libraries for End to End testing at the moment are Cypress and Playwright.
From the statistics on npmtrends.com we can see that Playwright surpassed Cypress in download numbers during 2024, and its popularity continues to grow:
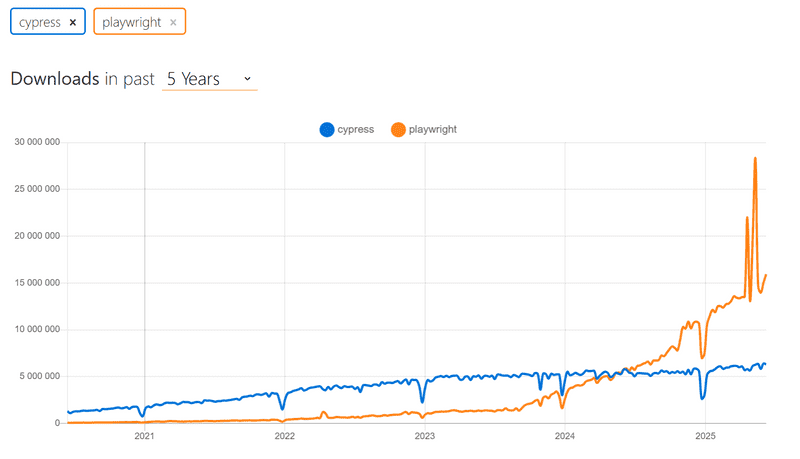
This course has been using Cypress for years. Now Playwright is a new addition. You can choose whether to complete the E2E testing part of the course with Cypress or Playwright. The operating principles of both libraries are very similar, so your choice is not very important. However, Playwright is now the preferred E2E library for the course.
If your choice is Playwright, please proceed. If you end up using Cypress, visit our older documentation.
Playwright
So Playwright is a newcomer to the End to End tests, which started to explode in popularity towards the end of 2023. Playwright is roughly on a par with Cypress in terms of ease of use. The libraries are slightly different in terms of how they work. Cypress is radically different from most libraries suitable for E2E testing, as Cypress tests are run entirely within the browser. Playwright's tests, on the other hand, are executed in the Node process, which is connected to the browser via programming interfaces.
Many blogs have been written about library comparisons, e.g. this and this.
It is difficult to say which library is better. One advantage of Playwright is its browser support; Playwright supports Chrome, Firefox and Webkit-based browsers like Safari. Currently, Cypress includes support for all these browsers, although Webkit support is experimental and does not support all of Cypress features.
Now let's explore Playwright.
Initializing tests
Unlike the backend tests or unit tests done on the React front-end, End to End tests do not need to be located in the same npm project where the code is.
Let's make a completely separate project for the E2E tests with the npm init command.
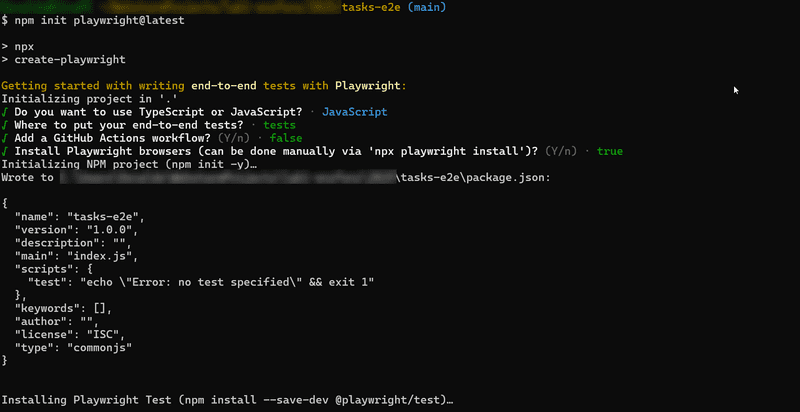
Then install Playwright by running in the new project directory the command:
npm init playwright@latestThe installation script will ask a few questions, answer them as follows:
FYI: When installing Playwright your operating system may not support all of the browsers Playwright offers and you may see an error message like below:
Webkit 18.0 (playwright build v2070) downloaded to /home/user/.cache/ms-playwright/webkit-2070
Playwright Host validation warning:
╔══════════════════════════════════════════════════════╗
║ Host system is missing dependencies to run browsers. ║
║ Missing libraries:                                   ║
║     libicudata.so.66                                 ║
║     libicui18n.so.66                                 ║
║     libicuuc.so.66                                   ║
║     libjpeg.so.8                                     ║
║     libwebp.so.6                                     ║
║     libpcre.so.3                                     ║
║     libffi.so.7                                      ║
╚══════════════════════════════════════════════════════╝
If this is the case you can either specify specific browsers to test with
--project=in your package.json:"test": "playwright test --project=chromium --project=firefox",or remove the entry for any problematic browsers from your playwright.config.js file:
  projects: [
    // ...
    //{
    //  name: "webkit",
    //  use: { ...devices["Desktop Safari"] },
    //},
    // ...
  ]
Let's define an npm script for running tests and test reports in package.json:
{
  // ...
  "scripts": {
    "test": "playwright test",
    "test:report": "playwright show-report"
  },
  // ...
}
During installation, the following is printed to the console:
And check out the following files:
  - ./tests/example.spec.js - Example end-to-end test
  - ./playwright.config.js - Playwright Test configuration
that is, the location of a few example tests for the project that the installation has created.
Let's run the tests:
$ npm test

> [email protected] test
> playwright test


Running 6 tests using 5 workers
  6 passed (3.9s)

To open last HTML report run:

  npx playwright show-report
The tests pass.
A more detailed test report can be opened either with npx playwrite show-report, or with npm run test:report.
Tests can also be run via the graphical UI with the command:
npm run test -- --uiThe sample tests in tests/example.spec.js look like this:
// @ts-check
import { test, expect } from "@playwright/test";

test("has title", async ({ page }) => {
  await page.goto("https://playwright.dev/");
  // Expect a title "to contain" a substring.
  await expect(page).toHaveTitle(/Playwright/);
});

test("get started link", async ({ page }) => {
  await page.goto("https://playwright.dev/");

  // Click the get started link.
  await page.getByRole("link", { name: "Get started" }).click();

  // Expects page to have a heading with the name of Installation.
  await expect(page.getByRole("heading", { name: "Installation" })).toBeVisible();
});
The first line of the test functions says that the tests are testing the page at https://playwright.dev/.
Testing our own code
Now let's remove the sample tests (by deleting tests/example.spec.js) and start testing our own application.
Playwright tests assume that the system under test is running when the tests are executed. Unlike, for example, backend integration tests, Playwright tests do not start the system under test during testing.
Let's make an npm script for the backend, which will enable it to be started in testing mode,
i.e. so that NODE_ENV gets the value test.
{
  // ...
  "scripts": {
    "start": "cross-env NODE_ENV=production node index.js",
    "dev": "cross-env NODE_ENV=development node --watch index.js",
    "test": "cross-env NODE_ENV=test node --test",
    "lint": "eslint .",
    // ...
    "start:test": "cross-env NODE_ENV=test node --watch index.js"  },
  // ...
}
Let's start the frontend and backend, and create the first test file for the application tests/task_app.spec.js:
const { test, expect } = require("@playwright/test");

test("front page can be opened", async ({ page }) => {
  await page.goto("http://localhost:5173");

  const locator = page.getByText("Tasks");
  await expect(locator).toBeVisible();
  await expect(page.getByText("Task app, Department of Computer Science, University of the Wacific")).toBeVisible();
});
First, the test opens the application with the method page.goto.
After this, it uses page.getByText
to get a locator that corresponds to the element where the text Tasks is found.
The method toBeVisible
ensures that the element corresponding to the locator is visible at the page.
The second check is done without using the auxiliary variable.
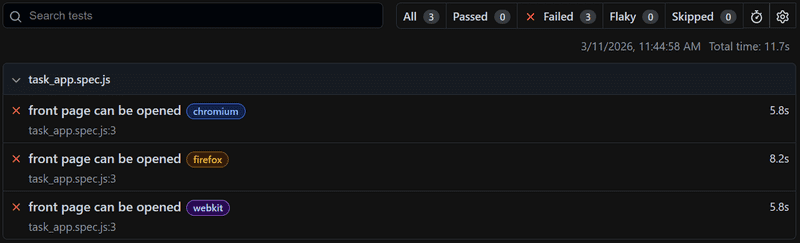
The test fails because we are looking for the incorrect name for our university (Wacific).
Playwright opens the test report in the browser and it becomes clear that Playwright has actually performed the tests with three different browsers:
Chrome, Firefox and Webkit, i.e. the browser engine used by Safari:
By clicking on the report of one of the browsers, we can see a more detailed error message:
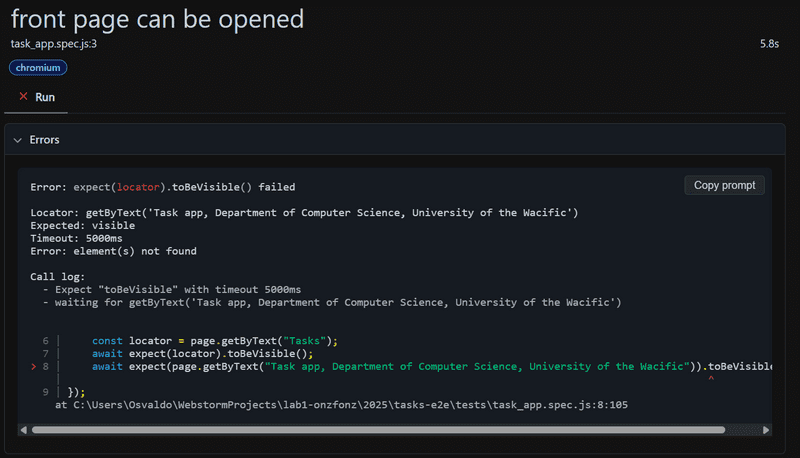
In the big picture, it is of course a very good thing that the testing takes place with all three commonly used browser engines, but this is slow, and when developing the tests it is probably best to carry them out mainly with only one browser. You can define the browser engine to be used with the command line parameter:
npm test -- --project chromiumFYI: If later on you find that this did not work, you can also comment out the
firefoxandwebkitprojects in playwright.config.js
Now let's fix the test with the correct name and let's add a describe block to the tests:
const { test, describe, expect } = require("@playwright/test");

describe("Task app", () => {  test("front page can be opened", async ({ page }) => {
    await page.goto("http://localhost:5173");

    const locator = page.getByText("Tasks");
    await expect(locator).toBeVisible();
    await expect(page.getByText("Task app, Department of Computer Science, University of the Pacific")).toBeVisible();
  });
});
Before we move on, let's break the tests one more time.
We notice that the execution of the tests is quite fast when they pass, but much slower if the they do not pass.
The reason for this is that Playwright's policy is to wait for searched elements until they are rendered and ready for action.
If the element is not found, a TimeoutError is raised and the test fails.
Playwright waits for elements by default for 5 or 30 seconds depending on the functions used in testing.
When developing tests, it may be wiser to reduce the waiting time to a few seconds. According to the documentation, this can be done by changing the file playwright.config.js as follows:
export default defineConfig({
  // ...
  timeout: 3000,  fullyParallel: false,  workers: 1,  // ...
});
We also made two other changes to the file, specifying that all tests be executed one at a time. With the default configuration, the execution happens in parallel, and since our tests use a database, parallel execution causes problems.
Writing on the form
Let's write a new test that tries to log into the application.
Let's assume that a user is stored in the database, with username powercat and password tigers.
Let's start by opening the login form.
describe("Task app", () => {
  // ...

  test("user can login", async ({ page }) => {
    await page.goto("http://localhost:5173");

    await page.getByRole("button", { name: "login" }).click();
  });
});
The test first uses the method page.getByRole to retrieve the button based on its text.
The method returns the Locator corresponding to the Button element.
Pressing the button is performed using the Locator method click.
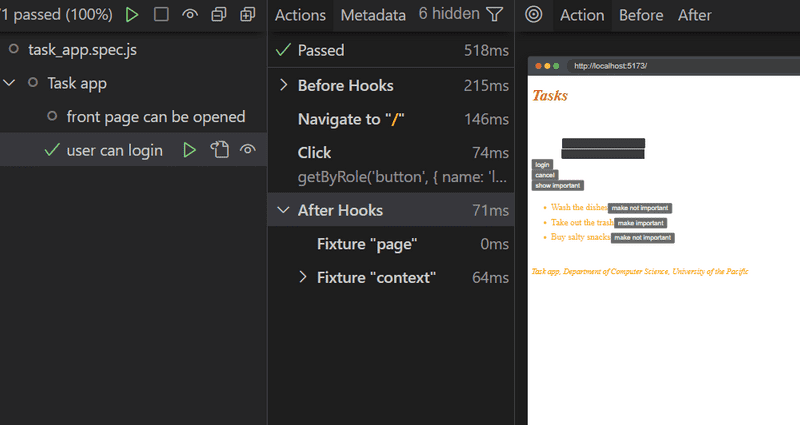
When developing tests, you could use Playwright's UI mode, i.e. the user interface version. Let's start the tests in UI mode as follows:
npm test -- --uiWe now see that the test finds the button
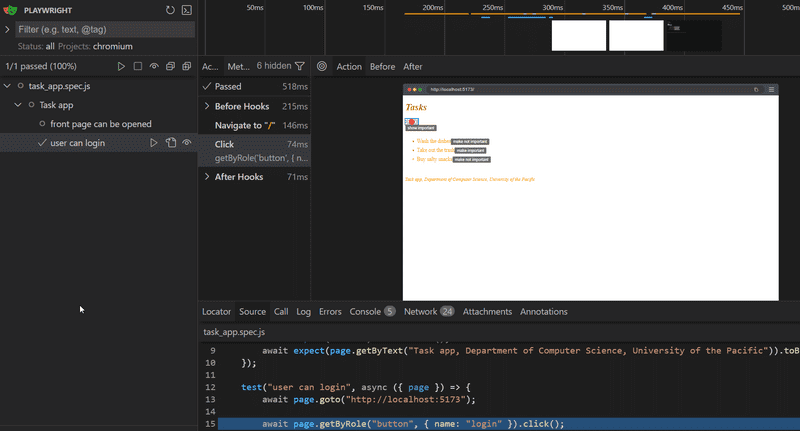
After clicking on After Hooks, the form will appear
When the form is opened, the test should look for the text fields and enter the username and password in them.
Let's make the first attempt using the method page.getByRole:
describe("Task app", () => {
  // ...

  test("user can login", async ({ page }) => {
    await page.goto("http://localhost:5173");

    await page.getByRole("button", { name: "login" }).click();
    await page.getByRole("textbox").fill("powercat");  });
});
This results in an error:
Error: locator.fill: Error: strict mode violation: getByRole("textbox") resolved to 2 elements:
  1) <input value=""/> aka getByRole('textbox').first()
  2) <input value="" type="password"/> aka locator('input[type="password"]')
The problem now is that getByRole finds two text fields, and calling the fill method fails,
because it assumes that there is only one text field found.
One way around the problem is to use the methods first and last:
describe("Task app", () => {
  // ...

  test("user can login", async ({ page }) => {
    await page.goto("http://localhost:5173");

    await page.getByRole("button", { name: "login" }).click();
    await page.getByRole("textbox").first().fill("powercat");    await page.getByRole("textbox").last().fill("tigers");    await page.getByRole("button", { name: "login" }).click();      await expect(page.getByText("Powercat logged in")).toBeVisible();  });
});
After writing in the text fields, the test presses the login button and checks that the application renders the logged-in user's information on the screen.
If there were more than two text fields, using the methods first and last would not be enough.
One possibility would be to use the all method, which turns the found locators into an array that can be indexed:
describe("Task app", () => {
  // ...
  test("user can login", async ({ page }) => {
    await page.goto("http://localhost:5173");

    await page.getByRole("button", { name: "login" }).click();
    const textboxes = await page.getByRole("textbox").all();    await textboxes[0].fill("test");    await textboxes[1].fill("pacific");
    await page.getByRole("button", { name: "login" }).click();

    await expect(page.getByText("Pacific Tests logged in")).toBeVisible();
  });
});
Both this and the previous version of the test work. However, both are problematic to the extent that if the registration form is changed, the tests may break, as they rely on the fields to be on the page in a certain order.
If an element is difficult to locate in tests, you can assign it a separate test-id attribute and find the element in tests using the getByTestId method.
Let's now take advantage of the existing elements of the login form. The input fields of the login form have been assigned unique labels:
// ...
<form onSubmit={handleSubmit}>
  <div>
    <label>      username      <input
        type="text"
        value={username}
        onChange={handleUsernameChange}
      />
    </label>  </div>
  <div>
    <label>      password      <input
        type="password"
        value={password}
        onChange={handlePasswordChange}
      />
    </label>  </div>
  <button type="submit">login</button>
</form>
// ...
Input fields can and should be located in tests using labels with the getByLabel method:
describe("Task app", () => {
  // ...

  test("user can login", async ({ page }) => {
    await page.goto("http://localhost:5173");

    await page.getByRole("button", { name: "login" }).click();
    await page.getByLabel("username").fill("pacrock");    await page.getByLabel("password").fill("ilikepaint");
    await page.getByRole("button", { name: "login" }).click();

    await expect(page.getByText("Khoury Graffiti Rock logged in")).toBeVisible();
  });
});
When locating elements, it makes sense to aim to utilize the content visible to the user in the interface, as this best simulates how a user would actually find the desired input field while navigating the application.
Notice that passing the test at this stage requires that there is a user in the test database of the backend with username pacrock and password ilikepaint.
Create a user if needed!
Test Initialization
Since both tests start in the same way, i.e. by opening the page http://localhost:5173,
it is recommended to isolate the common part in the beforeEach block that is executed before each test:
const { test, describe, expect, beforeEach } = require("@playwright/test")

describe("Task app", () => {
  beforeEach(async ({ page }) => {    await page.goto("http://localhost:5173");  });
  test("front page can be opened", async ({ page }) => {
    const locator = page.getByText("Tasks");
    await expect(locator).toBeVisible();
    await expect(page.getByText("Task app, Department of Computer Science, University of the Pacific")).toBeVisible();
  });

  test("user can login", async ({ page }) => {
    await page.getByRole("button", { name: "login" }).click();
    await page.getByLabel("username").fill("pacrock");
    await page.getByLabel("password").fill("ilikepaint");
    await page.getByRole("button", { name: "login" }).click();
    await expect(page.getByText("Khoury Graffiti Rock logged in")).toBeVisible();
  });
});
Testing task creation
Next, let's create a test that adds a new task to the application:
const { test, describe, expect, beforeEach } = require("@playwright/test");

describe("Task app", () => {
  // ...

  describe("when logged in", () => {
    beforeEach(async ({ page }) => {
      await page.getByRole("button", { name: "login" }).click();
      await page.getByLabel("username").fill("pacrock");
      await page.getByLabel("password").fill("ilikepaint");
      await page.getByRole("button", { name: "login" }).click();
    });

    test("a new task can be created", async ({ page }) => {
      await page.getByRole("button", { name: "new task" }).click();
      await page.getByRole("textbox").fill("a task created by playwright");
      await page.getByRole("button", { name: "save" }).click();
      await expect(page.getByText("a task created by playwright")).toBeVisible();
    });
  });
});
The test is defined in its own describe block.
Creating a task requires that the user is logged in, which is handled in the beforeEach block.
The test trusts that when creating a new task, there is only one input field on the page, so it searches for it as follows:
page.getByRole("textbox");If there were more fields, the test would break. Because of this, it could be better to add a test-id to the form input and search for it in the test based on this id.
FYI: the test will only pass the first time. The reason for this is that its expectation
await expect(page.getByText("a task created by playwright")).toBeVisible();causes problems when the same task is created in the application more than once. The problem will be solved in the next section.
The structure of the tests looks like this:
const { test, describe, expect, beforeEach } = require("@playwright/test");

describe("Task app", () => {
  // ....

  test("user can login", async ({ page }) => {
    await page.getByRole("button", { name: "login" }).click();
    await page.getByLabel("username").fill("pacrock");
    await page.getByLabel("password").fill("ilikepaint");
    await page.getByRole("button", { name: "login" }).click();
    await expect(page.getByText("Khoury Graffiti Rock logged in")).toBeVisible();
  });

  describe("when logged in", () => {
    beforeEach(async ({ page }) => {
      await page.getByRole("button", { name: "login" }).click();
      await page.getByLabel("username").fill("pacrock");
      await page.getByLabel("password").fill("ilikepaint");
      await page.getByRole("button", { name: "login" }).click();
    });

    test("a new task can be created", async ({ page }) => {
      await page.getByRole("button", { name: "new task" }).click();
      await page.getByRole("textbox").fill("a task created by playwright");
      await page.getByRole("button", { name: "save" }).click();
      await expect(page.getByText("a task created by playwright")).toBeVisible();
    });
  });
});
Since we have prevented the tests from running in parallel, Playwright runs the tests in the order they appear in the test code.
The first test, user can login, checks whether the user root can login to the application.
Then, the test a new task can be created gets executed, which also performs a login (shown in the beforeEach block).
Pertinent: Why do we log in again, isn't the user already logged in because of the first test? No, because the execution of each test starts from the browser's zero state, all changes made to the browser's state by the previous tests are reset.
Controlling the state of the database
If the tests need to be able to modify the server's database, the situation immediately becomes more complicated. Ideally, the server's database should be the same each time we run the tests, so our tests can be reliably and easily repeatable.
As with unit and integration tests, with E2E tests we should empty the database and format it before the tests are run. The challenge with E2E tests is that they do not have access to the database.
The solution is to create API endpoints for the backend tests. We can empty the database using these endpoints. Let's create a new router for the tests in controllers/testing.js.
const router = require("express").Router();
const Task = require("../models/task");
const User = require("../models/user");

router.post("/reset", async (request, response) => {
  await Task.deleteMany({});
  await User.deleteMany({});

  response.status(204).end();
});

module.exports = router
Now, let's add this router to the backend only if the application is run in test-mode:
// ...

app.use("/api/login", loginRouter);
app.use("/api/users", usersRouter);
app.use("/api/tasks", tasksRouter);

if (process.env.NODE_ENV === "test"); {  const testingRouter = require("./controllers/testing");  app.use("/api/testing", testingRouter);}
app.use(middleware.unknownEndpoint);
app.use(middleware.errorHandler);

module.exports = app
After the changes, *an HTTP POST request to the /api/testing/reset endpoint empties the database. Make sure your backend is running in test mode by starting it with this command (previously configured in the *package.json file):
npm run start:testThe modified backend code can be found on the GitHub branch part5-1.
Controlling the state of the database on the frontend
Next, we will change the beforeEach block so that it empties the server's database before tests are run.
Currently, it is not possible to add new users through the frontend's UI, so we add a new user to the backend from the beforeEach block.
While it may be a matter of preference, I"m going to make a different test user entirely (called Pacific Tests),
which means that I"ll also change my tests slightly to login with the new user.
If you want to minimize your changes, just change our Pacific Tests user back to the previous details of our previous user in the code below.
describe("Task app", () => {
  beforeEach(async ({ page, request }) => {
    await request.post("http://localhost:3001/api/testing/reset");
    await request.post("http://localhost:3001/api/users", {
      data: {
        name: "Pacific Tests",
        username: "test",
        password: "pacific"
      }
    });

    await page.goto("http://localhost:5173")
  });

  test("front page can be opened",  () => {
    // ...
  });

  test("user can login", () => {
    // change to test and pacific username here
    // ...
  });

  describe("when logged in", () => {
    // ...
  });
});
During initialization, the test makes HTTP requests to the backend with the method post
of the parameter request.
Unlike before, now the testing of the backend always starts from the same state, i.e. there is one user and no tasks in the database.
Let's make a test that checks that the importance of the tasks can be changed. There are a few different approaches to taking the test.
In the following, we first look for a task and click on its button that has text make not important. After this, we check that the task contains the button with make important.
describe("Task app", () => {
  // ...

  describe("when logged in", () => {
    // ...

    describe("and a task exists", () => {      beforeEach(async ({ page }) => {        await page.getByRole("button", { name: "new task" }).click();        await page.getByRole("textbox").fill("a test task by playwright");        await page.getByRole("button", { name: "save" }).click();      })        test("importance can be changed", async ({ page }) => {        await page.getByRole("button", { name: "make important" }).click();        await expect(page.getByText("make not important")).toBeVisible();      });    });
  });
});
This means that for our test *importance can be changed*, we execute the commands in the beforeEach block where playwright:
- Clicks on a button that has the name
new task - Fills the textbox with the text a test task by playwright and
- inside it the button make not important and clicks on it.
Before we start executing the test. This means that by the time that we sarch for make not important, we are clicking the importance of the task, a test task by playwright, and ensure that the text of that for the button on that task has changed to make important.
Test for failed login
Now let's do a test that ensures that the login attempt fails if the password is wrong.
The first version of the test looks like this:
describe("Task app", () => {
  // ...

  test("login fails with wrong password", async ({ page }) => {
    await page.getByRole("button", { name: "login" }).click();
    await page.getByLabel("username").fill("test");
    await page.getByLabel("password").fill("wrong");
    await page.getByRole("button", { name: "login" }).click();

    await expect(page.getByText("Wrong credentials")).toBeVisible();
  });

  // ...
});
The test verifies with the method page.getByText that the application prints an error message.
The application renders the error message to an element containing the CSS class error:
const Notification = ({ message }); => {
  if (message === null) {
    return null;
  }

  return (
    <div className="error">      {message}
    </div>
  );
};
We could refine the test to ensure that the error message is printed exactly in the right place, i.e. in the element containing the CSS class error:
test("login fails with wrong password", async ({ page }) => {
  // ...

  const errorDiv = page.locator(".error");  await expect(errorDiv).toContainText("Wrong credentials");
});
So the test uses the page.locator method to find the component containing the CSS class error and stores it in a variable.
The correctness of the text associated with the component can be verified with the expectation toContainText.
Notice that the CSS class selector starts with a dot, so the error class selector is .error.
It is also possible to test the application's CSS styles with matcher toHaveCSS.
For example, we can make sure that the color of the error message is red, and that there is a border around it:
test("login fails with wrong password", async ({ page }) => {
  // ...

  const errorDiv = page.locator(".error");
  await expect(errorDiv).toContainText("Wrong credentials");
  await expect(errorDiv).toHaveCSS("border-style", "solid");  await expect(errorDiv).toHaveCSS("color", "rgb(156, 43, 46)");});
Colors must be defined to Playwright as RGB codes.
Let's finalize this incorrect login test by ensuring that the application does not render the text describing a successful login, "Pacific Tests logged in":
test("login fails with wrong password", async ({ page }) =>{
  await page.getByRole("button", { name: "login" }).click();
  await page.getByLabel("username").fill("test");
  await page.getByLabel("password").fill("wrong");
  await page.getByRole("button", { name: "login" }).click();

  const errorDiv = page.locator(".error");
  await expect(errorDiv).toContainText("Wrong credentials");
  await expect(errorDiv).toHaveCSS("border-style", "solid");
  await expect(errorDiv).toHaveCSS("color", "rgb(156, 43, 46)");

  await expect(page.getByText("Pacific Tests logged in")).not.toBeVisible();});
Running tests one by one
By default, Playwright always runs all tests, and as the number of tests increases, it becomes time-consuming.
When developing a new test or debugging a broken one, the test can be defined with the command test.only,
which makes Playwright run only that test:
describe(() => {
  // this is the only test executed!
  test.only("login fails with wrong password", async ({ page }) => {    // ...
  });

  // this test is skipped...
  test("user can login with correct credentials", async ({ page }) => {
    // ...
  });

  // ...
});
When the test no longer needs to be isolated, *only can and should be deleted*.
Otherwise, we keep only running that one test.
Another option to run a single test is to use a command line parameter:
npm test -- -g "login fails with wrong password"Helper functions for tests
Our application tests currently look like this:
const { test, describe, expect, beforeEach } = require("@playwright/test");

describe("Task app", () => {
  // ...

  test("user can login with correct credentials", async ({ page }) => {
    await page.getByRole("button", { name: "login" }).click();
    await page.getByLabel("username").fill("test");
    await page.getByLabel("password").fill("pacific");
    await page.getByRole("button", { name: "login" }).click();
    await expect(page.getByText("Pacific Tests logged in")).toBeVisible();
  })

  test("login fails with wrong password", async ({ page }) =>{
    // ...
  });

  describe("when logged in", () => {
    beforeEach(async ({ page, request }) => {
      await page.getByRole("button", { name: "login" }).click();
      await page.getByLabel("username").fill("test");
      await page.getByLabel("password").fill("pacific");
      await page.getByRole("button", { name: "login" }).click();
    });

    test("a new task can be created", async ({ page }) => {
      // ...
    });

    // ...
  });
});
First, the login function is tested.
After this, another describe block contains a set of tests that assume that the user is logged in, and that same login is duplicated inside of the initializing beforeEach block.
Remember, each test is executed starting from the initial state (where the database is cleared and one user is created there), so even though the test is defined after another test in the code, it does not start from the same state where the tests in the code executed earlier have left!
While it looks like we need to duplicate the code because of how tests are structured, (and we try to keep tests to be simple to understand), we should also consider having non-repetitive code in tests, where it makes sense. Let's isolate the code that handles the login as a helper function, which is placed e.g. in the file tests/helper.js:
const loginWith = async (page, username, password)  => {
  await page.getByRole("button", { name: "login" }).click();
  await page.getByLabel("username").fill(username);
  await page.getByLabel("password").fill(password);
  await page.getByRole("button", { name: "login" }).click();
};

export { loginWith };
The tests becomes simpler and clearer:
const { test, describe, expect, beforeEach } = require("@playwright/test");
const { loginWith } = require("./helper");
describe("Task app", () => {
  // ...

  test("user can login", async ({ page }) => {
    await loginWith(page, "test", "pacific");    await expect(page.getByText("Pacific Tests logged in")).toBeVisible();
  });

  test("login fails with wrong password", async ({ page }) => {
    await loginWith(page, "test", "wrong");
    const errorDiv = page.locator(".error");
    // ...
  });

  describe("when logged in", () => {
    beforeEach(async ({ page }) => {
      await loginWith(page, "test", "pacific")    });

    // ...
  });
});
Playwright also offers a solution where the login is performed once before the tests, and each test starts from a state where the application is already logged in. In order for us to take advantage of this method, the initialization of the application's test data should be done a bit differently than now. In the current solution, the database is reset before each test, and because of this, logging in just once before the tests is impossible. In order for us to use the pre-test login provided by Playwright, the user should be initialized only once before the tests. We'll stick to our current solution for the sake of simplicity.
The corresponding repeating code actually also applies to creating a new task:
describe("Task app", function() {
  // ...

  describe("when logged in", () => {
    test("a new task can be created", async ({ page }) => {
      await page.getByRole("button", { name: "new task" }).click();
      await page.getByRole("textbox").fill("a task created by playwright");
      await page.getByRole("button", { name: "save" }).click();
      await expect(page.getByText("a task created by playwright")).toBeVisible();
    });

    describe("and a task exists", () => {
      beforeEach(async ({ page }) => {
        await page.getByRole("button", { name: "new task" }).click();
        await page.getByRole("textbox").fill("a test task by playwright");
        await page.getByRole("button", { name: "save" }).click();
      });

      test("it can be made important", async ({ page }) => {
        // ...
      });
    });
  });
});
We can isolate task creation to a helper function. The file tests/helper.js expands as follows:
const loginWith = async (page, username, password)  => {
  await page.getByRole("button", { name: "login" }).click();
  await page.getByLabel("username").fill(username);
  await page.getByLabel("password").fill(password);
  await page.getByRole("button", { name: "login" }).click();
};

const createTask = async (page, content) => {  await page.getByRole("button", { name: "new task" }).click();  await page.getByRole("textbox").fill(content);  await page.getByRole("button", { name: "save" }).click();};
export { loginWith, createTask };
This function, in turn, simplifies our tests:
const { test, describe, expect, beforeEach } = require("@playwright/test");
const { createTask, loginWith } = require("./helper");
describe("Task app", () => {
  // ...

  describe("when logged in", () => {
    beforeEach(async ({ page }) => {
      await loginWith(page, "test", "pacific");
    });

    test("a new task can be created", async ({ page }) => {
      await createTask(page, "a task created by playwright");      await expect(page.getByText("a task created by playwright")).toBeVisible();
    });

    describe("and a task exists", () => {
      beforeEach(async ({ page }) => {
        await createTask(page, "a test task by playwright");      });

      test("importance can be changed", async ({ page }) => {
        await page.getByRole("button", { name: "make important" }).click();
        await expect(page.getByText("make not important")).toBeVisible();
      });
    });
  });
});
There is one more annoying feature in our tests. The frontend address http://localhost:5173 and the backend address http://localhost:3001 are hardcoded for tests. Of these, the address of the backend is actually useless, because a proxy has been defined in the Vite configuration of the frontend, which forwards all requests made by the frontend to the address http://localhost:5173/api to the backend:
export default defineConfig({
  server: {
    proxy: {
      "/api": {
        target: "http://localhost:3001",
        changeOrigin: true,
      },
    }
  },
  // ...
});
So we can replace all the addresses in the tests from http://localhost:3001/api/... to http://localhost:5173/api/...
We can now define the baseUrl for the application in the tests configuration file playwright.config.js:
export default defineConfig({
  // ...
  use: {
    baseURL: "http://localhost:5173",
    // ...
  },
  // ...
});
All the commands in the tests that use the application URL, e.g.
await page.goto("http://localhost:5173");
await request.post("http://localhost:5173/api/testing/reset");
can be transformed to:
await page.goto("/");
await request.post("/api/testing/reset");
The current code for the tests is on GitHub branch part5-2.
Task importance change revisited
Let's take a look at the test we did earlier, which verifies that it is possible to change the importance of a task.
Let's change the initialization block of the test so that it creates two tasks instead of one:
describe("when logged in", () => {
  // ...
  describe("and several tasks exists", () => {    beforeEach(async ({ page }) => {
      await createTask(page, "first task");      await createTask(page, "second task");    });

    test("one of those can be made non-important", async ({ page }) => {
      const otherTaskElement = page.getByText("first task");

      await otherTaskElement
        .getByRole("button", { name: "make important" }).click();
      await expect(otherTaskElement.getByText("make not important")).toBeVisible();
    });
  });
});
The above test searches for the element first task using the method page.getByText and stores it in a variable (otherTaskElement).
After this, a button with the text make important is searched inside the element and the button is pressed.
Finally, the test verifies that the button's text has changed to make not important.
The test could also have been written without the auxiliary variable otherTaskElement:
test("one of those can be made non-important", async ({ page }) => {
  page.getByText("first task")
    .getByRole("button", { name: "make important" }).click();

  await expect(page.getByText("first task").getByText("make not important"))
    .toBeVisible();
});
Let's change the Task component so that the task text is rendered inside a span element
const Task = ({ task, toggleImportance }) => {
  const label = task.important
    ? "make not important" : "make important";

  return (
    <li className="task">
      <span>{task.content}</span>      <button onClick={toggleImportance}>{label}</button>
    </li>
  );
};
If you run the tests now, the tests break!
The reason for the problem is that the command page.getByText("first task") now returns a span element containing only text, and the button is outside of it.
One way to fix the problem is as follows:
test("one of those can be made non-important", async ({ page }) => {
  const otherTaskText = page.getByText("first task");  const otherTaskElement = otherTaskText.locator("..");
  await otherTaskElement.getByRole("button", { name: "make important" }).click();
  await expect(otherTaskElement.getByText("make not important")).toBeVisible();
});
The first line now looks for the span element containing the text associated with the first created task.
In the second line, the function locator is used and .. is given as an argument, which retrieves the element's parent element.
The locator function is very flexible, and we take advantage of the fact that accepts as argument
not only CSS selectors but also XPath selector.
It would be possible to express the same with CSS, but in this case XPath provides the simplest way to find the parent of an element.
Of course, the test can also be written using only one auxiliary variable:
test("one of those can be made non-important", async ({ page }) => {
  const secondTaskElement = page.getByText("second task").locator("..");
  await secondTaskElement.getByRole("button", { name: "make important" }).click();
  await expect(secondTaskElement.getByText("make not important")).toBeVisible();
});
Let's change the test so that three tasks are created, and the importance is changed in the second created task:
describe("when logged in", () => {
  beforeEach(async ({ page }) => {
    await loginWith(page, "powercat", "tigers");
  });

  test("a new task can be created", async ({ page }) => {
    await createTask(page, "a task created by playwright", true);
    await expect(page.getByText("a task created by playwright")).toBeVisible();
  });

  describe("and several tasks exists", () => {
    beforeEach(async ({ page }) => {
      await createTask(page, "first task");
      await createTask(page, "second task");
      await createTask(page, "third task");    });

    test("one of those can be made non-important", async ({ page }) => {
      const otherTaskText = page.getByText("second task");      const otherTaskElement = otherTaskText.locator("..");

      await otherTaskElement.getByRole("button", { name: "make important" }).click();
      await expect(otherTaskElement.getByText("make not important")).toBeVisible();
    });
  });
});
For some reason if we start running the tests, the tests starts working unreliably, sometimes it passes and sometimes it doesn't. It's time to roll up your sleeves and learn how to debug tests.
Test development and debugging
If, and when the tests don't pass and you suspect that the fault is in the tests instead of in the code, you should run the tests in debug mode.
The following command runs the problematic test in debug mode:
npm test -- -g"one of those can be made non-important" --debugOnce this launches, you'll see two windows open. One is the browser and the other is the Playwright Inspector.
The Playwright Inspector shows the progress of the tests step by step.
The arrow-dot button at the top ![]()
By default, debug steps through the test command by command.
If it is a complex test, it can be quite a burden to step through the test to the point of interest.
This can be avoided by using the command await page.pause():
describe("Task app", () => {
  beforeEach(async ({ page, request }) => {
    // ...
  });

  describe("when logged in", () => {
    beforeEach(async ({ page }) => {
      // ...
    });

    describe("and several tasks exists", () => {
      beforeEach(async ({ page }) => {
        await createTask(page, "first task");
        await createTask(page, "second task");
        await createTask(page, "third task");
      });

      test("one of those can be made non-important", async ({ page }) => {
        await page.pause();        const otherTaskText = page.getByText("second task");
        const otherTaskElement = otherTaskText.locator("..");

        await otherTaskElement.getByRole("button", { name: "make important" }).click();
        await expect(otherTaskElement.getByText("make not important")).toBeVisible();
      });
    });
  });
});
Now in the test you can go to page.pause() in one step, by pressing resume ![]()
pause command,
and at that point we find an interesting fact:
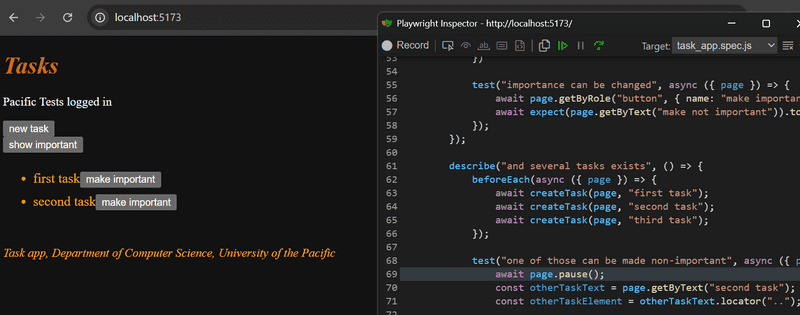
Pertinent: It seems that the browser does not render all the tasks created in the block
beforeEach. What is the problem?The reason for the problem is that when the test creates one task, it starts creating the next one even before the server has responded, and the added task is rendered on the screen. This in turn can cause some tasks to be lost (in the picture, this happened to the second task created), since the browser is re-rendered when the server responds, based on the state of the tasks at the start of that insert operation.
The problem can be solved by "slowing down" the insert operations by using the
waitFormethod after the insert to wait for the inserted task to render:const createTask = async (page, content) => { await page.getByRole("button", { name: "new task" }).click(); await page.getByRole("textbox").fill(content); await page.getByRole("button", { name: "save" }).click(); await page.getByText(content).waitFor();}
Instead of, or alongside debugging mode, running tests in UI mode can be useful. As already mentioned, tests are started in UI mode as follows:
npm run test -- --uiAlmost the same as UI mode is use of the Playwright's Trace Viewer. The idea is that a visual trace of the tests is saved, which can be viewed if necessary after the tests have been completed. A trace is saved by running the tests as follows:
npm run test -- --trace onIf necessary, Trace can be viewed with the command
npx playwright show-reportor with the npm script we defined npm run test:report
Once you click on one of the tests and then click the traces image after the report results, trace looks practically the same as running tests in UI mode.
UI mode and Trace Viewer also offer the possibility of assisted search for locators. This is done by pressing the locator button on the lower bar, and then by clicking on the desired user interface element. Playwright displays the element locator:

Playwright suggests the following as the locator for the third task
getByRole('listitem').filter({ hasText: 'third taskmake important' }).getByRole('button')The method getByRole is called with the argument listitem,
i.e. we search for all listitem elements on the page, of which there are three in total.
After this, using the filter method,
we narrow down to the li element that contains the text third task and the button element inside it is taken using the
getByRole method again.
The locator generated by Playwright is somewhat different from the locator used by our tests, which was
page.getByText("third task").locator("..").getByRole("button", { name: "make important" });Which of the locators is better is probably a matter of taste.
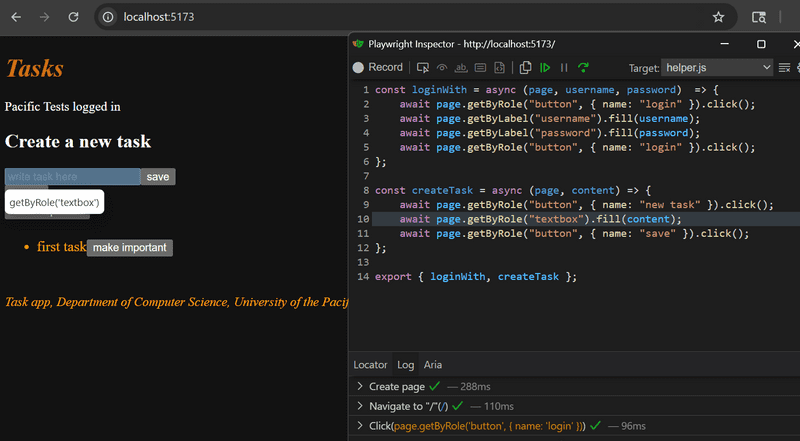
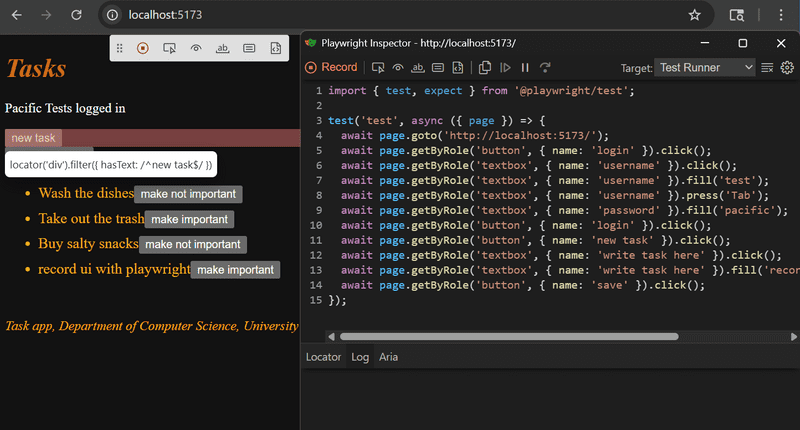
Playwright also includes a test generator that makes it possible to "record" a test through the user interface. The test generator is started with the command:
npx playwright codegen http://localhost:5173/When the Record mode is on, the test generator "records" the user's interaction in the Playwright inspector, from where it is possible to copy the locators and actions to the tests:
Instead of the command line, Playwright can also be used via Webstorm's IDE.
To avoid problem situations and increase understanding, it is definitely worth browsing Playwright's high-quality documentation. The most important sections are listed below:
- the section about locators gives good hints for finding elements in test
- section actions tells how it is possible to simulate the interaction with the browser in tests
- the section about assertions demonstrates the different expectations Playwright offers for testing
In-depth details can be found in the API description,
particularly useful are the class Page corresponding to the browser window of the application under test,
and the class Locator corresponding to the elements searched for in the tests.
The final version of the tests is in full on GitHub, in branch part5-3.
The final version of the frontend code is in its entirety on GitHub, in branch part5-9.