b
Many reducers
Let's continue building a simplified redux version of our tasks application.
As a reminder, the Redux store brings together:
To ease development, let's initialize our redux store's state in reducers/taskReducer.js.
Let's change taskReducer's default state from an empty array [] to an array of task objects initialState:
const initialState = [  {    content: 'remind myself that the reducer defines how the redux store works',    important: true,    id: 1,  },  {    content: 'repeat the words: a redux store can contain any data',    important: false,    id: 2,  },]
const taskReducer = (state = initialState, action) => {  // ...
}

// ...
export default taskReducer
Store with complex state
Let's implement filtering for the tasks that are displayed to the user. The user interface for the filters will be implemented with radio buttons:
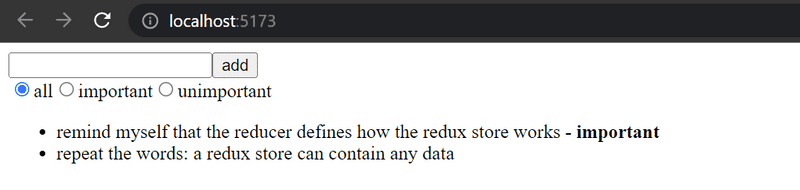
Let's start with a very simple and straightforward implementation in App.js:
import TaskForm from './components/TaskForm'
import Tasks from './components/Tasks'

const App = () => {
  const filterSelected = (value) => {    console.log(value)  }
  return (
    <div>
      <TaskForm />
      <div>        <input          type="radio"          name="filter"          onChange={() => filterSelected('ALL')}        />        all        <input          type="radio"          name="filter"          onChange={() => filterSelected('IMPORTANT')}        />        important        <input          type="radio"          name="filter"          onChange={() => filterSelected('UNIMPORTANT')}        />        unimportant      </div>      <Tasks />
    </div>
  )
}
Since the name attribute of all the radio buttons is the same, the three options form a button group where only one option can be selected.
The buttons have a change handler that currently only prints the string associated with the clicked button to the console.
In the following section, we will implement filtering by storing the value of the filter in the redux store in addition to the tasks themselves. Once we are finished, the state of the store hopefully looks something like this:
{
  tasks: [
    { content: 'remind myself that the reducer defines how the redux store works', important: true, id: 1},
    { content: 'repeat the words: a redux store can contain any data', important: false, id: 2}
  ],
  filter: 'IMPORTANT'
}
Previously, our application only stores the array of tasks. In the new implementation, the state object will have two properties:
tasksthat contains the array of tasksfilterthat contains a string indicating which tasks should be displayed to the user.
Combined reducers
To handle our new filter data, we could modify taskReducer to deal with the filter data as well.
However, a better solution in this situation is to separate the filter.
Let's also *create a new action creator function.
We will write this code into a new file *src/reducers/filterReducer.js:
const filterReducer = (state = 'ALL', action) => {
  switch (action.type) {
    case 'SET_FILTER':
      return action.payload
    default:
      return state
  }
}

export const filterChange = filter => {
  return {
    type: 'SET_FILTER',
    payload: filter
  }
}

export default filterReducer
The actions for changing the filter's state look like this:
{
  type: 'SET_FILTER',
  payload: 'IMPORTANT'
}
We can create the actual reducer for our application by combining the two existing reducers with the combineReducers function.
Let's define the combined reducer in main.jsx:
import ReactDOM from 'react-dom/client'
import { Provider } from 'react-redux'
import { createStore, combineReducers } from 'redux'

import App from './App'
import filterReducer from './reducers/filterReducer'import taskReducer from './reducers/taskReducer'

const reducer = combineReducers({
  tasks: taskReducer,
  filter: filterReducer
})

const store = createStore(reducer)

console.log(store.getState())

ReactDOM.createRoot(document.getElementById('root')).render(
  <Provider store={store}>
    {/*<App />*/}
    <div />
  </Provider>
)
Since our application breaks at this point, we render a
<div />element, commenting out our<App />. Remember that you can toggle multiline comments with Ctrl-Shift-/.You could also use Ctrl-/, which will comment out lines individually.
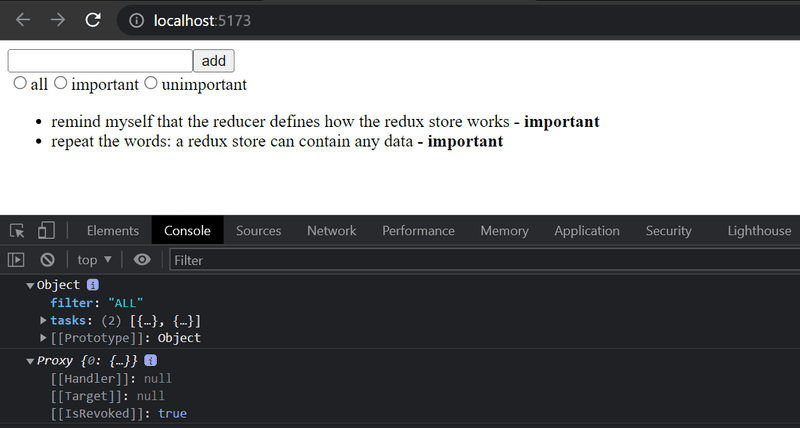
Thanks to console.log, the state of the store is printed to the console:
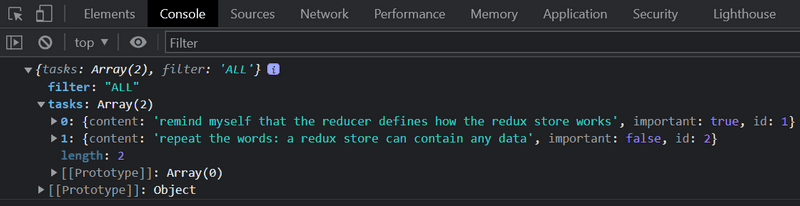
As we can see from the output, the store has the exact form we wanted it to!
Let's review how we were able to get this object by examining the
reducerwe passed tocreateStore,combineReducersconst reducer = combineReducers({ tasks: taskReducer, filter: filterReducer, })
combineReducershelped us create a state object with two properties:tasksandfilter. The value of thetasksproperty is defined by thetaskReducer, which does not have to deal with the other properties of the state. Likewise, thefilterproperty is managed by thefilterReducer.
Combined reducers in action
In this section we're going to take a step back from our project to investigate how the combined reducer works. Let's simulate changing the filter and creating a task by temporarily adding the following to the main.jsx file:
// ...
const store = createStore(reducer)
console.log(store.getState())
import { createTask } from './reducers/taskReducer'import { filterChange } from './reducers/filterReducer'store.subscribe(() => console.log(store.getState()))store.dispatch(filterChange('IMPORTANT'))store.dispatch(createTask('remember that combineReducers forms one reducer from many simple reducers'))
ReactDOM.createRoot(document.getElementById('root')).render(
<Provider store={store}>
<div />
</Provider>
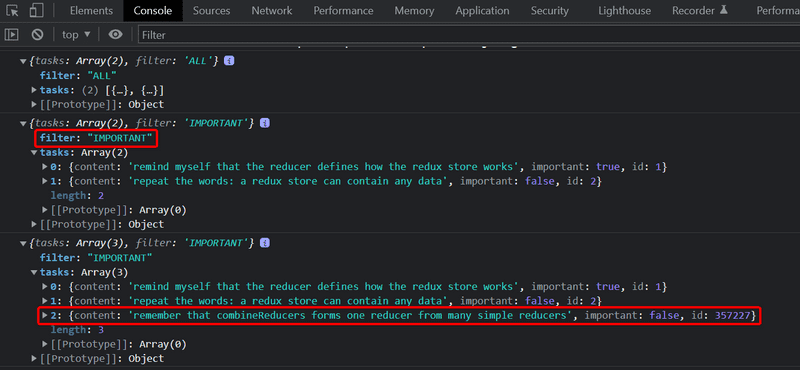
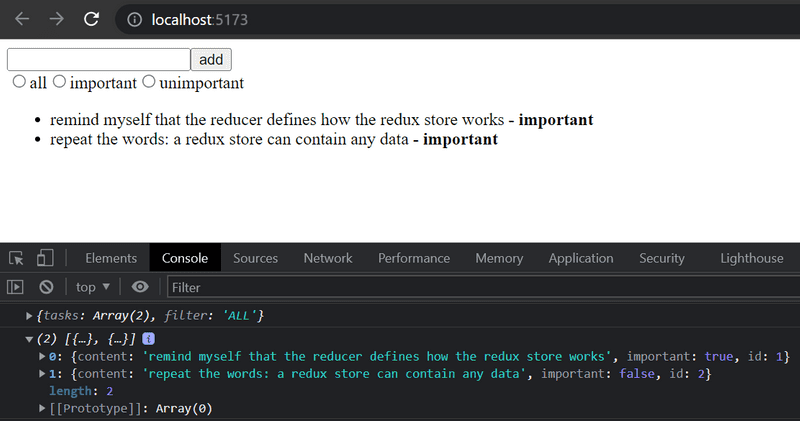
)Notice that with our subscribe call above, the store's state gets logged to the console after every change:
At this point, it is good to become aware of a tiny but important detail.
If we add a console.log statement to the beginning of both reducers:
const filterReducer = (state = 'ALL', action) => {
  console.log('ACTION: ', action)  // ...
}
Based on the console output one might think that every action gets duplicated:
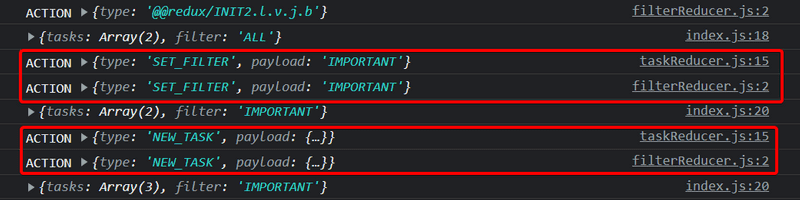
Is there a bug in our code? No.
The combined reducer works in such a way that every action gets handled in every part of the combined reducer.
In other words, every reducer listens to all of the dispatched actions and does something with them if it has been instructed to do so.
Typically, only one reducer is interested in any given action,
but there are situations where multiple reducers change their respective parts of the state based on the same action.
Finishing the filters
Let's finish the application so that it uses the combined reducer.
We start by removing the extra code from main.jsx and restore App as the rendered component:
import ReactDOM from 'react-dom/client'
import { Provider } from 'react-redux'
import { createStore, combineReducers } from 'redux'

import App from './App'
import filterReducer from './reducers/filterReducer'
import taskReducer from './reducers/taskReducer'

const reducer = combineReducers({
  tasks: taskReducer,
  filter: filterReducer
})

const store = createStore(reducer)

console.log(store.getState())

ReactDOM.createRoot(document.getElementById('root')).render(
  <Provider store={store}>
    <App />
  </Provider>
)
Next, let's fix a bug that is caused by the code expecting the application store to be an array of tasks:
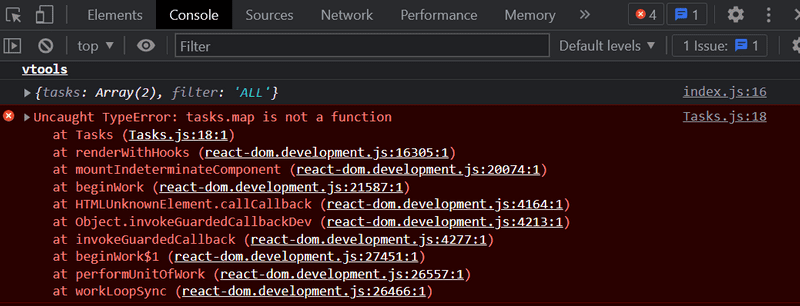
Because the tasks are now embedded further into the state object, let's tweak the selector function:
const Tasks = () => {
  const dispatch = useDispatch()
  const tasks = useSelector(state => state.tasks)
  return(
    <ul>
      {tasks.map(task =>
        <Task
          key={task.id}
          task={task}
          handleClick={() =>
            dispatch(toggleImportanceOf(task.id))
          }
        />
      )}
    </ul>
  )
}
Previously the selector function returned the whole state of the store:
const tasks = useSelector(state => state)And now it returns only its field tasks
const tasks = useSelector(state => state.tasks)Visibility Filter
Let's extract the visibility/importance filter into its own src/components/VisibilityFilter.js component:
import { useDispatch } from 'react-redux'
import { filterChange } from '../reducers/filterReducer'

const VisibilityFilter = () => {
  const dispatch = useDispatch()

  return (
    <div>
      <input
        type="radio"
        name="filter"
        onChange={() => dispatch(filterChange('ALL'))}
      />
      all
      <input
        type="radio"
        name="filter"
        onChange={() => dispatch(filterChange('IMPORTANT'))}
      />
      important
      <input
        type="radio"
        name="filter"
        onChange={() => dispatch(filterChange('UNIMPORTANT'))}
      />
      unimportant
    </div>
  )
}

export default VisibilityFilter
With the new component App can be simplified as follows:
import TaskForm from './components/TaskForm'
import Tasks from './components/Tasks'
import VisibilityFilter from './components/VisibilityFilter'

const App = () => {
  return (
    <div>
      <TaskForm />
      <VisibilityFilter />
      <Tasks />
    </div>
  )
}

export default App
Now, clicking the different radio buttons changes the state of the store's filter property via the dispatch call.
Let's change the Tasks component's useSelector from this:
useSelector(state => state.tasks)to incorporating our visibility filter, which we'll embed in the useSelector directly.
const Tasks = () => {
  const dispatch = useDispatch()
  const tasks = useSelector(state => {    if (state.filter === 'ALL') {      return state.tasks    }    return state.filter  === 'IMPORTANT'      ? state.tasks.filter(task => task.important)      : state.tasks.filter(task => !task.important)  })
  return (
    <ul>
      {tasks.map(task => (
        <Task
          key={task.id}
          task={task}
          handleClick={() =>
            dispatch(toggleImportanceOf(task.id))
          }
        />
      ))}
    </ul>
  )
}
We can simplify useSelector even further by destructuring state's parameters:
const tasks = useSelector(({ filter, tasks }) => {
  if ( filter === 'ALL' ) {
    return tasks
  }
  return filter  === 'IMPORTANT'
    ? tasks.filter(task => task.important)
    : tasks.filter(task => !task.important)
})
There is a slight cosmetic flaw in our application.
Even though the filter is set to ALL by default, the associated radio button is not selected.
Naturally, this issue can be fixed, but since this is relatively harmless we will save the fix for later.
The current version of the application can be found on GitHub, branch part6-2.
Exercise 6.9
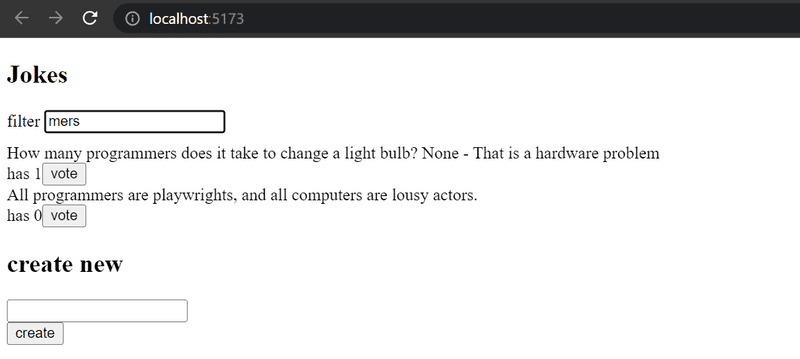
6.9 Jokes, Step 7
Implement filtering for the jokes that are displayed to the user.
Store the state of the filter in the redux store. It is recommended to create for the store:
- a new reducer
- action creators
- a combined reducer
Make sure you use the combineReducers function.
Create a new Filter component for displaying the filter.
You can use the following code as a template for the component:
const Filter = () => {
  const handleChange = (event) => {
    // input-field value is in variable event.target.value
  }
  const style = {
    marginBottom: 10
  }

  return (
    <div style={style}>
      filter <input onChange={handleChange} />
    </div>
  )
}

export default Filter
Redux Toolkit and Refactoring the Store Configuration
As we have seen so far, Redux's configuration and state management implementation requires some effort. For example, the reducer and action creator-related code has somewhat repetitive boilerplate code. Redux Toolkit is a library that solves these common Redux-related problems. This library simplifies the Redux store's configuration and offers a large variety of tools to ease state management.
Let's start using Redux Toolkit in our application by refactoring the existing code. First, we will need to install the library:
npm i @reduxjs/toolkitNext, open the main.jsx file which currently creates the Redux store.
Instead of Redux's createStore function, let's create the store using Redux Toolkit's configureStore function in main.jsx:
import ReactDOM from 'react-dom/client'
import { Provider } from 'react-redux'
import { configureStore } from '@reduxjs/toolkit'
import App from './App'
import filterReducer from './reducers/filterReducer'
import taskReducer from './reducers/taskReducer'

const store = configureStore({  reducer: {    tasks: taskReducer,    filter: filterReducer  }})
console.log(store.getState())

ReactDOM.createRoot(document.getElementById('root')).render(
  <Provider store={store}>
    <App />
  </Provider>
)
We already got rid of a few lines of code now that we don't need the combineReducers function to create the reducer for the store.
We will soon see that the configureStore function has many additional benefits such as the effortless integration of development tools
and many commonly used libraries without the need for additional configuration.
Let's further clean up the main.jsx by moving the code related to the creation of the Redux store into a separate file. Let's create a new file src/store.js:
import { configureStore } from '@reduxjs/toolkit'

import taskReducer from './reducers/taskReducer'
import filterReducer from './reducers/filterReducer'

const store = configureStore({
  reducer: {
    tasks: taskReducer,
    filter: filterReducer
  }
})

export default store
After the changes, the content of the main.jsx is the following:
import ReactDOM from 'react-dom/client'
import { Provider } from 'react-redux'

import App from './App'
import store from './store'

ReactDOM.createRoot(document.getElementById('root')).render(
  <Provider store={store}>
    <App />
  </Provider>
)
Refactoring our Reducers with Redux Toolkit
With Redux Toolkit, we can easily create reducer and related action creators using the createSlice function.
Let's use createSlice to refactor the reducer and action creators in the reducers/taskReducer.js file:
import { createSlice } from '@reduxjs/toolkit'
const initialState = [
  {
    content: 'remind myself that the reducer defines how the redux store works',
    important: true,
    id: 1,
  },
  {
    content: 'repeat the words: a redux store can contain any data',
    important: false,
    id: 2,
  },
]

const generateId = () =>
  Number((Math.random() * 1000000).toFixed(0))

const taskSlice = createSlice({  name: 'tasks',  initialState,  reducers: {    createTask(state, action) {      const content = action.payload      state.push({        content,        important: false,        id: generateId(),      })    },    toggleImportanceOf(state, action) {      const id = action.payload      const taskToChange = state.find(t => t.id === id)      const changedTask = {         ...taskToChange,         important: !taskToChange.important       }      return state.map(task =>        task.id !== id ? task : changedTask       )         }  },})
export const { createTask, toggleImportanceOf } = taskSlice.actionsexport default taskSlice.reducer
The createSlice function's name parameter defines the prefix which is used in the action's type values.
From the code above, notice our object has name: 'tasks'; thus the createTask action will have the type value of tasks/createTask.
It is a good practice to give a unique name property.
That way there won't be unexpected collisions between the application's action type values.
The initialState parameter defines the reducer's initial state.
The reducers parameter takes the reducer itself as an object, where we define how functions handle state changes caused by certain actions.
Notice that the action.payload in the function contains the argument provided by calling the action creator:
dispatch(createTask('Preach about how awesome Redux Toolkit is!'))This dispatch call is equivalent to dispatching the following object:
dispatch({ type: 'tasks/createTask', payload: 'Preach about how awesome Redux Toolkit is!' })Redux Toolkit and Immutability
If you followed closely, you might have noticed that inside the createTask action,
we see code that seems to violate the reducers' immutability principle mentioned earlier:
createTask(state, action) {
  const content = action.payload

  state.push({
    content,
    important: false,
    id: generateId(),
  })
}
We are mutating state argument's array by calling the push method instead of returning a new instance of the array. 😱
What's this all about?
Redux Toolkit utilizes the Immer library with reducers created by the createSlice function.
Using this library makes it possible to mutate the state argument inside of createSlice.
Immer uses the mutated state to produce a new, immutable state and thus the state changes remain immutable.
Notice that state can be changed without mutating it, as we have done with the toggleImportanceOf action.
In this case, the function directly returns the new state.
Nevertheless, mutating the state will often come in handy especially when a complex state needs to be updated.
The createSlice function returns an object containing the reducer as well as the action creators defined by the reducers parameter.
We can access the reducer via taskSlice.reducer and the action creators via taskSlice.actions.
We can produce the file's exports in the following way:
const taskSlice = createSlice({
  // ...
})

export const { createTask, toggleImportanceOf } = taskSlice.actionsexport default taskSlice.reducer
Now, the imports in the other files will work just like before:
import taskReducer, { createTask, toggleImportanceOf } from './reducers/taskReducer'Nonetheless, we need to alter the action type names in the tests due to the conventions of ReduxToolkit:
import deepFreeze from 'deep-freeze'
import { describe, expect, test } from 'vitest'
import taskReducer from './taskReducer'

describe('taskReducer', () => {
  test('returns new state with action tasks/createTask', () => {
    const state = []
    const action = {
      type: 'tasks/createTask',      payload: 'learn more about how the app state is in redux store',    }

    deepFreeze(state)
    const newState = taskReducer(state, action)

    expect(newState).toHaveLength(1)
    expect(newState.map(task => task.content)).toContainEqual(action.payload)  })

  test('returns new state with action tasks/toggleImportanceOf', () => {    const state = [
        {
        content: 'learn more about how the app state is in redux store',
        important: true,
        id: 1
      },
      {
        content: 'understand more fully how state changes are made with actions',
        important: false,
        id: 2
      }
    ]

    const action = {
      type: 'tasks/toggleImportanceOf',      payload: 2    }

    deepFreeze(state)
    const newState = taskReducer(state, action)

    expect(newState).toHaveLength(2)
    expect(newState).toContainEqual(state[0])
    expect(newState).toContainEqual({
      content: 'understand more fully how state changes are made with actions',
      important: true,
      id: 2
    })
  })
})
Redux Toolkit and console.log
As we have learned, console.log has been a handy tool.
Let's try to print the state of the Redux Store to the console in the middle of the reducer created with the function createSlice:
const taskSlice = createSlice({
  name: 'tasks',
  initialState,
  reducers: {
    // ...
    toggleImportanceOf(state, action) {
      const id = action.payload

      const taskToChange = state.find(t => t.id === id)

      const changedTask = {
        ...taskToChange,
        important: !taskToChange.important
      }

      console.log(state)
      return state.map(task =>
        task.id !== id ? task : changedTask
      )
    }
  },
})
When we now change the importance of a task by clicking its name, the following is printed to the console
The output is interesting but not very useful. The reason we don't see any nice information is because of the Immer library used by the Redux Toolkit, which is now used internally to save the state of the Store.
The state can be converted to a human-readable format by using the current function from the immer library.
The function can be imported with the following command:
import { current } from '@reduxjs/toolkit'and after this, the state can be printed to the console with the following command:
console.log(current(state))Console output is now human-readable
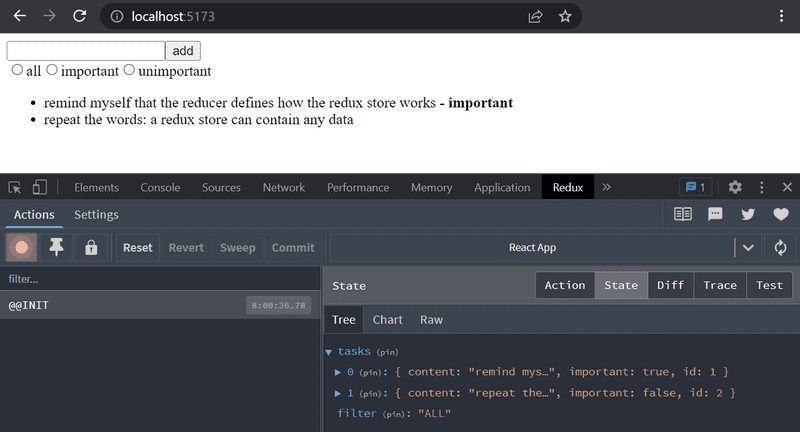
Redux DevTools
Redux DevTools is a Chrome addon that offers useful development tools for Redux.
It can be used to inspect the Redux store's state and dispatch actions through the browser's console.
When the store is created using Redux Toolkit's configureStore function, no additional configuration is needed for Redux DevTools to work.
Once the addon is installed, clicking the Redux tab in the browser's developer tools, the Redux DevTools should open:
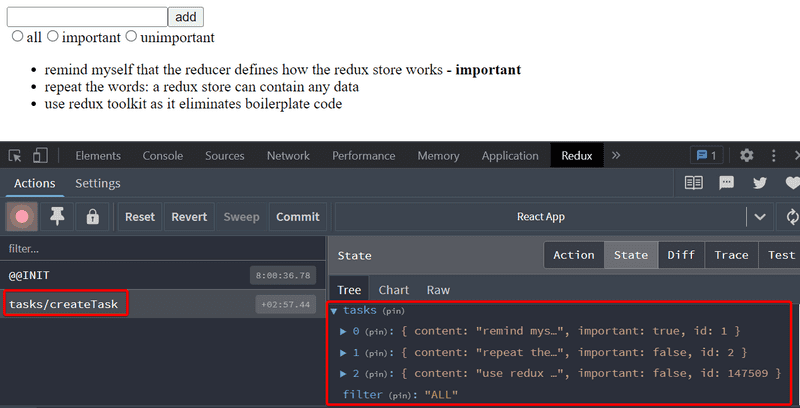
You can inspect how dispatching a certain action changes the state by clicking the action:
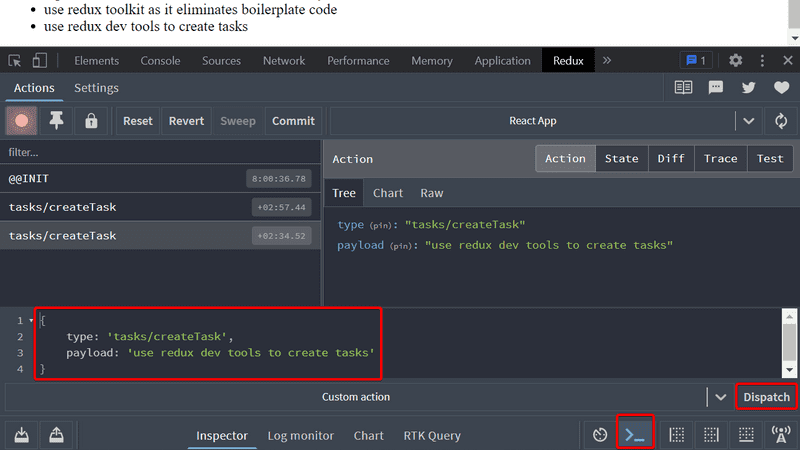
It is also possible to dispatch actions to the store using the development tools:
You can find the code for our current application in its entirety in the part6-3 branch of this GitHub repository.
Exercises 6.10-6.13
Let's continue working on the joke application using Redux that we started in exercise 6.3.
6.10 Jokes, Step 8
Install Redux Toolkit for the project.
Move the Redux store creation into the file store.js and use Redux Toolkit's configureStore to create the store.
Change the definition of the filter reducer and action creators to use the Redux Toolkit's createSlice function.
Also, start using Redux DevTools to debug the application's state more easily.
6.11 Jokes, Step 9
Change the definition of the joke reducer and action creators to use Redux Toolkit's createSlice function.
6.12 Jokes, Step 10
The application has a ready-made body for the Notification component:
const Notification = () => {
  const style = {
    padding: 10,
    backgroundColor: "lavender",
    marginBottom: 10
  }

  return (
    <div style={style}>
      render here notification...
    </div>
  )
}

export default Notification
Extend the component so that it renders the message stored in the Redux store, making the component take the following form:
import { useSelector } from 'react-redux'
const Notification = () => {
  const notification = useSelector(/* something here */)  const style = {
    padding: 10,
    backgroundColor: "lavender",
    marginBottom: 10
  }
  return (
    <div style={style}>
      {notification}    </div>
  )
}
You will have to make changes to the application's existing reducer.
Create a separate reducer for the new functionality by using the Redux Toolkit's createSlice function.
The application does not have to use the Notification component intelligently at this point in the exercises.
It is enough for the application to display the initial value set for the message in the notificationReducer.
6.13 Jokes, Step 11
Extend the application so that it uses the Notification component to display a message for five seconds when the user votes for a joke or creates a new joke:
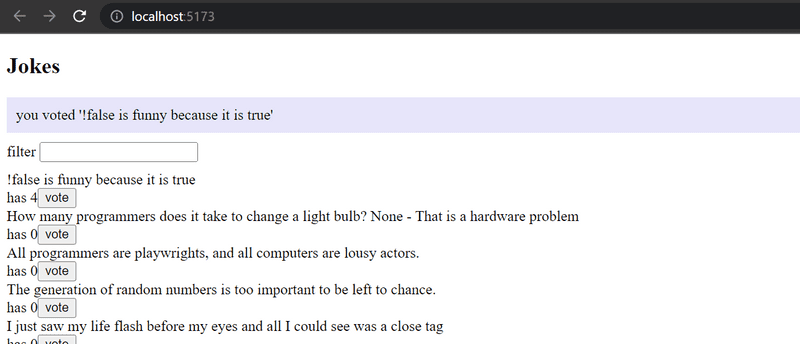
It's recommended to create separate action creators for setting and removing notifications.