d
React Query, useReducer and the context
We will continue to look at various ways to manage an application's state.
Let's continue with our task application. We will focus on communication with the server. Let's start the application from scratch. Here's version zero of our App.jsx:
const App = () => {
  const addTask = async (event) => {
    event.preventDefault()
    const content = event.target.task.value
    event.target.task.value = ''
    console.log(content)
  }

  const toggleImportance = (task) => {
    console.log('toggle importance of', task.id)
  }

  const tasks = []

  return (
    <div>
      <h2>Tasks app</h2>
      <form onSubmit={addTask}>
        <input name="task" />
        <button type="submit">add</button>
      </form>
      {tasks.map(task =>
        <li key={task.id} onClick={() => toggleImportance(task)}>
          {task.content}
          <strong> {task.important ? '- important' : ''}</strong>
        </li>
      )}
    </div>
  )
}

export default App
The initial code is on GitHub in branch part6-0.
Managing data on the server with the React Query library
We shall now use the React Query library to store and manage data retrieved from the server. The latest version of the library is also called TanStack Query, but we'll stick to calling it React Query.
Install the library with the command
npm i @tanstack/react-queryA few additions to the file main.jsx are needed to pass the library functions to the entire application:
import { createRoot } from 'react-dom/client'
import { QueryClient, QueryClientProvider } from '@tanstack/react-query'
import App from './App.jsx'

const queryClient = new QueryClient()
createRoot(document.getElementById('root')).render(
  <QueryClientProvider client={queryClient}>    <App />
  </QueryClientProvider>)
Let's use JSON Server as in the previous parts to simulate the backend. You can start the server with:
npm run serverRemember: You should also copy over db.json from one of the other projects.
We can now retrieve the tasks in the App component.
The code expands as follows:
import { useQuery } from '@tanstack/react-query'
const App = () => {
  const addTask = async (event) => {
    event.preventDefault()
    const content = event.target.task.value
    event.target.task.value = ''
    console.log(content)
  }

  const toggleImportance = (task) => {
    console.log('toggle importance of', task.id)
  }

  const result = useQuery({    queryKey: ['tasks'],    queryFn: async () => {      const response = await fetch('http://localhost:3001/tasks')      if (!response.ok) {        throw new Error('Failed to fetch tasks')      }      return await response.json()    }  })   console.log(JSON.parse(JSON.stringify(result)))   if (result.isLoading) {    return <div>loading data...</div>  }   const tasks = result.data
  return (
    // ...
  )
}
Retrieving data from the server still looks familiar as it uses Axios' get method.
However, the Axios method call is now wrapped in a query
formed by the useQuery function.
useQuery's first parameter is a string tasks, which acts as a key to the query defined,
i.e. the list of tasks.
The return value of the useQuery function is an *object that indicates the status of the query*.
Observe the browser's console output, which comes from our console.log(result) call:
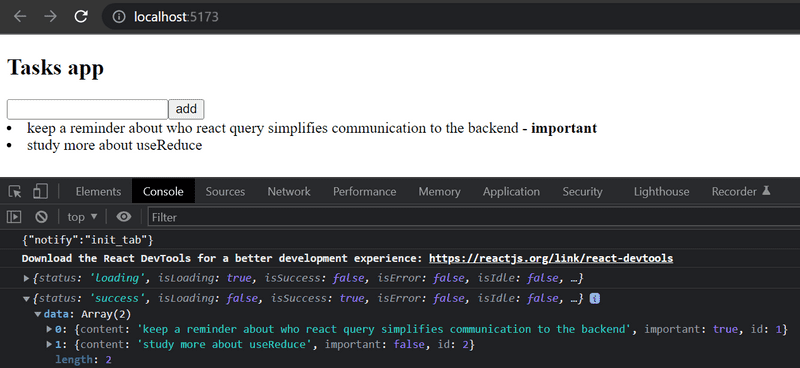
The first time the component is rendered, the query is still in the loading state, i.e. the associated HTTP request is pending.
At this stage, only the following is rendered:
<div>loading data...</div>However, the HTTP request is completed so quickly that it's hard to ever see the text.
When the request is completed, the component is rendered again.
The query is in the state success on the second rendering, and the field data of the query object contains the data returned by the request,
which is the task list rendered on the screen.
So the code above retrieves data from the server and renders it on the screen without using the React hooks useState and useEffect used in chapters 2-5 at all.
The data on the server is now entirely under the administration of the React Query library,
and the application does not need the state defined with React's useState hook at all!
Let's move the function making the actual HTTP request to its own file requests.js
const baseUrl = 'http://localhost:3001/tasks'

export const getTasks = async () => {
  const response = await fetch(baseUrl)
  if (!response.ok) {
    throw new Error('Failed to fetch tasks')
  }
  return await response.json()
}
The App component is now slightly simplified:
import { useQuery } from '@tanstack/react-query'
import { getTasks } from './requests'
const App = () => {
  // ...

  const result = useQuery({
    queryKey: ['tasks'],
    queryFn: getTasks  })

  // ...
}
The current code for the application is on GitHub in the branch part6-1.
This code successfully retrieves data from the server. The next section will focus on sending data to the server.
Synchronizing data to the server using React Query
Let's start by adding new tasks.
In requests.js, make a function createTask for saving new tasks:
const baseUrl = 'http://localhost:3001/tasks'

export const getTasks = async () => {
  const response = await fetch(baseUrl)
  if (!response.ok) {
    throw new Error('Failed to fetch tasks')
  }
  return await response.json()
}

export const createTask = async (newTask) => {  const options = {    method: 'POST',    headers: { 'Content-Type': 'application/json' },    body: JSON.stringify(newTask)  }   const response = await fetch(baseUrl, options)   if (!response.ok) {    throw new Error('Failed to create task')  }   return await response.json()}
The App component will change as follows
import { useQuery, useMutation } from '@tanstack/react-query'import { getTasks, createTask } from './requests'
const App = () => {
  const newTaskMutation = useMutation({    mutationFn: createTask,  })
  const addTask = async (event) => {
    event.preventDefault()
    const content = event.target.task.value
    event.target.task.value = ''
    newTaskMutation.mutate({ content, important: true })  }

  // ...

}
Let's review what we added.
To create a new task, a mutation is needed for us to modify the server's data.
We define the mutation via
useMutation:
const newTaskMutation = useMutation({
  mutationFn: createTask,
})
The parameter is the function we added to the file requests.js, which uses Fetch API to send a new task to the server.
The event handler addTask performs the mutation by calling the mutation object's mutate method and passing in the new task (content, important: true) as an argument:
newTaskMutation.mutate({ content, important: true })Our solution looks promising, but it doesn't work. While the new task is saved on the server, it is not updated on the screen.
To render a new task, we need to tell React Query to invalidate the old tasks from the query.
We can invalidate the tasks by adding a second parameter to useMutation.
That parameter is an onSuccess callback function that tells the react query to invalidate the tasks key.
import { useQuery, useMutation, useQueryClient } from '@tanstack/react-query'import { getTasks, createTask } from './requests'

const App = () => {
  const queryClient = useQueryClient()
  const newTaskMutation = useMutation({
    mutationFn: createTask,
    onSuccess: () => {      queryClient.invalidateQueries({ queryKey: ['tasks'] })    },  })

  // ...
}
So once the mutation has been successfully executed, the function call
queryClient.invalidateQueries({ queryKey: ['tasks'] })will cause React Query to automatically fetch the tasks from the server.
As a result, the application renders the up-to-date state on the server, i.e. the added task is also rendered.
Let's also implement changing the importance of tasks. Start by adding a function for updating tasks to requests.js:
export const updateTask = async (updatedTask) => {
  const options = {
    method: 'PUT',
    headers: { 'Content-Type': 'application/json' },
    body: JSON.stringify(updatedTask)
  }

  const response = await fetch(`${baseUrl}/${updatedTask.id}`, options)

  if (!response.ok) {
    throw new Error('Failed to update task')
  }

  return await response.json()
}
Updating the task is also done by mutation.
The App component expands as follows:
import { useQuery, useMutation, useQueryClient } from '@tanstack/react-query'
import { getTasks, createTask, updateTask } from './requests'
const App = () => {
  const queryClient = useQueryClient()

  const newTaskMutation = useMutation({
    mutationFn: createTask,
    onSuccess: () => {
      queryClient.invalidateQueries({ queryKey: ['tasks'] })
    }
  })

  const updateTaskMutation = useMutation({    mutationFn: updateTask,    onSuccess: () => {      queryClient.invalidateQueries({ queryKey: ['tasks'] })    }  })
  const addTask = async (event) => {
    event.preventDefault()
    const content = event.target.task.value
    event.target.task.value = ''
    newTaskMutation.mutate({ content, important: true })
  }

  const toggleImportance = (task) => {
    updateTaskMutation.mutate({...task, important: !task.important })  }

  // ...

  const toggleImportance = (task) => {
    updateTaskMutation.mutate({...task, important: !task.important })  }

  // ...
}
So again, a mutation was created that invalidated the query tasks so that the updated task is rendered correctly.
Using mutations is easy, the method mutate receives a task as a parameter, with the important property toggled.
The current code for the application is in GitHub in the branch part6-2.
Optimizing the performance
Our application works, and the code is understandable.
It's effortless to make changes to the list of tasks too!
For example, when we change the importance of a task, invalidating the query tasks is enough for the application data to be updated:
const updateTaskMutation = useMutation({
  mutationFn: updateTask,
  onSuccess: () => {
    queryClient.invalidateQueries({ queryKey: ['tasks'] })  }
})
The consequence of this, of course, is that after the PUT request that causes the task to change, the application makes a new GET request to retrieve the query data from the server:
If the amount of data retrieved by the application is not large, it doesn't really matter. Similarly, from the client's perspective, making an extra HTTP GET request doesn't matter either, but in some situations it could strain the server.
If necessary, we could optimize performance by manually updating the query state maintained by React Query.
Here's the code that manually updates the new task mutation:
const App = () => {
  const queryClient = useQueryClient()

  const newTaskMutation = useMutation({
    mutationFn: createTask,
    onSuccess: (newTask) => {      const tasks = queryClient.getQueryData(['tasks'])      queryClient.setQueryData(['tasks'], tasks.concat(newTask))    }
  })

  // ...
}
In the onSuccess callback, where we now have the newTask as a parameter,
the queryClient object reads the existing tasks state and updates it by adding the new task.
The value of the newTask parameter is the value returned by the function createTask, defined in the file requests.js as follows:
export const createTask = async (newTask) => {
  const options = {
    method: 'POST',
    headers: { 'Content-Type': 'application/json' },
    body: JSON.stringify(newTask)
  }

  const response = await fetch(baseUrl, options)

  if (!response.ok) {
    throw new Error('Failed to create task')
  }

  return await response.json()
}
It would be reasonable to make a similar change to the mutation that changes a task's importance, but we leave it as an optional exercise.
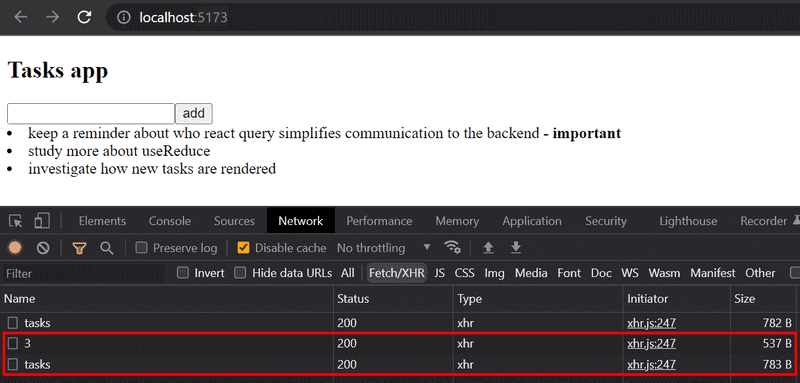
Noticing extra network calls
Finally, notice an interesting detail. React Query re-fetches all tasks when we switch to another browser tab and then return to the application's tab. This can be observed in the Network tab of the Developer Console:
What is going on? The React Query documentation, explains that queries (*whose status is stale*) are updated when the window focus changes. So since the input field becomes active when clicked, that changes the window focus, and thus the queries update. If we want, we can turn off the functionality by creating a query as follows:
const App = () => {
  // ...
  const result = useQuery({
    queryKey: ['tasks'],
    queryFn: getTasks,
    refetchOnWindowFocus: false  })

  // ...
}
If you put a console.log statement in the code, you could see from browser console how often React Query causes the application to be re-rendered.
The rule of thumb is that rerendering happens at least whenever there is a need for it, i.e. when the state of the query changes.
You can read more about render optimizations here.
The code for the application is in GitHub in the branch part6-3.
React Query summary
React Query is a versatile library that, based on what we have already seen, simplifies the application. Does React Query make more complex state management solutions such as Redux unnecessary? No. React Query can partially replace the state of the application in some cases, but as the documentation states:
- *React Query is a server-state library, responsible for managing asynchronous operations between your server and client*
- *Redux, etc. are client-state libraries that can be used to store asynchronous data, albeit inefficiently when compared to a tool like React Query*
So React Query is a library that maintains the server state in the frontend, i.e. acts as a cache for what is stored on the server. React Query simplifies the processing of data on the server, and can in some cases eliminate the need for data on the server to be saved in the frontend state.
Most React applications need not only a way to temporarily store the served data, but also some solution for how the rest of the frontend state (e.g. the state of forms or notifications) is handled.
Exercises 6.20-6.22
Now let's make a new version of the joke application that uses the React Query library.
Use the quipquery folder in your part6 repo as your starting point in your project.
The project has a ready-installed JSON Server, the operation of which has been slightly modified.
*Read server.js for more details.*
Also, make sure you're connecting to the correct PORT.
Start the server with npm run server.
Use the Fetch API to make requests.
Exercise 6.20
Implement retrieving jokes from the server using React Query.
The application should work in such a way that if there are problems communicating with the server, only an error page will be displayed:

Here is some info on how to detect possible server errors.
*You can simulate a problem with the server by turning off the JSON Server.*
Please be aware that if a request fails, the query stays in the isLoading state for a while.
This is because React Query tries the request a few times before it determines that the request is not successful.
You can optionally specify that no retries are made:
const result = useQuery({
    queryKey: ['jokes'],
    queryFn: getJokes,
    retry: false
  }
)
or that the request is retried a specific number of times (like once):
const result = useQuery({
    queryKey: ['jokes'],
    queryFn: getJokes,
    retry: 1
  }
)
Exercise 6.21
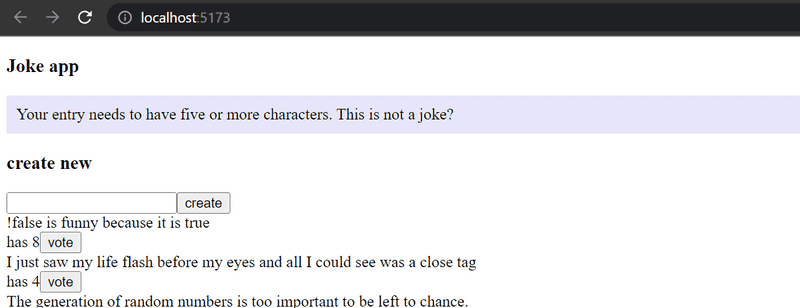
Implement adding new jokes to the server using React Query. The application should render a new joke by default. Make sure that the content of the joke must be at least five characters long, otherwise the server will reject the POST request. You don't have to worry about error handling now.
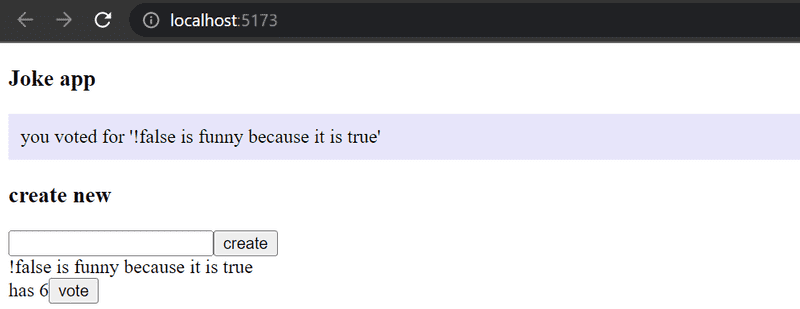
Exercise 6.22
Implement voting for jokes using React Query. The application should automatically render the increased number of votes for the voted joke
useReducer
So even if the application uses React Query, some kind of solution is usually needed to manage the rest of the frontend state (for example, the state of forms).
Quite often, the state created with useState is a sufficient solution.
Using Redux is of course possible, but there are other alternatives.
Let's look at a simple counter application. The application displays the counter value, and offers three buttons to update the counter status:

We shall now implement the counter state management using a Redux-like state management mechanism provided by React's built-in useReducer hook.
The file App.jsx looks as follows:
import { useReducer } from 'react'

const counterReducer = (state, action) => {
  switch (action.type) {
    case 'INC':
      return state + 1
    case 'DEC':
      return state - 1
    case 'ZERO':
      return 0
    default:
      return state
  }
}

const App = () => {
  const [counter, counterDispatch] = useReducer(counterReducer, 0)

  return (
    <div>
      <div>{counter}</div>
      <div>
        <button onClick={() => counterDispatch({ type: 'INC' })}>+</button>
        <button onClick={() => counterDispatch({ type: 'DEC' })}>-</button>
        <button onClick={() => counterDispatch({ type: 'ZERO' })}>0</button>
      </div>
    </div>
  )
}

export default App
The hook useReducer provides a mechanism to create a state for an application.
useReducer's first parameter, is the reducer function that handles state changes, while the second parameter is the initial value of the state:
const [counter, counterDispatch] = useReducer(counterReducer, 0)The reducer function that handles state changes is similar to Redux's reducers, i.e. the function takes in parameters for the current state and the action that changes the state. The function returns the new state updated based on the type and possible contents of the action:
const counterReducer = (state, action) => {
  switch (action.type) {
    case 'INC':
      return state + 1
    case 'DEC':
      return state - 1
    case 'ZERO':
      return 0
    default:
      return state
  }
}
In our example, actions only have a type.
If the action's type is INC, it increases the value of the counter by one, etc.
Like Redux's reducers, actions can also contain arbitrary data, which is usually put in the action's payload field.
The function useReducer returns an array that contains:
- an element to access the current value of the state
- a
dispatchfunction to change the state:
const App = () => {
  const [counter, counterDispatch] = useReducer(counterReducer, 0)
  return (
    <div>
      <div>{counter}</div>      <div>
        <button onClick={() => counterDispatch({ type: 'INC' })}>+</button>        <button onClick={() => counterDispatch({ type: 'DEC' })}>-</button>
        <button onClick={() => counterDispatch({ type: 'ZERO' })}>0</button>
      </div>
    </div>
  )
}
One can observe that the state change is done exactly as in Redux, the dispatch function is given the appropriate state-changing action as a parameter:
counterDispatch({ type: "INC" })The current code for the application is in the repository https://github.com/comp227/hook-counter in the branch part6-1.
Passing state via props
When the application is split into multiple components, the counter value and the dispatch function used to manage it must also be passed to the other components. One solution is to pass these as props in the usual way.
Let's define a separate Display component for the application, whose responsibility is to show the counter value.
The contents of the file src/components/Display.jsx should be:
const Display = ({ counter }) => {
  return <div>{counter}</div>
}

export default Display
Additionally, let's define a Button component that is responsible for the application's buttons:
const Button = ({ dispatch, type, label }) => {
  return (
    <button onClick={() => dispatch({ type })}>
      {label}
    </button>
  )
}

export default Button
The file App.jsx changes as follows:
import { useReducer } from 'react'

import Button from './components/Button'import Display from './components/Display'
const counterReducer = (state, action) => {
  switch (action.type) {
    case 'INC':
      return state + 1
    case 'DEC':
      return state - 1
    case 'ZERO':
      return 0
    default:
      return state
  }
}

const App = () => {
  const [counter, counterDispatch] = useReducer(counterReducer, 0)

  return (
    <div>
      <Display counter={counter} />      <div>
        <Button dispatch={counterDispatch} type='INC' label='+' />        <Button dispatch={counterDispatch} type='DEC' label='-' />        <Button dispatch={counterDispatch} type='ZERO' label='0' />      </div>
    </div>
  )
}
The application has now been split into multiple components. The state management is defined in the file App.jsx, from which the values and functions needed for state management are passed to child components as props.
The solution works, but is not optimal. If the component structure becomes very nested, the dispatcher would need to be forwarded using props through all of those intermediary sub-components, even though those components in between may not need the dispatcher. This phenomenon is called prop drilling.
Using context for passing the state to components
React's built-in Context API provides a solution for us. React's context is like a global state for the application, so that any component could get access to the state.
Let us now create a context in the application that stores the state management of the counter.
The context is created with React's hook createContext. Let's create a context in the file CounterContext.jsx:
import { createContext } from 'react'

const CounterContext = createContext()

export default CounterContext
The App component can now provide a context to its child components as follows:
import { useReducer } from 'react'

import Button from './components/Button'
import Display from './components/Display'
import CounterContext from './CounterContext'
// ...

const App = () => {
  const [counter, counterDispatch] = useReducer(counterReducer, 0)

  return (
    <CounterContext.Provider value={{ counter, counterDispatch }}>      <Display />      <div>
        <Button type='INC' label='+' />        <Button type='DEC' label='-' />        <Button type='ZERO' label='0' />      </div>
    </CounterContext.Provider>  )
}
The code above wraps child components inside the CounterContext.Provider component and sets a value in its attributes.
The context providers's value is set to be an object containing the value of the counter, and the dispatch function (counterDispatch).
Other components (including Display and Button)
can now access the context using the useContext hook:
The Display component changes as follows:
import { useContext } from 'react'import CounterContext from './CounterContext'
const Display = () => {  const { counter } = useContext(CounterContext)
  return <div>{counter}</div>
}
Display component therefore no longer needs props; it obtains the counter value by calling the useContext hook with the CounterContext object as its argument.
Similarly, the Button component becomes:
import { useContext } from 'react'import CounterContext from './CounterContext'
const Button = ({ type, label }) => {  const { counterDispatch } = useContext(CounterContext)
  return (
    <button onClick={() => counterDispatch({ type })}>      {label}
    </button>
  )
}
Components therefore receive the value provided by the context provider. In this case, the context is an object with:
- a
counterfield that represents the counter's value - a
counterDispatchfield that is the dispatch function used to change the counter's state.
Components access the attributes they need using JavaScript's destructuring syntax:
const { counter } = useContext(CounterContext)The current code for the application is in GitHub in the branch part6-2.
Defining the counter context in a separate file
In studying the application's code further,
we want to avoid the fact that the functionality of the counter state management is partly defined in the App component.
Let's move everything related to the counter to CounterContext.jsx:
import { createContext, useReducer } from 'react'

const counterReducer = (state, action) => {
  switch (action.type) {
    case 'INC':
      return state + 1
    case 'DEC':
      return state - 1
    case 'ZERO':
      return 0
    default:
      return state
  }
}

const CounterContext = createContext()

export const CounterContextProvider = (props) => {
  const [counter, counterDispatch] = useReducer(counterReducer, 0)

  return (
    <CounterContext.Provider value={{ counter, counterDispatch }}>
      {props.children}
    </CounterContext.Provider>
  )
}

export default CounterContext
The file now exports, in addition to the CounterContext object, the CounterContextProvider component,
whose value is a counter and a dispatcher used for its state management.
Let's enable the context provider by making a change in main.jsx:
import { StrictMode } from 'react'
import { createRoot } from 'react-dom/client'

import App from './App'
import { CounterContextProvider } from './CounterContext'
createRoot(document.getElementById('root')).render(
  <StrictMode>
    <CounterContextProvider>      <App />
    </CounterContextProvider>  </StrictMode>
)
Now the context defining the value and functionality of the counter is available to all components of the application.
The App component is simplified to the following form:
import Button from './components/Button'
import Display from './components/Display'

const App = () => {
  return (
    <div>
      <Display />
      <div>
        <Button type='INC' label='+' />
        <Button type='DEC' label='-' />
        <Button type='ZERO' label='0' />
      </div>
    </div>
  )
}

export default App
The context is still used in the same way, and no changes are needed in the other components.
For example, the Button component is defined as follows:
import { useContext } from 'react'
import CounterContext from '../CounterContext'

const Button = ({ type, label }) => {
  const { counterDispatch } = useContext(CounterContext)

  return (
    <button onClick={() => counterDispatch({ type })}>
      {label}
    </button>
  )
}

export default Button
This code is much cleaner.
The entire state of the application, i.e. the value of the counter and the code for managing it, is now isolated in the file CounterContext.
Components access the part of the context they need by using the useContext hook and JavaScript's destructuring syntax.
The final code for the application is in GitHub in the branch part6-3.
Exercises 6.23-6.24
Exercise 6.23
The application has a Notification component for displaying notifications to the user.
Implement the application's notification state management using the useReducer hook and context.
The notification should tell the user when a new joke is created or an joke is voted on:
The notification is displayed for five seconds.
Exercise 6.24
As stated in exercise 6.21, the server requires that the content of the joke to be added is at least five characters long. Now implement error handling for the insertion. In practice, it is sufficient to display a notification to the user in case of a failed POST request:
The error condition should be handled in the callback function registered for it, here's how to register a function.
This was the last exercise for this part of the course and it's time to push your code to GitHub if you haven't already and mark the exercises that were completed on Canvas.
Which state management solution to choose?
In chapters 1-5, all state management of the application was done using React's hook useState.
Asynchronous calls to the backend required the use of the useEffect hook in some situations.
In principle, nothing else is needed.
However as we have discussed in this section, the idea of prop drilling or of wanting a more complex state management solution has often arisen.
Over the years, several alternative solutions have been developed for state management of React applications. However, no solution has been "final", all have their own pros and cons, and new solutions are being developed all the time.
The situation may confuse a beginner and even an experienced web developer. Which solution should be used?
For a simple application, useState is certainly a good starting point.
If the application is communicating with the server, the communication can be handled in the same way as in chapters 1-5, using the state of the application itself.
Recently, however, it has become more common to move the communication and associated state management at least partially under the control of React Query (or some other similar library).
There are also situations where it may make sense to handle some of the state with useState and some with contexts.
The most comprehensive and robust state management solution is Redux,
which is a way to implement the so-called Flux architecture.
Redux is slightly older than the solutions presented in this section.
The rigidity of Redux has been the motivation for many new state management solutions, such as React's useReducer.
Some of the criticisms of Redux's rigidity have already become obsolete thanks to the Redux Toolkit.
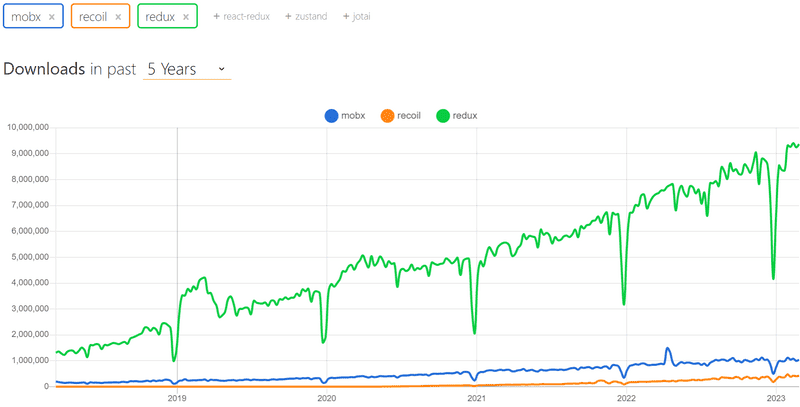
Over the years, there have also been other state management libraries developed that are similar to Redux, such as the newer entrant Recoil and the slightly older MobX. However, according to Npm trends, Redux still clearly dominates, and in fact seems to be increasing its lead:
Also, Redux does not have to be used in its entirety in an application. It may make sense, for example, to manage the form state outside of Redux, especially in situations where the state of a form does not affect the rest of the application. It is also possible to use Redux and React Query together in the same application.
The question of which state management solution should be used is not at all straightforward. It is impossible to give a single correct answer. It may also turn out that over time, the application may outgrow the selected state management solution, even if the application has already been put into production use.
The best we can do is to continue to learn about what's available.