a
Flux-architecture and Redux
So far, we have followed the state management conventions recommended by React.
We have placed the state and the functions for handling it in a higher single component,
and then passed the state into the various components that use it.
Quite often most of the app state and state altering functions reside directly in the root component.
We then pass the state and its handlers to other components via props.
This works up to a certain point, but when applications grow larger, state management becomes challenging.
Flux-architecture
A few years back Facebook developed the Flux architecture to make state management of React apps easier. In Flux, the state is separated from the React components and into its own stores. State in the store is not changed directly, but with different actions.
When an action changes the state of the store, the views are re-rendered:
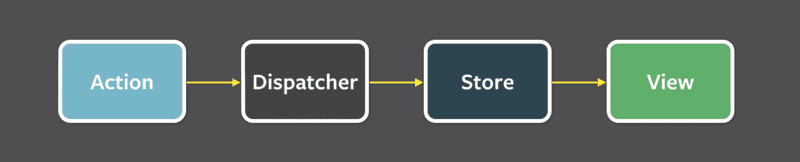
For example, if you push a button that triggers the need to change the state, that change will be made with an action. This causes re-rendering the view again:

Flux provides a standardized way to store and modify an application's state.
Redux
Facebook has an implementation for Flux, but we will be using the Redux library. It follows the same principles but is simpler to use. Facebook also uses Redux now instead of their original Flux.
We will get to know Redux by implementing a counter application yet again:

Start with a new Vite application and then install redux with the command
npm i reduxRedux's Store and Actions
Like Flux, the state in Redux is housed in a store. You can think of the store as like a mini-database that redux uses to house information.
Unlike Flux, Redux stores this state in a single JavaScript object. Because our application only needs the value of the counter, we will save it straight to the store. If the state were more complex, the different values would be saved as separate properties in the object.
The state of the store is changed with actions. Actions are objects, which have at least a field determining the type of the action. Our application will need for example the following action:
{
  type: 'INCREMENT'
}
If there is data involved with the action, other fields can be declared as needed.
However, our counting app is so simple that the actions are fine with just the type field.
Reducers
The impact of the action to the state of the application is defined using a reducer. In practice, a reducer is a function that is given the current state and an action as parameters. It returns a new state.
Let's now define a reducer for our application at main.jsx. The file initially looks like this:
const counterReducer = (state, action) => {
  if (action.type === 'INCREMENT') {
    return state + 1
  } else if (action.type === 'DECREMENT') {
    return state - 1
  } else if (action.type === 'ZERO') {
    return 0
  }

  return state
}
The first parameter is the state in the store.
The *reducer returns a new state based on the action type.
So, here when the type of Action is *INCREMENT, the state gets the old value plus one.
If the type of Action is ZERO the new value of state is zero.
Let's change the code a bit.
We have used if-else statements to build our reducer;
counterReducer responds to an action and changes the state.
However, the switch statement is the most common approach to writing a reducer.
Let's also define a default value of 0 for the parameter state.
Now the reducer works even if the state has not been initialized.
const counterReducer = (state = 0, action) => {  switch (action.type) {
    case 'INCREMENT':
      return state + 1
    case 'DECREMENT':
      return state - 1
    case 'ZERO':
      return 0
    default: // if none of the above matches, code comes here
      return state
  }
}
While counterReducer is a function, we are never supposed to call any reducer directly from our code.
Instead, we pass the reducer into the older createStore function (for now),
which will handle calling the function:
import { createStore } from 'redux'
const counterReducer = (state = 0, action) => {
  switch (action.type) {
    case 'INCREMENT':
      return state + 1
    case 'DECREMENT':
      return state - 1
    case 'ZERO':
      return 0
    default:
      return state
  }
}

const store = createStore(counterReducer)
The code editor may warn that createStore is deprecated
Let's ignore this for now; there is a more detailed explanation about this further below.
The store now uses the reducer to handle actions,
which are dispatched or 'sent' to the store with its dispatch method.
store.dispatch({ type: 'INCREMENT' })You can find out the state of store using the method getState.
For example, the following code:
// ...

const store = createStore(counterReducer)

console.log(store.getState())store.dispatch({type: 'INCREMENT'})store.dispatch({type: 'INCREMENT'})store.dispatch({type: 'INCREMENT'})console.log(store.getState())store.dispatch({type: 'ZERO'})store.dispatch({type: 'DECREMENT'})console.log(store.getState())
would print the following to the console
0
3
-1
At first, the state of store is 0.
After three INCREMENT actions, store's state is 3.
In the end, after the ZERO and DECREMENT actions, the store's state is -1.
In addition to dispatch and getState, store also has the subscribe method,
which is used to create callback functions that the store calls whenever an action is dispatched to it.
If, for example, we would add the following function to subscribe, every change in the store would be printed to the console.
store.subscribe(() => {
  const storeNow = store.getState()
  console.log('breaking news! ', storeNow)
})
so the code
// ...

const store = createStore(counterReducer)

store.subscribe(() => {  const storeNow = store.getState()  console.log('breaking news! ', storeNow)})
store.dispatch({ type: 'INCREMENT' })store.dispatch({ type: 'INCREMENT' })store.dispatch({ type: 'INCREMENT' })store.dispatch({ type: 'ZERO' })store.dispatch({ type: 'DECREMENT' })
would cause the following to be printed
breaking news! 1
breaking news! 2
breaking news! 3
breaking news! 0
breaking news! -1
Let's now replace our hello world content with buttons and some visible HTML.
The entire code is below.
All of it has been written in main.jsx,
so store is directly available everywhere 👀.
Later on we will focus on properly structuring our React/Redux code.
import ReactDOM from 'react-dom/client'
import { createStore } from 'redux'

const counterReducer = (state = 0, action) => {
  switch (action.type) {
    case 'INCREMENT':
      return state + 1
    case 'DECREMENT':
      return state - 1
    case 'ZERO':
      return 0
    default:
      return state
  }
}

const store = createStore(counterReducer)

const App = () => {
  return (
    <div>
      <div>
        {store.getState()}      </div>
      <button onClick={e => store.dispatch({ type: 'INCREMENT' })}>        plus
      </button>
      <button onClick={e => store.dispatch({ type: 'DECREMENT' })}>        minus
      </button>
      <button onClick={e => store.dispatch({ type: 'ZERO' })}>        zero
      </button>
    </div>
  )
}

const root = ReactDOM.createRoot(document.getElementById('root'))

const renderApp = () => {  root.render(<App />)}renderApp()store.subscribe(renderApp)
There are a few notable things in the code.
App renders the value of the counter by asking for it from the store with the method store.getState().
The buttons' onClick handlers dispatch the right action object to the store.
When store's state changes, React cannot automatically re-render the application by itself.
Thus we have registered a function renderApp with store.subscribe.
Now, renderApp will re-render the entire app anytime store changes.
Remember that we have to also directly call renderApp().
Otherwise, we would have only defined renderApp and so the first rendering of the app would never happen.
A notice about the use of createStore
You may have noticed that in WebStorm, createStore has a strikethrough.
If you move the mouse over the name, an explanation will appear
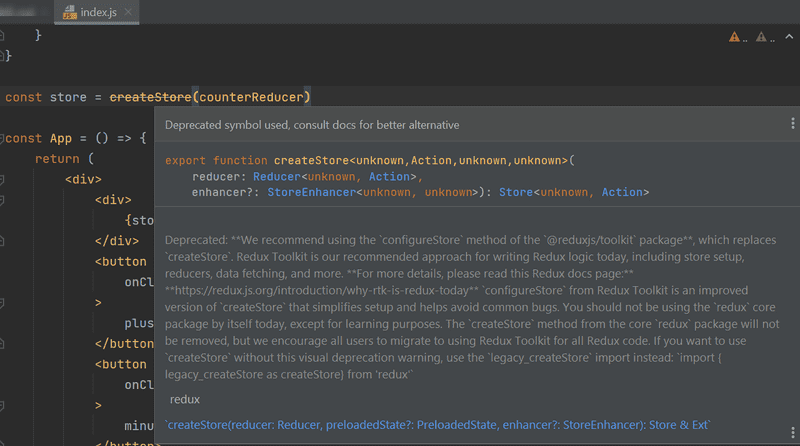
Here's an official explanation:
*We recommend using the
configureStoremethod of the @reduxjs/toolkit package, which replacescreateStore.*Redux Toolkit is our recommended approach for writing Redux logic today, including store setup, reducers, data fetching, and more.
For more details, please read this Redux docs page: https://redux.js.org/introduction/why-rtk-is-redux-today
configureStorefrom Redux Toolkit is an improved version ofcreateStorethat simplifies setup and helps avoid common bugs.You should not be using the
reduxcore package by itself today, except for learning purposes. ThecreateStoremethod from the core redux package will not be removed, but we encourage all users to migrate to using Redux Toolkit for all Redux code.
So, since Redux recommends configureStore over createStore,
we will start using configureStore in the next section,
but we will continue using createStore here as we are still introducing redux concepts.
An Aside:
createStoreis defined as deprecated. Functions/features that are deprecated are sometimes removed in a future version of a library. The explanation above and this discussion reveal thatcreateStorewill not be removed, and it has been given the statusdeprecated, perhaps to nudge people to useconfigureStoreinstead.
You can see the full code for the calculator on GitHub in the main branch.
Redux-tasks
We aim to modify our task application to use Redux for state management. However, let's first cover a few key concepts through a simplified task application.
The first version of our application, written in the file main.jsx, looks as follows:
import ReactDOM from 'react-dom/client'
import { createStore } from 'redux'

const taskReducer = (state = [], action) => {
  switch (action.type) {
    case 'NEW_TASK':
      state.push(action.payload)
      return state
    default:
      return state
  }
}

const store = createStore(taskReducer)

store.dispatch({
  type: 'NEW_TASK',
  payload: {
    content: 'learn more about how the app state is in redux store',
    important: true,
    id: 1
  }
})

store.dispatch({
  type: 'NEW_TASK',
  payload: {
    content: 'understand more fully how state changes are made with actions',
    important: false,
    id: 2
  }
})

const App = () => {
  return (
    <div>
      <ul>
        {store.getState().map(task => (
          <li key={task.id}>
            {task.content} <strong>{task.important ? '- important' : ''}</strong>
          </li>
        ))}
      </ul>
    </div>
  )
}

const root = ReactDOM.createRoot(document.getElementById('root'))

const renderApp = () => {
  root.render(<App />)
}

renderApp()
store.subscribe(renderApp)
So far the application does not have the functionality for adding new tasks, although it is possible to do so by dispatching NEW_TASK actions.
Notice how the actions have a type and a payload, the latter containing the task to be added:
{
  type: 'NEW_TASK',
  payload: {
    content: 'understand more fully how state changes are made with actions',
    important: false,
    id: 2
  }
}
The general convention is that actions have exactly two fields:
typereferring to the type of Action (ieNEW_TASK)payloadcontaining the data to include with the Action.
Pure functions, immutable
If we remember the goal of a reducer, then our initial version of taskReducer is straightforward:
const taskReducer = (state = [], action) => {
  switch (action.type) {
    case 'NEW_TASK':
      state.push(action.payload)
      return state
    default:
      return state
  }
}
The state here is an Array.
NEW_TASK actions cause a new task to be added to the state with the push method.
While the application seems to work, our taskReducer implementation is unacceptable.
Unfortunately, taskReducer breaks a basic assumption
that Redux reducers must be pure functions.
Pure functions must:
- not cause any side effects
- always return the same response when called with the same parameters
We added a new task to the state with the method state.push(action.payload).
Calling state.push *changes our state object which is a side-effect*.
This is not allowed.
The problem is easily solved by using the
concat method.
Calling state.concat creates a new array that contains all the elements of the old array along with the new element:
const taskReducer = (state = [], action) => {
  switch (action.type) {
    case 'NEW_TASK':
      return state.concat(action.payload)    default:
      return state
  }
}
A reducer state must be composed of immutable objects.
If there is a change in the state, the old object is not changed, but it is replaced with a new, changed, object.
This is exactly what we did with our revised taskReducer: the old state array is replaced with the new one.
Let's expand our reducer so that it can handle the change of a task's importance:
{
  type: 'TOGGLE_IMPORTANCE',
  payload: {
    id: 2
  }
}
TDD with Redux setup
Since we do not have any code which uses this functionality yet,
let's expand the reducer via Test-Driven Development (TDD).
Let's start by creating a test for handling the action NEW_TASK.
In short, TDD follows this three-step process:
- Make a test that causes the existing code to fail (red)
- Change the code so that it passes all the tests again (green)
- Refactor the code while ensuring the tests still pass (refactor)
To follow TDD, we'll need to configure the Vitest testing library for the project. Let's install it as a development dependency for the application:
npm i -D vitest Let us expand package.json with a script for running the tests:
{
  // ...
  "scripts": {
    "dev": "vite",
    "build": "vite build",
    "lint": "eslint .",
    "preview": "vite preview",
    "test": "vitest"  },
  // ...
}
To make testing easier, we'll first move the reducer's code to its own module to file src/reducers/taskReducer.js.
const taskReducer = (state = [], action) => {
  switch (action.type) {
    case 'NEW_TASK':
      return state.concat(action.payload)
    default:
      return state
  }
}

export default taskReducer
The file main.jsx changes as follows:
import ReactDOM from 'react-dom/client'
import { createStore } from 'redux'
import taskReducer from './reducers/taskReducer'
const store = createStore(taskReducer)

// ...
Testing and Deep Freeze
We'll also add the library deep-freeze, which can help ensure that our reducer has been correctly defined as an immutable function. Let's install the library as a development dependency:
npm i -D deep-freezeWe are now ready to write tests.
Let's start by creating a test for handling the action NEW_TASK.
The test, which we define in the file src/reducers/taskReducer.test.js, has the following content:
import taskReducer from './taskReducer'
import deepFreeze from 'deep-freeze'
import { describe, expect, test } from 'vitest'
import taskReducer from './taskReducer'

describe('taskReducer', () => {
  test('returns new state with action NEW_TASK', () => {
    const state = []
    const action = {
      type: 'NEW_TASK',
      payload: {
        content: 'learn more about how the app state is in redux store',
        important: true,
        id: 1
      }
    }

    deepFreeze(state)    const newState = taskReducer(state, action)

    expect(newState).toHaveLength(1)
    expect(newState).toContainEqual(action.payload)
  })
})
Run the test with npm test.
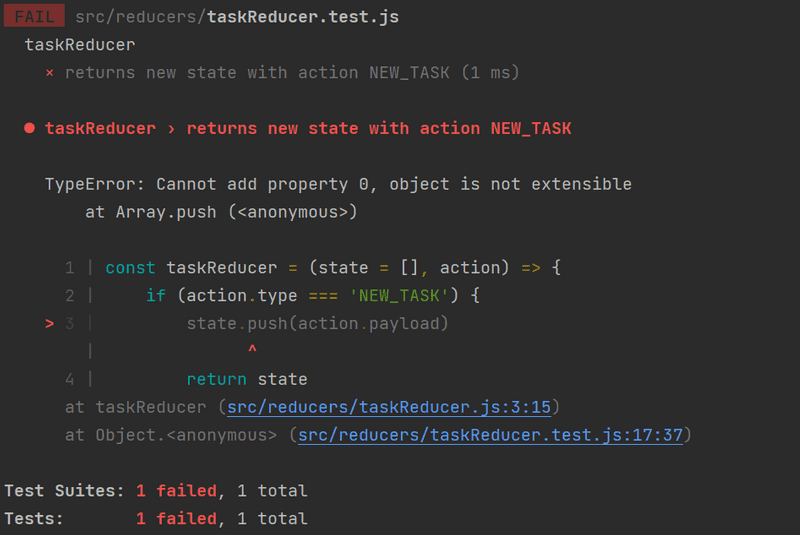
The test ensures that the new state returned by the reducer is an array containing a single element,
which is the same object as the one in the action’s payload field.
The deepFreeze(state) command ensures that the reducer does not change the state of the store given to it as a parameter.
If the reducer uses the push command to manipulate the state, the test will fail:
Our first redux test - toggling importance
Now that we setup our first step, let's start with TDD.
We have yet to implement the functionality for toggling the importance of a task.
Let's then create a test for the TOGGLE_IMPORTANCE action:
test('returns new state with action TOGGLE_IMPORTANCE', () => {
  const state = [
    {
      content: 'learn more about how the app state is in redux store',
      important: true,
      id: 1
    },
    {
      content: 'understand more fully how state changes are made with actions',
      important: false,
      id: 2
    }
  ]

  const action = {
    type: 'TOGGLE_IMPORTANCE',
    payload: {
      id: 2
    }
  }

  deepFreeze(state)
  const newState = taskReducer(state, action)

  expect(newState).toHaveLength(2)

  expect(newState).toContainEqual(state[0])

  expect(newState).toContainEqual({
    content: 'understand more fully how state changes are made with actions',
    important: true,
    id: 2
  })
})
So the following action
{
  type: 'TOGGLE_IMPORTANCE',
  payload: {
    id: 2
  }
}
has to change the importance of the task with the id 2.
If you were to run the test, it would fail, because we have yet to implement anything related to TOGGLE_IMPORTANCE.
With our failing test, we can now work on the reducer.
Below is our expanded reducer:
const taskReducer = (state = [], action) => {
  switch(action.type) {
    case 'NEW_TASK':
      return state.concat(action.payload)
    case 'TOGGLE_IMPORTANCE': {      const id = action.payload.id      const taskToChange = state.find(t => t.id === id)      const changedTask = {         ...taskToChange,         important: !taskToChange.important       }      return state.map(task =>        task.id === id ? changedTask : task      )    }    default:
      return state
  }
}
We create changedTask, a copy of the task but with the important field flipped, utilizing the code we implemented in part 2.
We then replace the state with a new object containing the unchanged tasks along with our changedTask.
Let's recap what goes on in the code. First, we search for a specific task object, the importance of which we want to change:
const taskToChange = state.find(t => t.id === id)then we create a new object, which is a copy of the original task, only the value of the important field has been flipped to the opposite of what it was:
const changedTask = {
  ...taskToChange,
  important: !taskToChange.important
}
We create a new state by taking all of the tasks from the old state (via map) except for the desired task, which we replace with its slightly altered copy:
state.map(task =>
  task.id === id ? changedTask : task
)
Our reducer then returns that new array of tasks.
Array spread syntax
Because we now have a reducer that passes our tests, we can follow TDD and move to refactor the code.
Currently in NEW_TASK, the code creates a copy of state via the Array's concat function.
Let's take a look at how we can achieve the same
by using JavaScript's spread operator syntax:
const taskReducer = (state = [], action) => {
  switch(action.type) {
    case 'NEW_TASK':
      return [...state, action.payload]    case 'TOGGLE_IMPORTANCE': {
      // ...
    }
    default:
    return state
  }
}
Here's how the spread syntax works. If we declare:
const my_physics_midterm_scores = [35, 34, 31]...my_midterm_scores breaks the array up into individual elements, which can be placed in another array.
[...my_physics_midterm_scores, 23, 13]and the result is an array [35, 34, 31, 23, 13].
If we would have placed the array into another array without the spread operator
[numbers, 34, 35]the result would have been [ [35, 34, 31] , 23, 13].
When we take elements from an array by destructuring, a similar-looking syntax is used to gather the rest of the elements:
const my_physics_midterm_scores = [35, 34, 31, 23, 13, 7]

const [first, second, ...rest] = my_physics_midterm_scores

console.log(first)     // prints 35
console.log(second)   // prints 34
console.log(rest)     // prints [31, 23, 13, 7]
Exercises 6.1-6.2
For this part's exercises, please accept the assignment from http://go.djosv.com/227lab6.
Once it's been setup, make sure to clone the repository.
Here we will have three projects in the same folder.
Remember that you'll need to run npm install in the correct subfolder before being able to work on that particular project.
Let's make a simplified version of the Studytracker exercise from part 1. Let's handle the state management with Redux.
6.1: Studytracker revisited, Step 1
Before implementing the functionality of the UI, let's implement the functionality required by the store.
We have to save the number of each kind of feedback to the store, so the form of the state in the store is:
{
  yeah: 5,
  kinda: 4,
  nah: 2
}
The project has the following base for a reducer:
const initialState = {
  yeah: 0,
  kinda: 0,
  nah: 0
}

const counterReducer = (state = initialState, action) => {
  console.log(action)
  switch (action.type) {
    case 'YEAH':
      return state
    case 'KINDA':
      return state
    case 'NAH':
      return state
    case 'ZERO':
      return state
    default:
      return state
  }
}

export default counterReducer
and a base for its tests
import deepFreeze from 'deep-freeze'
import { describe, expect, test } from 'vitest'
import counterReducer from './reducer'

describe('studytracker reducer', () => {
  const initialState = {
    yeah: 0,
    kinda: 0,
    nah: 0
  }

  test('should return a proper initial state when called with undefined state', () => {
    const action = {
      type: 'DO_NOTHING'
    }

    const newState = counterReducer(undefined, action)
    expect(newState).toEqual(initialState)
  })

  test('yeah is incremented', () => {
    const action = {
      type: 'YEAH'
    }
    const state = initialState

    deepFreeze(state)
    const newState = counterReducer(state, action)
    expect(newState).toEqual({
      yeah: 1,
      kinda: 0,
      nah: 0
    })
  })
})
Implement the reducer and its tests.
You can run the tests via npm test.
In the tests, make sure that the reducer is an immutable function with the deep-freeze library.
Ensure that the provided first test passes, because Redux expects that the reducer returns a sensible original state when it is called so that the first parameter state,
which represents the previous state, is undefined.
Start by expanding the reducer so that both tests pass. After that, add the remaining tests for the different actions of the reducer and implement the corresponding functionality in the reducer.
A good model for the reducer is the redux-tasks example above.
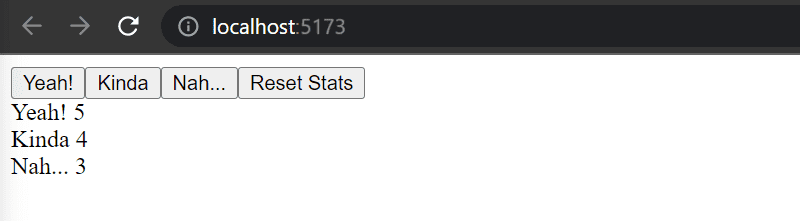
6.2: Studytracker revisited, Step 2
Now implement the actual functionality of the application.
Your application can have a modest appearance, nothing else is needed but buttons and the number of reviews for each type:
Uncontrolled form
Let's add the functionality for adding new tasks and changing their importance:
// ...

const generateId = () => Number((Math.random() * 1000000).toFixed(0))
const App = () => {
  const addTask = event => {    event.preventDefault()    const content = event.target.task.value    event.target.task.value = ''    store.dispatch({      type: 'NEW_TASK',      payload: {        content,        important: false,        id: generateId()      }    })  }
  const toggleImportance = id => {    store.dispatch({      type: 'TOGGLE_IMPORTANCE',      payload: { id }    })  }
  return (
    <div>
      <form onSubmit={addTask}>        <input name="task" />         <button type="submit">add</button>      </form>      <ul>
        {store.getState().map(task =>
          <li
            key={task.id}
            onClick={() => toggleImportance(task.id)}          >
            {task.content} <strong>{task.important ? '- important' : ''}</strong>
          </li>
        )}
      </ul>
    </div>
  )
}

// ...
The implementation of both actions is straightforward.
Notice that we have not bound the state of the form fields to the state of the App component like we have previously done.
React calls this kind of form uncontrolled.
Uncontrolled forms have certain limitations (for example, dynamic error messages or disabling the submit button based on an input are not possible). However uncontrolled forms are suitable enough for now.
If interested, you can read more about uncontrolled forms.
Let's review the highlighted code above carefully.
The method handler addTask, mainly dispatches the action for adding tasks to our store:
addTask = (event) => {
  event.preventDefault()
  const content = event.target.task.value  event.target.task.value = ''
  store.dispatch({
    type: 'NEW_TASK',
    payload: {
      content,
      important: false,
      id: generateId()
    }
  })
}
We can get the content of the new task straight from our form's task input field.
Because this field has a name, we access its content via the event object: event.target.task.value:
const content = event.target.task.valueNotice that the input field must have a name in order to access its value:
<form onSubmit={addTask}>
  <input name="task" />  <button type="submit">add</button>
</form>
A task's importance can be changed by clicking its name.
The event handler is modest:
toggleImportance = id => {
  store.dispatch({
    type: 'TOGGLE_IMPORTANCE',
    payload: { id }
  })
}
Action creators
We begin to notice that, even in applications as primitive as ours, using Redux can simplify the frontend code. However, we can do a lot better.
React components don't need to know the Redux action types and forms. Let's separate the creation of action objects into functions:
const createTask = content => {
  return {
    type: 'NEW_TASK',
    payload: {
      content,
      important: false,
      id: generateId()
    }
  }
}

const toggleImportanceOf = id => {
  return {
    type: 'TOGGLE_IMPORTANCE',
    payload: { id }
  }
}
Functions that create these action objects are called action creators.
The App component does not have to know anything about the inner representation of the actions anymore, it just gets the right action by calling the creator function:
const App = () => {
  const addTask = event => {
    event.preventDefault()
    const content = event.target.task.value
    event.target.task.value = ''
    store.dispatch(createTask(content))  }

  const toggleImportance = id => {
    store.dispatch(toggleImportanceOf(id))  }

  // ...
}
Forwarding Redux Store to various components
Aside from the reducer, our application is in one file. 🧐
We should separate App into its module.
But how can the App access the store after the move?
And more broadly, when a component is composed of many smaller components, there must be a way for all of the components to access the store.
There are multiple ways to share the Redux store with components.
The newest (and possibly easiest) way of sharing the store is by using the hooks API of the react-redux library.
First, let's install react-redux
npm i react-reduxLet's organize the application code more sensibly into several different files.
If you haven't done so already, move the App component into its own file App.jsx.
Once moved, main.jsx becomes:
import ReactDOM from 'react-dom/client'
import { createStore } from 'redux'
import { Provider } from 'react-redux'
import App from './App'
import taskReducer from './reducers/taskReducer'

const store = createStore(taskReducer)

ReactDOM.createRoot(document.getElementById('root')).render(
  <Provider store={store}>    <App />
  </Provider>
)
Notice that the application is now defined as a child of a Provider component provided by the react-redux library.
The application's store is given to the Provider as its attribute store.
const store = createStore(taskReducer)

ReactDOM.createRoot(document.getElementById('root')).render(
  <Provider store={store}>    <App />
  </Provider>)
Defining the action creators has been moved to the file reducers/taskReducer.js where the reducer is defined. That file looks like this:
const taskReducer = (state = [], action) => {
  switch (action.type) {
    case 'NEW_TASK':
      return [...state, action.payload]
    case 'TOGGLE_IMPORTANCE': {
      const id = action.payload.id
      const taskToChange = state.find(t => t.id === id)
      const changedTask = {
        ...taskToChange,
        important: !taskToChange.important
      }
      return state.map(task =>
        task.id === id ? changedTask : task
      )
    }
    default:
      return state
  }
}

const generateId = () =>
  Number((Math.random() * 1000000).toFixed(0))

export const createTask = (content) => {  return {
    type: 'NEW_TASK',
    payload: {
      content,
      important: false,
      id: generateId()
    }
  }
}

export const toggleImportanceOf = (id) => {
  return {
    type: 'TOGGLE_IMPORTANCE',
    payload: { id }
  }
}

export default taskReducer
The module now has multiple export commands.
The reducer function is still returned with the export default command, so the reducer can be imported the usual way:
import taskReducer from './reducers/taskReducer'A module can have only *one default export*, but *multiple normal exports*
export const createTask = (content) => {
  // ...
}

export const toggleImportanceOf = (id) => {
  // ...
}
In contrast, the normal exports (createTask and toggleImportanceOf) are imported via the curly brace syntax:
import { createTask } from '../../reducers/taskReducer'Next, we move the App component into its own file src/App.jsx.
The content of the file is as follows:
import { createTask, toggleImportanceOf } from './reducers/taskReducer'import { useSelector, useDispatch } from 'react-redux'
const App = () => {
  const dispatch = useDispatch()  const tasks = useSelector(state => state)
  const addTask = (event) => {
    event.preventDefault()
    const content = event.target.task.value
    event.target.task.value = ''
    dispatch(createTask(content))  }

  const toggleImportance = (id) => {
    dispatch(toggleImportanceOf(id))  }

  return (
    <div>
      <form onSubmit={addTask}>
        <input name="task" />
        <button type="submit">add</button>
      </form>
      <ul>
        {tasks.map(task =>          <li
            key={task.id}
            onClick={() => toggleImportance(task.id)}
          >
            {task.content} <strong>{task.important ? '- important' : ''}</strong>
          </li>
        )}
      </ul>
    </div>
  )
}

export default App
There are a few things to observe in the code.
Previously, the App dispatched actions by calling the dispatch method of the Redux store:
store.dispatch({
  type: 'TOGGLE_IMPORTANCE',
  payload: { id }
})
Now it does it with the dispatch function from the useDispatch hook.
import { useSelector, useDispatch } from 'react-redux'
const App = () => {
  const dispatch = useDispatch()  // ...

  const toggleImportance = (id) => {
    dispatch(toggleImportanceOf(id))  }

  // ...
}
The useDispatch hook provides *any React component access to main.jsx' dispatch's store*.
This allows all components to make changes to the state of the Redux store.
The component can access the tasks stored in the store with the useSelector hook of the react-redux library.
import { useSelector, useDispatch } from 'react-redux'
const App = () => {
  // ...
  const tasks = useSelector(state => state)  // ...
}
useSelector receives a function as a parameter.
The function either searches for or selects data from the Redux store.
Here we need all of the tasks, so our selector function returns the whole state:
state => statewhich is a shorthand for:
(state) => {
  return state
}
Usually, selector functions are a bit more interesting and return only selected parts of the contents of the Redux store. We could for example return only tasks marked as important:
const importantTasks = useSelector(state => state.filter(task => task.important)) The current version of the application can be found on GitHub, branch part6-0.
More components
Let's separate the form responsible for creating a new task into its own component in the file components/TaskForm.jsx:
import { useDispatch } from 'react-redux'
import { createTask } from '../reducers/taskReducer'

const TaskForm = () => {  const dispatch = useDispatch()

  const addTask = (event) => {
    event.preventDefault()
    const content = event.target.task.value
    event.target.task.value = ''
    dispatch(createTask(content))  }

  return (
    <form onSubmit={addTask}>
      <input name="task" />
      <button type="submit">add</button>
    </form>
  )
}

export default TaskForm
Unlike in the React code we did without Redux, the event handler for changing the state of the app (which now lives in Redux)
has been moved away from the App to a child component.
The logic for changing the state in Redux is still neatly separated from the whole React part of the application.
We'll also separate the list of tasks and displaying a single task into their own components Let's place both in the file components/Tasks.jsx:
import { useDispatch, useSelector } from 'react-redux'
import { toggleImportanceOf } from '../reducers/taskReducer'

const Task = ({ task, handleClick }) => {
  return (
    <li onClick={handleClick}>
      {task.content}
      <strong> {task.important ? '- important' : ''}</strong>
    </li>
  )
}

const Tasks = () => {
  const dispatch = useDispatch()  const tasks = useSelector(state => state)
  return (
    <ul>
      {tasks.map(task =>
        <Task
          key={task.id}
          task={task}
          handleClick={() => dispatch(toggleImportanceOf(task.id))}
        />
      ))}
    </ul>
  )
}

export default Tasks
The logic for changing the importance of a task is now in the component managing the list of tasks.
With this refactoring, only a small amount of code remains in App.jsx:
import TaskForm from './components/TaskForm'
import Tasks from './components/Tasks'

const App = () => {
  return (
    <div>
      <TaskForm />
      <Tasks />
    </div>
  )
}

export default AppTask, responsible for rendering a single task, is very simple and is not aware that the event handler it gets as props dispatches an action.
These kinds of components are called presentational in React terminology.
Tasks, on the other hand, is a
container component,
as it contains some application logic:
it defines what the event handlers of the Task components do and coordinates the configuration of presentational components, that is, the Tasks.
We will return to the presentational/container division later on.
The code of the Redux application can be found on GitHub, branch part6-1.
Exercises 6.3-6.8
Let's move on to a new version of the joke voting application from part 1. The project you cloned at the beginning of part6 has the jokes folder with everything you need to start.
Remember, to install the dependencies first before trying to run the application
npm i
npm run dev
After completing the exercises below, your application should look like this:
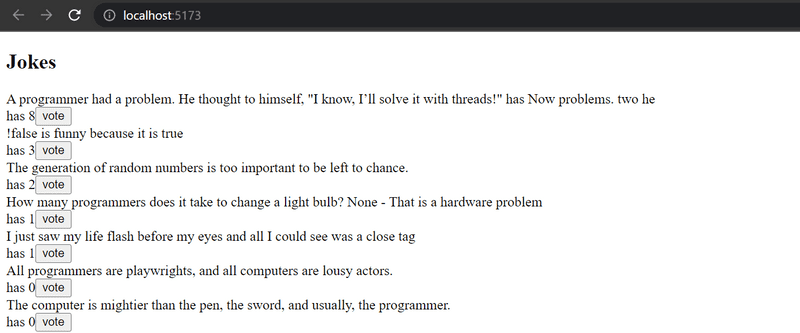
6.3: Jokes, Step 1
Implement the functionality for voting jokes. The number of votes must be saved to a Redux store.
6.4: Jokes, Step 2
Implement the functionality for adding new jokes.
You can keep the form uncontrolled like we did earlier.
6.5: Jokes, Step 3
Make sure that the jokes are ordered by the number of votes.
6.6: Jokes, Step 4
If you haven't done so already, separate the creation of action-objects to action creator functions functions and place them in the src/reducers/jokeReducer.js file, so do what we have been doing since the chapter action creators.
6.7: Jokes, Step 5
Separate the creation of new jokes into a component called JokeForm.
Move all logic for creating a new joke into this new component.
6.8: Jokes, Step 6
Separate the rendering of the list of jokes into a component called Jokes.
Move all logic related to voting for a joke into this new component.
Now the App component should look like this:
import JokeForm from './components/JokeForm'
import Jokes from './components/Jokes'

const App = () => {
  return (
    <div>
      <h2>Jokes</h2>
      <JokeForm />
      <Jokes />
    </div>
  )
}

export default App