b
Forms
Let's continue expanding our application by allowing users to add new tasks.
Important: I just want to remind you that I am expecting you all to type in code as we go. Is it more frustrating? Absolutely. But merely reading (or just watching) is not enough, you have to practice and type things in and work with the examples given. If you do not type and spend time grappling with the material, you will not learn it. While there are copy buttons in most of the code snippets, please use those only as a last resort. However, if you missed a step or did not reset your code from the last example in part 2a, start with the code from here and follow along. To keep things separate, I would also encourage you to practice copying over the lab 1 and doing a new vite project called reading in your part2 repo. Make sure that you type the rest in and follow along to check that things are working. If they are not, use this guide to ask for help!
To get our page to update when new tasks are added it's best to store the tasks in the App component's state.
Let's import the useState function
and use it to define a piece of state that gets initialized with the initial tasks array passed in the props.
Pertinent: You can use the live template to make useState popup, just type
useStateon line 1 of App.jsx and press Tab, then typetasks, and you can move that line down into your app!
import { useState } from 'react'import Task from './components/Task'
const App = (props) => { const [tasks, setTasks] = useState(props.tasks)
return (
<div>
<h1>Tasks</h1>
<ul>
{tasks.map(task =>
<Task key={task.id} task={task} />
)}
</ul>
</div>
)
}
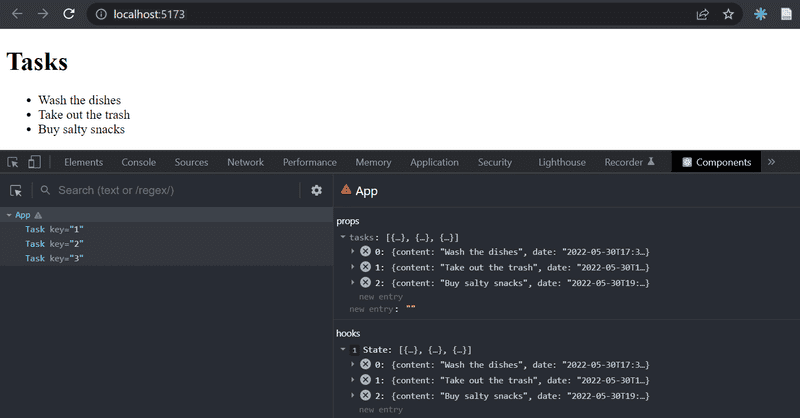
export default App;The component uses the useState function to initialize the piece of state stored in tasks with the array of tasks passed in the props:
const App = (props) => {
  const [tasks, setTasks] = useState(props.tasks)

  // ...
}
We can also use React Developer Tools to see that this really happens:
If we wanted to start with an empty list of tasks, we would set the initial value as an empty array,
and since the props would not be used, we could omit the props parameter from the function definition:
const App = () => {
  const [tasks, setTasks] = useState([])

  // ...
}
Let's stick with the initial value passed in the props for the time being.
This means you should undo the changes in this code block above.
Next, let's add an HTML form to the component that will be used for adding new tasks.
const App = (props) => {
  const [tasks, setTasks] = useState(props.tasks)
  const addTask = (event) => {    event.preventDefault()    console.log('button clicked', event.target)  }
  return (
    <div>
      <h1>Tasks</h1>
      <ul>
        {tasks.map(task =>
          <Task key={task.id} task={task} />
        )}
      </ul>
      <form onSubmit={addTask}>        <input />        <button type="submit">save</button>      </form>       </div>
  )
}
We have added the addTask function as an event handler to the form element that will be called when the form is submitted, by clicking the submit button.
We use the method discussed in part 1 for defining our event handler:
const addTask = (event) => {
  event.preventDefault()
  console.log('button clicked', event.target)
}
The event parameter is the event that triggers the call to the event handler function:
The event handler immediately calls the event.preventDefault() method, which prevents the default action of submitting a form.
The default action would, among other things,
cause the page to reload.
The target of the event stored in event.target is logged to the console:
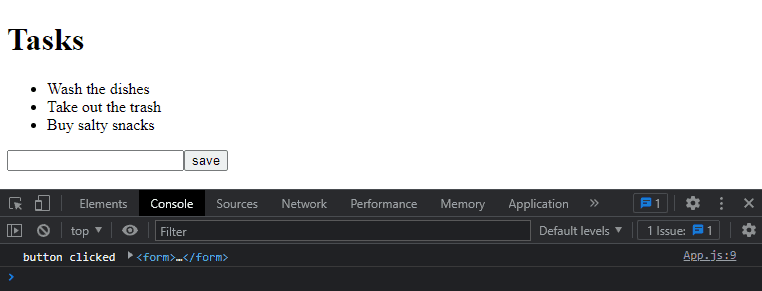
The target in this case is the form that we have defined in our component.
*How then, do we access the data in the form's input element?*
Controlled component
There are many ways to access the form input's data; one way is via controlled components.
Let's add a new piece of state called newTask for storing the user-submitted input and let's *set it as the input element's value attribute*:
Remember: Type the
useStateshortcut to get that muscle memory for creating states!
const App = (props) => {
  const [tasks, setTasks] = useState(props.tasks)
  const [newTask, setNewTask] = useState(    'a new task...'  )
  const addTask = (event) => {
    event.preventDefault()
    console.log('button clicked', event.target)
  }

  return (
    <div>
      <h1>Tasks</h1>
      <ul>
        {tasks.map(task =>
          <Task key={task.id} task={task} />
        )}
      </ul>
      <form onSubmit={addTask}>
        <input value={newTask} />        <button type="submit">save</button>
      </form>
    </div>
  )
}
The initial value for newTask (a new task...) appears in the input element, but the input text can't be edited.
The console displays a warning that gives us a clue as to what might be wrong:

Pertinent: If you get another warning about changing from an uncontrolled to a controlled component, you can just refresh the page and you'll be able to see this error instead. That error is due to us reloading and editing the page on the fly. Remember that you can always refresh the browser and clear the console to get the most up-to-date error messages.
Since we assigned a piece of the App component's state as the value attribute of the input element,
the App component now controls the behavior of the input element.
To enable editing of the input element, we have to register an event handler that synchronizes the changes made to the input with the component's state:
const App = (props) => {
  const [tasks, setTasks] = useState(props.tasks)
  const [newTask, setNewTask] = useState(
    'a new task...'
  )

  // ...

  const handleTaskChange = (event) => {    console.log(event.target.value)    setNewTask(event.target.value)  }
  return (
    <div>
      <h1>Tasks</h1>
      <ul>
        {tasks.map(task =>
          <Task key={task.id} task={task} />
        )}
      </ul>
      <form onSubmit={addTask}>
        <input
          value={newTask}
          onChange={handleTaskChange}        />
        <button type="submit">save</button>
      </form>
    </div>
  )
}
We have now registered an event handler to the onChange attribute of the form's input element:
<input
  value={newTask}
  onChange={handleTaskChange}
/>
The event handler is called every time a change occurs in the input element.
The event handler function receives the event object as its event parameter:
const handleTaskChange = (event) => {
  console.log(event.target.value)
  setNewTask(event.target.value)
}
The target property of the event object now corresponds to the controlled input element, and event.target.value refers to the input value of that element.
Notice that we did not need to call the event.preventDefault() method like we did in the onSubmit event handler.
This is because no default action occurs on an input change, unlike a form submission.
You can follow along in the console to see how the event handler is called:
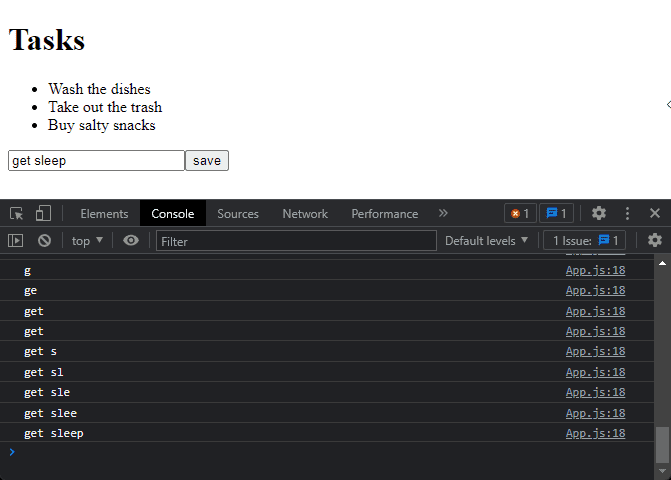
👀 You did remember to install React devtools, right? 👀 Good. You can directly view how the state changes from the React Devtools tab:
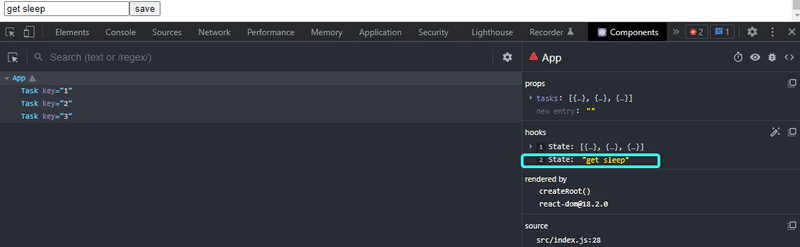
Now the App component's newTask state reflects the current value of the input,
which means that we can complete the addTask function for creating new tasks:
const addTask = (event) => {
  event.preventDefault()
  const taskObject = {
    content: newTask,
    date: new Date().toISOString(),
    important: Math.random() > 0.5,
    id: String(tasks.length + 1),
  }

  setTasks(tasks.concat(taskObject))
  setNewTask('')
}
First, we create a new object for the task called taskObject that will receive its content from the component's newTask state.
The unique identifier id is generated based on the total number of tasks.
This method works for our application since tasks are never deleted.
With the help of the Math.random() function, our task has a 50% chance of being marked as important.
The new task is added to the list of tasks using the
concat array method,
introduced in part 1:
setTasks(tasks.concat(taskObject))The method does not mutate the original tasks array, but rather creates a new copy of the array with the new item added to the end.
This is important since we must never mutate state directly in React!
The event handler also resets the value of the controlled input element by calling the setNewTask function of the newTask state:
setNewTask('')You can find the code for our current application in its entirety in the part2-2 branch of this GitHub repository.
Filtering Displayed Elements
Let's add some new functionality to our application that allows us to only view the important tasks.
Let's add a piece of state to the App component that keeps track of which tasks should be displayed:
const App = (props) => {
  const [tasks, setTasks] = useState(props.tasks)
  const [newTask, setNewTask] = useState('')
  const [showAll, setShowAll] = useState(true)
  // ...
}
Let's change the component so that it stores a list of all the tasks to be displayed in the tasksToShow variable.
The items on the list depend on the state of the component:
import { useState } from 'react'
import Task from './components/Task'

const App = (props) => {
  const [tasks, setTasks] = useState(props.tasks)
  const [newTask, setNewTask] = useState('')
  const [showAll, setShowAll] = useState(true)

  // ...

  const tasksToShow = showAll    ? tasks    : tasks.filter(task => task.important === true)
  return (
    <div>
      <h1>Tasks</h1>
      <ul>
        {tasksToShow.map(task =>          <Task key={task.id} task={task} />
        )}
      </ul>
      // ...
    </div>
  )
}
The definition of the tasksToShow variable is rather compact:
const tasksToShow = showAll
  ? tasks
  : tasks.filter(task => task.important === true)
The definition uses the conditional AKA ternary AKA ?: operator
also found in many other programming languages.
The operator functions as follows. If we have:
const result = condition ? val1 : val2the result variable will be set to the value of val1 if condition is true.
If condition is false, the result variable will be set to the value ofval2.
If the value of showAll is false, the tasksToShow variable will be assigned to a list that only contains tasks that have the important property set to true.
Filtering is done with the help of Array's filter method:
tasks.filter(task => task.important === true)The comparison operator === true is redundant, since the value of task.important is either true or false, which means that we can should instead write:
tasks.filter(task => task.important)We showed the comparison operator first to emphasize an important detail: in JavaScript val1 == val2 does not always work as expected.
When performing comparisons, it's always safer to use val1 === val2.
You can read more about the topic in Mozilla's documentation.
You can test out the filtering functionality by changing the initial value of the
showAllstate.
Next, Let's add functionality that enables users to toggle the showAll state of the application from the user interface.
The relevant changes are shown below:
import { useState } from 'react'
import Task from './components/Task'

const App = (props) => {
  const [tasks, setTasks] = useState(props.tasks)
  const [newTask, setNewTask] = useState('')
  const [showAll, setShowAll] = useState(true)

  // ...

  return (
    <div>
      <h1>Tasks</h1>
      <div>        <button onClick={() => setShowAll(!showAll)}>          show {showAll ? 'important' : 'all'}        </button>      </div>      <ul>
        {tasksToShow.map(task =>
          <Task key={task.id} task={task} />
        )}
      </ul>
      // ...
    </div>
  )
}
The displayed tasks (all versus important) are controlled with a button.
The event handler for the button is so simple that it has been defined directly in the attribute of the button element.
The event handler switches the value of showAll from true to false and vice versa:
() => setShowAll(!showAll)What text the button displays depends on the showAll state:
show {showAll ? 'important' : 'all'}You can find the code for our current application in its entirety in the part2-3 branch of this GitHub repository.
Exercises 2.6-2.10
In the first exercise, we will start working on an application that will be further developed in the later exercises, so you'll need to create another application. In related sets of exercises, it is sufficient to return the final version of your application.
The exercises are submitted through GitHub and marking them as done on Canvas.
Please make sure that you commit in tiny steps, as that will be the way you show your work and progress through the course. Getting into that habit will also improve your reflections and workflow as a developer.
WARNING make sure you are in the correct location before calling create-react-app
2.6: The Communities, Step 1
Let's create a simple community directory, which will be a list of communities that we may want to join.
Let us start by implementing the addition of a single community to this directory.
You can use the code below as a starting point for the App component of your application:
import { useState } from 'react'

const App = () => {
  const [groups, setGroups] = useState([
    { name: 'COMP 227 Students' }
  ])
  const [newName, setNewName] = useState('')

  return (
    <div>
      <h2>Community Directory</h2>
      <form>
        <div>
          name: <input />
        </div>
        <div>
          <button type="submit">add</button>
        </div>
      </form>
      <h2>URLs</h2>
      ...
    </div>
  )
}

export default App
The newName state is meant for controlling the form input element.
Sometimes it can be useful to render state and other variables as text for debugging purposes. You can temporarily add the following element to the rendered component:
<div>debug: {newName}</div>It's also important to put what we learned in the debugging React applications chapter of part one into good use. The React developer tools extension is incredibly useful for tracking changes that occur in the application's state.
After finishing this exercise your application should look something like this:
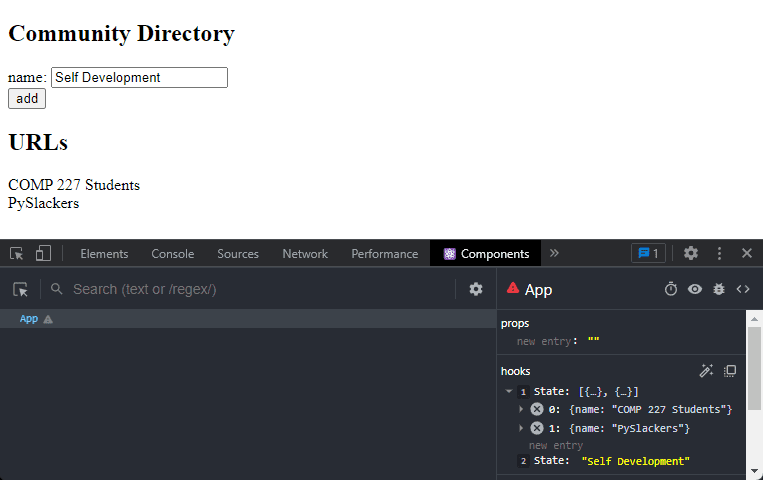
Notice the use of the React developer tools extension in the picture above!
Pertinent:
- you can use the group's name as a value of the
keyproperty- remember to prevent the default action of submitting HTML forms!
2.7: The Communities, Step 2
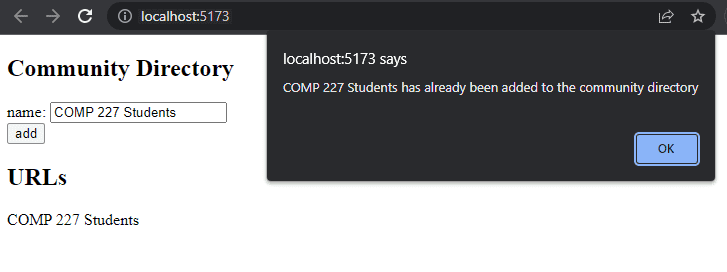
Prevent the user from being able to add names that already exist in the list. JavaScript arrays have numerous suitable methods for accomplishing this job. Keep in mind how object equality works in Javascript.
Issue a warning with the alert command when such an action is attempted:
Hint: when you are forming strings that contain values from variables, it is recommended to use a template string:
`${newName} has already been added to the community directory`If the
newNamevariable holds the valuePowercat, the template string expression returns the string`Powercat has already been added to the community directory`The same could be done in a more Java-like fashion by using the plus operator:
newName + ' has already been added to the community directory'Nonetheless, using template strings is the more idiomatic option and the sign of a true JavaScript professional.
2.8: The Communities, Step 3
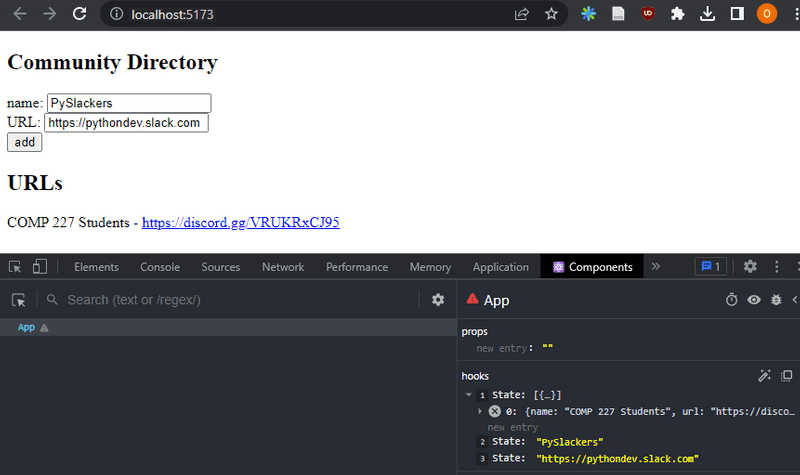
Expand your application by allowing users to add URLs to the community directory. The URL will be an invitation link to that communities' discord or slack group. You will need to add a second input element to the form (along with its own event handler):
<form>
  <div>name: <input /></div>
  <div>URL: <input /></div>
  <div><button type="submit">add</button></div>
</form>
At this point, the application could look something like this. The image also displays the application's state with the help of React developer tools:
2.9*: The Communities, Step 4
Implement a search field that can be used to filter the list of communities by name:
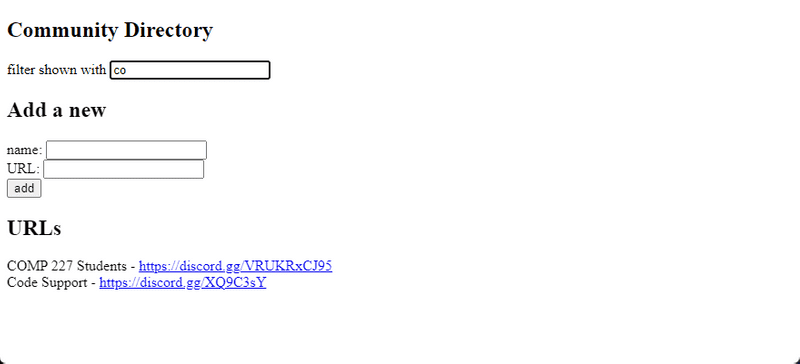
You can implement the search field as an input element that is placed outside the HTML form.
The filtering logic shown in the image is case insensitive, meaning that the search term comp also returns results that contain Comp with an uppercase C.
Pertinent: When you are working on new functionality, it's often useful to "hardcode" some dummy data into your application, e.g.
const App = () => {
  const [groups, setGroups] = useState([
    { name: 'COMP 227 Students', url: 'https://discord.gg/85rgmTtxHm', id: 1 },
    { name: 'PySlackers', url: 'https://pythondev.slack.com', id: 2 },
    { name: 'Code Support', url: 'https://discord.gg/XQ9C3sY', id: 3 },
    { name: 'Front End Developers', url: 'https://discord.gg/XHsumw2C39', id: 4 }
  ])

  // ...
}
This saves you from having to manually input data into your application for testing out your new functionality.
2.10: The Communities, Step 5
If you have implemented your application in a single component, refactor it by extracting suitable parts into new components.
Maintain the application's state and all event handlers in the App root component.
It is sufficient to extract three components from the application. Good candidates for separate components are, for example, the search filter, the form for adding a group, a component that renders all communities, and a component that renders a single group's details.
The application's root component could look similar to this after the refactoring. The refactored root component below only renders titles and lets the extracted components take care of the rest.
const App = () => {
  // ...

  return (
    <div>
      <h2>Community Directory</h2>

      <Filter ... />

      <h3>Add a new</h3>

      <GroupForm
        ...
      />

      <h3>URLs</h3>

      <Groups ... />
    </div>
  )
}Pertinent:: You might run into problems in this exercise if you define your components "in the wrong place". Now would be a good time to rehearse the section do not define a component in another component from the last part.