e
Adding styles to React app
The appearance of our current Tasks application is quite modest. In exercise 0.2, the assignment was to go through Mozilla's CSS tutorial.
Let's take a look at how we can add styles to a React application. There are several different ways of doing this and we will take a look at the other methods later on. First, we will add CSS to our application the old-school way; in a single file without using a CSS preprocessor (although this is not entirely true as we will learn later on).
Let's add a new index.css file under the src directory and then add it to the application by importing it in the main.jsx file:
import './index.css'Let's add the following CSS rule to the index.css file:
h1 {
  color: chocolate;
}
Pertinent: when the content of the file index.css changes, React might not notice that automatically, so you may need to refresh the browser to see your changes!
CSS rules comprise of selectors and declarations.
The selector defines which elements the rule should be applied to.
The selector above is h1, which will match all of the h1 header tags in our application.
The declaration sets the color property to the value chocolate.
🍫? all this work is making me hungry! 😋
One CSS rule can contain an arbitrary number of declarations.
Let's modify the previous rule to make the text cursive, by defining the font style as italic:
h1 {
  color: chocolate;
  font-style: italic;}
FYI: Make sure you continue trying to type out the parts (instead of copying) and use Tab to help WebStorm autocomplete the syntax for you.
There are many ways of matching elements by using different types of CSS selectors.
If we wanted to target, let's say, each one of the tasks with our styles,
we could use the selector li, as all of the tasks are wrapped inside li tags:
const Task = ({ task, toggleImportance }) => {
  const label = task.important
    ? 'make not important'
    : 'make important'

  return (
    <li>
      {task.content}
      <button onClick={toggleImportance}>{label}</button>
    </li>
  )
}
Let's add the following rule at the end of our stylesheet (relying on my non-existent knowledge of color theory and design):
li {
  color: #f4b223;
  padding-top: 8px;
  font-size: 18px;
}
Using element types for defining CSS rules is slightly problematic.
If our application contained other li tags, the same style rule would also be applied to them.
If we want to apply our style specifically to tasks, then it is better to use class selectors.
In regular HTML, classes are defined as the value of the class attribute:
<li class="task">some text...</li>In React we have to use the className attribute instead of the class attribute.
With this in mind, let's make the following changes to our Task component:
const Task = ({ task, toggleImportance }) => {
  const label = task.important
    ? 'make not important'
    : 'make important'

  return (
    <li className='task'>      {task.content}
      <button onClick={toggleImportance}>{label}</button>
    </li>
  )
}
Class selectors are then defined instead with the .className syntax (replacing our li syntax):
.task {
  color: #f4b223;
  padding-top: 8px;
  font-size: 18px;
}
Notice this time that instead of a named color, I used a hex color value to specify a color in the RGB space.
If you now add other non-task li elements to the application, they will not be affected by the style rule above.
One final selector that we are going to use is called a pseudo-class selector, which is not an actual class, but something that is defined by most browsers. In our case, since we've been doing a lot websites with dark mode, we'll jump on the bandwagon and add this to index.css:
:root { color-scheme:dark; }
Once you save, you'll immediately notice that the entire page has inverted, including the colors for button controls and textboxes. You can apply this to any of the future assignments if you prefer all things dark.
Improved error message
We previously implemented the error message that was displayed when the user tried to toggle the importance of a deleted task with the alert method.
Let's implement the error message as its own React component, in components/Notification.jsx.
The component is quite simple:
const Notification = ({ message }) => {
  if (message === null) {
    return null
  }

  return (
    <div className="error">
      {message}
    </div>
  )
}

export default Notification
If the value of the message prop is null, then nothing is rendered to the screen,
and in other cases, the message gets rendered inside of a div element.
Let's add a new piece of state called errorMessage to the App component.
Let's initialize it with some error message so that we can immediately test our component:
import { useState, useEffect } from 'react'
import Task from './components/Task'
import taskService from './services/tasks'
import Notification from './components/Notification'
const App = () => {
  const [tasks, setTasks] = useState([])
  const [newTask, setNewTask] = useState('')
  const [showAll, setShowAll] = useState(true)
  const [errorMessage, setErrorMessage] = useState('some error happened...')
  // ...

  return (
    <div>
      <h1>Tasks</h1>
      <Notification message={errorMessage} />      <div>
        <button onClick={() => setShowAll(!showAll)}>
          show {showAll ? 'important' : 'all' }
        </button>
      </div>
      // ...
    </div>
  )
}
Then let's add a style rule that suits an error message:
.error {
  background-color: #9c2b2e;
  font-size: 22px;
  border-style: solid;
  border-width: 1px;
  border-radius: 5px;
  padding: 10px;
  margin-bottom: 10px;
}
By this point you should now be able to see a styled Error Message appear on the webpage with no errors in the console.
Once you can verify this, we can add the logic for displaying the error message.
Let's change the toggleImportanceOf function in the following way:
const toggleImportanceOf = id => {
const task = tasks.find(t => t.id === id)
const changedTask = { ...task, important: !task.important }
taskService
.update(id, changedTask).then(returnedTask => {
setTasks(tasks.map(task => task.id !== id ? task : returnedTask))
})
.catch(error => {
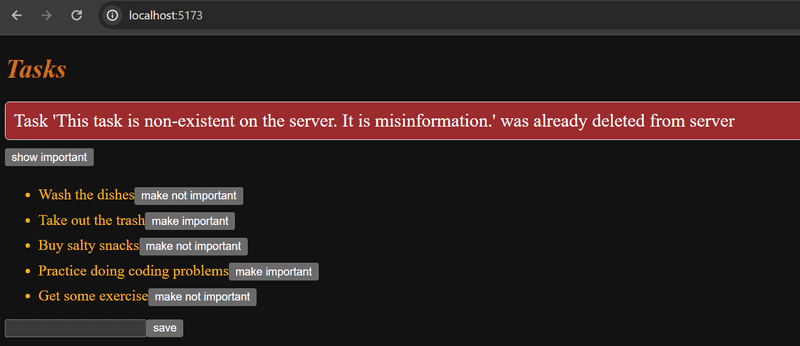
setErrorMessage( `Task '${task.content}' was already deleted from server` ) setTimeout(() => { setErrorMessage(null) }, 5000) setTasks(tasks.filter(t => t.id !== id))
})
}When the error occurs we add a descriptive error message to the errorMessage state.
At the same time, we start a timer, that will set the errorMessage state to null after five seconds.
The result looks like this:
The code for the current state of our application can be found in the part2-7 branch on GitHub.
Inline styles
React also makes it possible to write styles directly in the code as so-called inline styles.
The idea behind defining inline styles is extremely simple. Any React component or element can be provided with a set of CSS properties as a JavaScript object through the style attribute.
CSS rules follow a different format/case convention in JavaScript compared to normal CSS. Let's say that we wanted to give some element the color green and italic font. In CSS, it would look like this:
{
  color: green;
  font-style: italic;
}
But as a React inline-style object it would look like this:
{
  color: 'green',
  fontStyle: 'italic'
}
Every CSS property is defined as a separate property of the JavaScript object. Numeric values for pixels can be simply defined as integers. One of the major differences compared to regular CSS, is that hyphenated (kebab-case) CSS properties are written in camelCase.
Let's add a footer component, Footer, to our application and define inline styles for it.
The component is defined in the file components/Footer.jsx and used in the file App.jsx as follows:
const Footer = () => {
  const footerStyle = {
    marginTop: 30,
    paddingBottom: 15,
    color: 'orange',
    fontStyle: 'italic',
    fontSize: 16
  }

  return (
    <div style={footerStyle}>
      <p>
      Task app, Department of Computer Science, University of the Pacific
      </p>
    </div>
  )
}

export default Footer
import { useState, useEffect } from 'react'
import Footer from './components/Footer'import Task from './components/Task'
import Notification from './components/Notification'
import taskService from './services/tasks'
const App = () => {
// ...
return (
<div>
<h1>Tasks</h1>
<Notification message={errorMessage} />
// ...
<Footer /> </div>
)
}Inline styles come with certain limitations. For instance, so-called pseudo-classes can't be used straightforwardly.
Inline styles and some of the other ways of adding styles to React components go completely against the grain of old conventions. Traditionally, it has been considered best practice to entirely separate CSS from the content (HTML) and functionality (JavaScript). According to this older school of thought, the goal was to write CSS, HTML, and JavaScript into their separate files.
The philosophy of React is, in fact, the polar opposite of this. Since the separation of CSS, HTML, and JavaScript into separate files did not seem to scale well in larger applications, React bases the division of the application along the lines of its logical functional entities.
The structural units that make up the application's functional entities are React components. A React component defines the HTML for structuring the content, the JavaScript functions for determining functionality, and also the component's styling; all in one place. This is to create individual components that are as independent and reusable as possible.
The code of the final version of our application can be found in the part2-8 branch on GitHub.
Exercises 2.16-2.17
2.16: Communities, Step 11
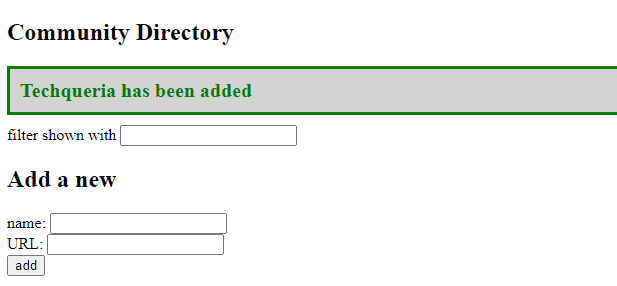
Use the improved error message example from part 2 as a guide to show a notification that lasts for a few seconds after a successful operation is executed (a group is added or a number is changed). In these examples, use the gray and green colors.
2.17*: Communities, Step 12
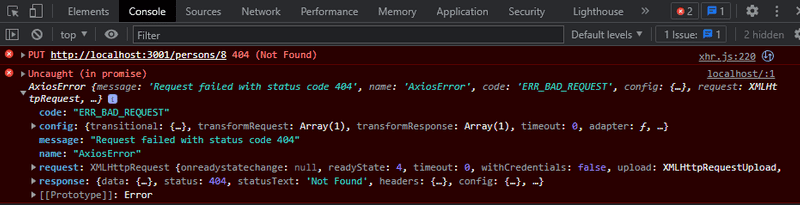
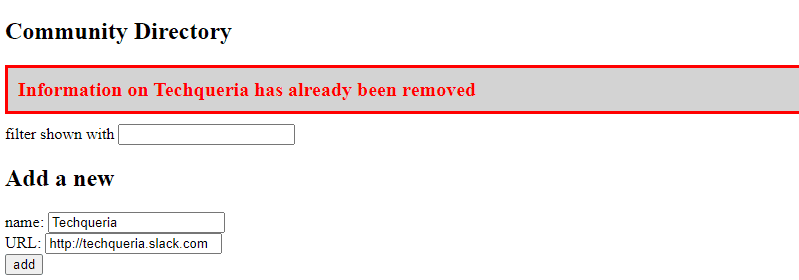
Open your application in two browsers. If you delete a group in browser A a short while before attempting to change the group's URL in browser B, you will get the following error message:
Fix the issue according to the example shown in promise and errors in part 2. Modify the example so that the user is shown a message when the operation does not succeed. The messages shown for successful and unsuccessful events should look different:
Notice that even if you handle the exception, the first 404 error message is still printed to the console. But you should not see
"Uncaught (in promise) Error".
Couple of important remarks
At the end of this part, there are a few more challenging exercises. At this stage, you can skip the exercises if they are too much of a headache, we will come back to the same themes again later. You should still read through this material below.
Know that we have done one thing in our app that is masking away a very typical source of errors:
We set the state tasks to have an initial value of an empty array.
const App = () => {
  const [tasks, setTasks] = useState([])

  // ...
}
This is a reasonable initial value for tasks since we will be storing multiple tasks in that state.
If the state *were only saving one thing*,
it would be better to initialize that state to null since it indicates that there is nothing initially.
Let's see what happens if we initialize our state to null:
const App = () => {
  const [tasks, setTasks] = useState(null)
  // ...
}
The app breaks down.
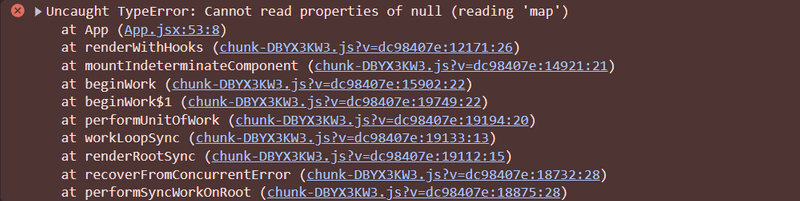
The error message gives the reason and location for the error. The code that caused the problems is the following:
  // tasksToShow gets the value of tasks
  const tasksToShow = showAll
    ? tasks
    : tasks.filter(task => task.important)

  // ...

  {tasksToShow.map(task =>    <Task key={task.id} task={task} />
  )}
The error message is
Cannot read properties of null (reading 'map')The variable tasksToShow is first assigned the value of the state tasks.
Then, the code tries to call the method map to a non-existing object, that is, to null.
What is the reason for that?
The effect hook uses the function setTasks to set the tasks that the backend is returning:
  useEffect(() => {
    taskService
      .getAll()
      .then(initialTasks => {
        setTasks(initialTasks)      })
  }, [])
However, the problem is that the effect is executed only after the first render.
And because tasks has the initial value of null:
const App = () => {
  const [tasks, setTasks] = useState(null)
  // ...
on the first render, the following code gets executed:
tasksToShow = tasks // has the value null

// ...

tasksToShow.map(task => ...) // uh-oh...
and this blows up the app since we can not call the method map on the value null.
When we initialize tasks to an empty array,
there is no error since we can call map on an empty array.
So, the initialization of the state masked the problem that is caused by the data not yet being fetched from the backend.
Another way to circumvent the problem is to use conditional rendering
and return null if the component state is not properly initialized:
const App = () => {
  const [tasks, setTasks] = useState(null)  // ...

  useEffect(() => {
    taskService
      .getAll()
      .then(initialTasks => {
        setTasks(initialTasks)
      })
  }, [])

  // do not render anything if tasks is still null
  if (!tasks) {     return null   }
  // ...
}
So on the first render, nothing is rendered.
When the tasks arrive from the backend,
the effect used the function setTasks to set the value of the state tasks.
This causes the component to be rendered again,
and at the second render, the tasks get rendered to the screen.
This conditional rendering is suitable in cases where it is impossible to define the state so that the initial rendering is possible.
The other thing that we still need to have a closer look at is useEffect's second parameter:
  useEffect(() => {
    taskService
      .getAll()
      .then(initialTasks => {
        setTasks(initialTasks)
      })
}, [])useEffect's second parameter specifies how often the effect is run.
The principle is that the effect is always executed after the first render of the component
and when the value of the second parameter changes.
If the second parameter is an empty array [], its content never changes
and the effect is only run after the first render of the component.
This is what we want when we initialize the app state from the server.
However, there are situations where we want to perform the effect at other times, e.g. when the state of the component changes in a particular way.
Consider the following simple application for querying currency exchange rates from the Exchange rate API:
import { useState, useEffect } from 'react'
import axios from 'axios'

const App = () => {
  const [value, setValue] = useState('')
  const [rates, setRates] = useState({})
  const [currency, setCurrency] = useState(null)

  useEffect(() => {
    console.log('effect run, currency is now', currency)

    // skip if currency is not defined
    if (currency) {
      console.log('fetching exchange rates...')
      axios
        .get(`https://open.er-api.com/v6/latest/${currency}`)
        .then(response => {
          setRates(response.data.rates)
        })
    }
  }, [currency])

  const handleChange = (event) => {
    setValue(event.target.value)
  }

  const onSearch = (event) => {
    event.preventDefault()
    setCurrency(value)
  }

  return (
    <div>
      <form onSubmit={onSearch}>
        currency: <input value={value} onChange={handleChange} />
        <button type="submit">exchange rate</button>
      </form>
      <pre>
        {JSON.stringify(rates, null, 2)}
      </pre>
    </div>
  )
}

export default App
The user interface of the application has a form, in the input field of which the name of the desired currency is written. If the currency exists, the application renders the exchange rates of the currency to other currencies:
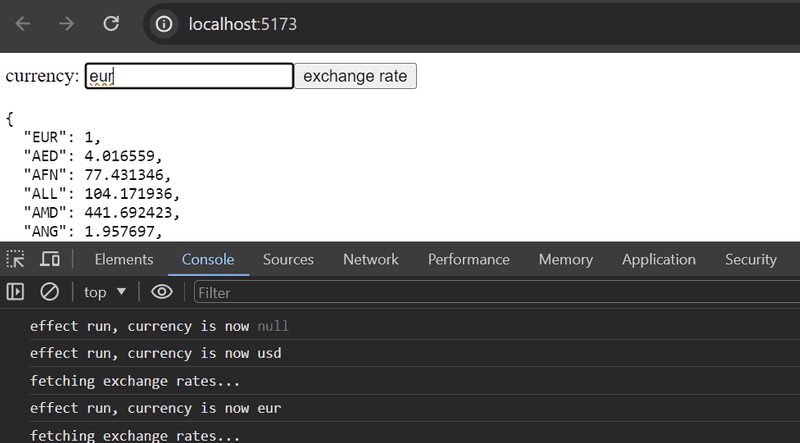
The application sets the name of the currency entered into the form to the state currency at the moment the button is pressed.
When the currency gets a new value, the application fetches its exchange rates from the API in the effect function:
const App = () => {
  // ...
  const [currency, setCurrency] = useState(null)

  useEffect(() => {
    console.log('effect run, currency is now', currency)

    // skip if currency is not defined
    if (currency) {
      console.log('fetching exchange rates...')
      axios
        .get(`https://open.er-api.com/v6/latest/${currency}`)
        .then(response => {
          setRates(response.data.rates)
        })
    }
  }, [currency])  // ...
}
The useEffect hook has now currency as the second parameter.
The effect function is therefore executed after the first render,
and always after the table as its second parameter currency changes.
That is, when the state currency gets a new value, the content of the table changes and the effect function is executed.
It is natural to choose null as the initial value for the variable currency, because currency represents a single item.
The initial value null indicates that there is nothing in the state yet, and it is also easy to check with an if statement whether a value has been assigned to the variable.
The effect has the following condition:
if (currency) {
  // get exchange rates
}
which prevents requesting the exchange rates just after the first render when the variable currency still has the initial value, i.e. a null value.
So if the user types eur in the search field,
the application uses Axios to perform an HTTP GET request to the address https://open.er-api.com/v6/latest/eur
and stores the response in the rates state.
When the user then enters another value in the search field, e.g. usd,
the effect function is executed again and the exchange rates of the new currency are requested form the API.
The way presented here for making API requests might seem a bit awkward.
This particular application could have been made without useEffect,
by making the API requests directly in the form's submit handler function:
  const onSearch = (event) => {
    event.preventDefault()
    axios
      .get(`https://open.er-api.com/v6/latest/${value}`)
      .then(response => {
        setRates(response.data.rates) // ☣️
      })
  }
However, there are situations where that technique would not work.
For example, you might encounter one such a situation in the exercise 2.20 where the use of useEffect could provide a solution.
Notice that this depends on the approach you selected.
Exercises 2.18-2.20
2.18*: Data for countries, Step 1
The API https://restcountries.com provides data for different countries in a machine-readable format, a so-called REST API.
Create an application, in which one can look at data from various countries. The application should probably get the data from the endpoint all.
NOTICE make sure again that you are careful to call vite in your base directory when you make your new application, which you can call countries.
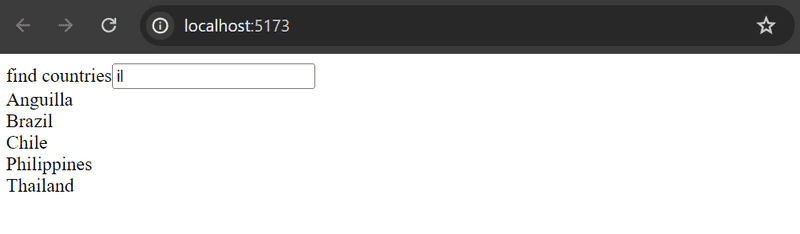
The user interface is very simple. The country to be shown is found by typing a search query into the search field.
If there are too many (over 10) countries that match the query, then the user is prompted to make their query more specific:

If there are ten or fewer countries, but more than one, then all countries matching the query are shown:
When there is only one country matching the query, then the basic data of the country (e.g. capital and area), its flag and the languages spoken are shown:

Pertinent: It is enough that your application works for most countries. Some countries, like Sudan, can be hard to support since the name of the country is part of the name of another country, South Sudan. You don't need to worry about these edge cases.
2.19*: Data for countries, Step 2
There is still a lot to do in this part, so don't get stuck on this exercise!
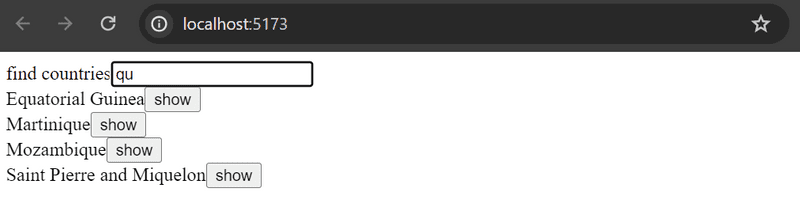
Improve on the application in the previous exercise, such that when the names of multiple countries are shown on the page there is a button next to the name of the country, which when pressed shows the view for that country:
In this exercise, it is also enough that your application works for most countries. Countries whose name appears in the name of another country, like Sudan, can be ignored.
2.20*: Data for countries, Step 3
There is still a lot to do in this part, so don't get stuck on this exercise!
Add to the view showing the data of a single country, the weather report for the capital of that country. There are dozens of providers for weather data. One suggested API is https://openweathermap.org. Notice that it might take some minutes until a generated API key is valid.

If you use Open weather map, here is the description for how to get weather icons.
Pertinent: In some browsers (such as Firefox) the chosen API might send an error response, which indicates that HTTPS encryption is not supported, although the request URL starts with
http://. This issue can be fixed by completing the exercise using Chrome.
You will need an api-key to use almost every weather service. Do not save the api-key to source control! Nor hardcode the api-key to your source code. Instead use an environment variable to save keys. In real-life applications, it's considered insecure sending these keys directly from the browser, as anyone who can open the dev console would be able to intercept your keys! We will focus on implementing a separate backend in the next part of the course.
Assuming the api-key is t0p53cr3t4p1k3yv4lu3, when the application is started like so:
export VITE_SOME_KEY=t0p53cr3t4p1k3yv4lu3 && npm run dev // For Linux/macOS Bash
($env:VITE_SOME_KEY="t0p53cr3t4p1k3yv4lu3") -and (npm run dev) // For Windows PowerShell
set "VITE_SOME_KEY=t0p53cr3t4p1k3yv4lu3" && npm run dev // For Windows cmd.exe
you can access the value of the key from the import.meta.env object:
const api_key = import.meta.env.VITE_SOME_KEY
// variable api_key has now the value set in startup
The other alternative is to delete the .env file that we had mentioned before and then make sure that you have added .env file in your .gitignore.
To completely remove the .env file from being re-added or tracked by github, run these commands from terminal in the directory where your .env file is.
git rm --cached .env
git commit -m "Removed .env from the repo"
echo ".env" >> .gitignore
git add .gitignore
git commit -m "added .env to gitignore"
You can see how this process looks by looking at the commit history of the part2-8 branch, which now has the .env file removed from the latest snapshot of the repo and git will no longer track any changes to the file.
Pertinent: The .env file can still be seen in older commits, so make sure you do not add the any keys before ignoring the file first!
Now you can use the .env file rather than defining it on the command line each time by adding the following to it.
# .env

REACT_APP_API_KEY=t0p53cr3t4p1k3yv4lu3
Either way, you will need to restart the server to apply the changes.
FYI: To prevent accidentally leaking environment variables to the client, only variables prefixed with
VITE_are exposed to Vite.