c
User administration
We now want to add user authentication and authorization to our application. This means we will:
- Store users in a database
- Link every task to the user who created it.
- Ensure that only the user who created a task can edit or delete it.
Before we begin the implementation, let's consider conceptually how a use will relate to a task. You may have noticed there is a one-to-many relationship between the user (User) and tasks (Task):
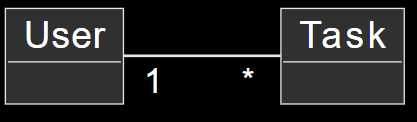
If we were working with a relational database the implementation between User and Task would be straightforward. Both resources would have their separate database tables, and the id of the User who created a Task would be stored in the tasks table as a foreign key.
However, with document databases there are many different ways of modeling the situation.
The existing solution saves every task in the tasks collection in the database. If we do not want to change this existing collection, then the natural choice is to save users in their own collection, users for example.
Like with all document databases, we can use object IDs in Mongo to reference documents in other collections. This is similar to using foreign keys in relational databases.
Traditionally document databases like Mongo do not support join queries that are available in relational databases, used for aggregating data from multiple tables.
FYI: However, starting from version 3.2. Mongo has supported lookup aggregation queries*.
*We will not study lookup aggretation queries in this course.
If we need functionality similar to join queries, we will implement it in our application code by making multiple queries. In certain situations, Mongoose can take care of joining and aggregating data, which gives the appearance of a join query. However, even in these situations, Mongoose makes multiple queries to the database in the background.
References across collections
If we were using a relational database, the task would contain a reference key to the user who created it. In document databases, we can do the same thing.
Let's assume that the users collection contains two users:
[
  {
    username: "powercat",
    _id: 123456,
  },
  {
    username: "randy",
    _id: 141414,
  },
]
The tasks collection contains three tasks that all have a user field that references a user in the users collection:
[
  {
    content: "Wash the dishes",
    important: false,
    _id: 221212,
    user: 123456,
  },
  {
    content: "Attend university events",
    important: true,
    _id: 221255,
    user: 123456,
  },
  {
    content: "Work on personal React project",
    important: false,
    _id: 221244,
    user: 141414,
  },
]
Document databases do not demand the foreign key to be stored in the task resources, it could also be stored in the users collection, or even both:
[
  {
    username: "powercat",
    _id: 123456,
    tasks: [221212, 221255],
  },
  {
    username: "randy",
    _id: 141414,
    tasks: [221244],
  },
]
Since users can have many tasks, the related IDs are stored in an array in the tasks field.
Document databases also offer a radically different way of organizing the data: In some situations,
it might be beneficial to nest the entire tasks array as a part of the documents in the users collection:
[
  {
    username: "powercat",
    _id: 123456,
    tasks: [
      {
        content: "Wash the dishes",
        important: false,
      },
      {
        content: "Attend university events",
        important: true,
      },
    ],
  },
  {
    username: "randy",
    _id: 141414,
    tasks: [
      {
        content:
          "Work on personal React project",
        important: false,
      },
    ],
  },
]
In this schema, tasks would be tightly nested under users and the database would not generate IDs for them.
The structure and schema of the database are not as self-evident as it was with relational databases. The chosen schema must support the use cases of the application the best. This is not a simple design decision to make, as all use cases of the applications are not known when the design decision is made.
Paradoxically, schema-less databases like Mongo require developers to make far more radical design decisions about data organization at the beginning of the project than relational databases with schemas. On average, relational databases offer a more or less suitable way of organizing data for many applications.
Mongoose schema for users
In this case, we have decided to store the IDs of the tasks created by the user in the user document.
Let's define the model for representing a User in the models/user.js file:
const mongoose = require("mongoose");

const userSchema = new mongoose.Schema({
  username: String,
  name: String,
  passwordHash: String,
  tasks: [    {      type: mongoose.Schema.Types.ObjectId,      ref: "Task"    }  ],});

userSchema.set("toJSON", {
  transform: (document, returnedObject) => {
    returnedObject.id = returnedObject._id.toString();
    delete returnedObject._id;
    delete returnedObject.__v;
    // the passwordHash should not be revealed
    delete returnedObject.passwordHash;
  }
});

const User = mongoose.model("User", userSchema);

module.exports = User;
The highlighted text above helps us conceptualize that the IDs of the tasks are stored within the user document as an array of Mongo IDs.
The field type is ObjectId, meaning it refers to another document.
The ref field specifies the name of the model being referenced.
Mongo does not inherently know that this is a field that references tasks, the syntax is purely related to and defined by Mongoose.
Let's expand the schema of the task defined in the models/task.js file so that the task contains information about the user who created it:
const taskSchema = new mongoose.Schema({
  content: {
    type: String,
    required: true,
    minlength: 5
  },
  date: {
    type: Date,
    required: true,
  },
  important: Boolean,
  user: {    type: mongoose.Schema.Types.ObjectId,    ref: "User"  }});
In stark contrast to the conventions of relational databases, references are now stored in both documents:
- the
taskreferences theuserwho created it - the
userhas an array of references to all of thetaskscreated by them.
Creating users
Let's implement a route for creating new users.
Users have a unique username, a name and something called a passwordHash.
The password hash is the output of a
one-way hash function
applied to the user's password.
It is never wise to store unencrypted plain text passwords in the database!
Let's install the bcrypt package for generating the password hashes:
npm i bcryptCreating new users happens in compliance with the RESTful conventions discussed in part 3, by making an HTTP POST request to the users path.
Let's first add this new router handler in our application via the app.js file, so that it handles requests made to the /api/users URL:
// ...
const tasksRouter = require('./controllers/tasks')
const usersRouter = require("./controllers/users");
// ...

app.use('/api/tasks', tasksRouter)
app.use("/api/users", usersRouter);
The contents of the file, (controllers/users.js), that defines the router is as follows:
const bcrypt = require("bcrypt");
const usersRouter = require("express").Router();
const User = require("../models/user");

usersRouter.post("/", async (request, response) => {
  const { username, name, password } = request.body;

  const saltRounds = 10;
  const passwordHash = await bcrypt.hash(password, saltRounds);

  const user = new User({
    username,
    name,
    passwordHash,
  });

  const savedUser = await user.save();

  response.status(201).json(savedUser);
});

module.exports = usersRouter;
We store the hash of the password that is generated with the bcrypt.hash function.
The password sent in the request is not stored in the database.
The fundamentals of storing passwords are outside the scope of this course material.
For example, we will not discuss what assigning the magic number 10 to saltRounds does,
but you can read more about it in the linked material.
Our current code does not contain any error handling or input validation for verifying that the username and password are in the desired format.
The new feature can and should initially be tested manually with a tool like WebStorm's REST Client or Postman. However, testing things manually will quickly become too cumbersome, especially once we implement functionality that enforces usernames to be unique.
It takes much less effort to write automated tests, and it will make the development of our application much easier.
Our initial tests for a user could be put into a separate file tests/user_api.test.js and look like this:
const bcrypt = require("bcrypt");
const User = require("../models/user");
const helper = require("./test_helper");
const app = require("../app");
const supertest = require("supertest");
const api = supertest(app);

describe("when there is initially one user in db", () => {
  beforeEach(async () => {
    await User.deleteMany({});

    const passwordHash = await bcrypt.hash("secreto", 10);
    const user = new User({ username: "root", passwordHash });

    await user.save();
  });

  test("creation succeeds with a fresh username", async () => {
    const usersAtStart = await helper.usersInDb();

    const newUser = {
      username: "powercat",
      name: "Tommy Tiger Jr.",
      password: "pacificrox",
    }

    await api
      .post("/api/users")
      .send(newUser)
      .expect(201)
      .expect("Content-Type", /application\/json/);

    const usersAtEnd = await helper.usersInDb();
    assert.strictEqual(usersAtEnd.length, usersAtStart.length + 1)

    const usernames = usersAtEnd.map(u => u.username);
    assert(usernames.includes(newUser.username))
  });
});


afterAll(async () => {
  await mongoose.connection.close();
});
The tests use the usersInDb() helper function that we will implement in the tests/test_helper.js file.
The function is used to help us verify the state of the database after a user is created:
const User = require("../models/user");

// ...

const usersInDb = async () => {
  const users = await User.find({});
  return users.map(u => u.toJSON());
};

module.exports = {
  // ...
  usersInDb,
};
The beforeEach block adds a user with the username root to the database.
We can write a new test in user_api.test.js that verifies that a new user with the same username can not be created:
describe("when there is initially one user in db", () => {
  // ...

  test("creation fails with proper status code and message if username already taken", async () => {
    const usersAtStart = await helper.usersInDb();

    const newUser = {
      username: "root",
      name: "Superuser",
      password: "tigers",
    };

    const result = await api
      .post("/api/users")
      .send(newUser)
      .expect(400)
      .expect("Content-Type", /application\/json/);

    const usersAtEnd = await helper.usersInDb();
    assert(result.body.error.includes('expected `username` to be unique'))
    assert.strictEqual(usersAtEnd.length, usersAtStart.length)
  })
})
The test case obviously will not pass at this point. We are essentially practicing Test-Driven Development (TDD), where tests for new functionality are written before the functionality is implemented.
Mongoose validations do not provide a direct way to check the uniqueness of a field value. However, it is possible to achieve uniqueness by defining a uniqueness index for a field. The definition is done as follows:
const mongoose = require('mongoose')

const userSchema = mongoose.Schema({
  username: {    type: String,    required: true,    unique: true // this ensures the uniqueness of username  },  name: String,
  passwordHash: String,
  tasks: [
    {
      type: mongoose.Schema.Types.ObjectId,
      ref: "Task"
    }
  ],
});

// ...
However, we want to be careful when using the uniqueness index.
If there are already documents in the database that violate the uniqueness condition,
no index will be created.
So when adding a uniqueness index, make sure that the database is in a healthy state!
The test above added the user with username root to the database twice,
and these must be removed for the index to be formed and the code to work.
Mongoose validations do not detect the index violation, and instead of ValidationError they return an error of type MongoServerError.
We therefore need to extend the error handler for that case:
const errorHandler = (error, request, response, next) => {
  if (error.name === 'CastError') {
    return response.status(400).send({ error: 'malformatted id' })
  } else if (error.name === 'ValidationError') {
    return response.status(400).json({ error: error.message })
  } else if (error.name === 'MongoServerError' && error.message.includes('E11000 duplicate key error')) {    return response.status(400).json({ error: 'expected `username` to be unique' })  }
  next(error)
}
After these changes, the tests will pass.
FYI: We could also implement other validations into the user creation. We could check that the:
- username is long enough
- username only consists of permitted characters
- password is strong enough
Implementing these functionalities is left as an optional exercise.
Before we continue, let's add an initial implementation of a route handler in controllers/users.js that returns all of the users in the database:
usersRouter.get("/", async (request, response) => {
  const users = await User.find({});
  response.json(users);
});
In addition to unit tests, we also want to verify this works with users we have made.
For making new users in a production or development environment,
you may send a POST request to /api/users/ via Postman or REST Client in the following format:
{
"username": "root",
"name": "Superuser",
"password": "tigers"
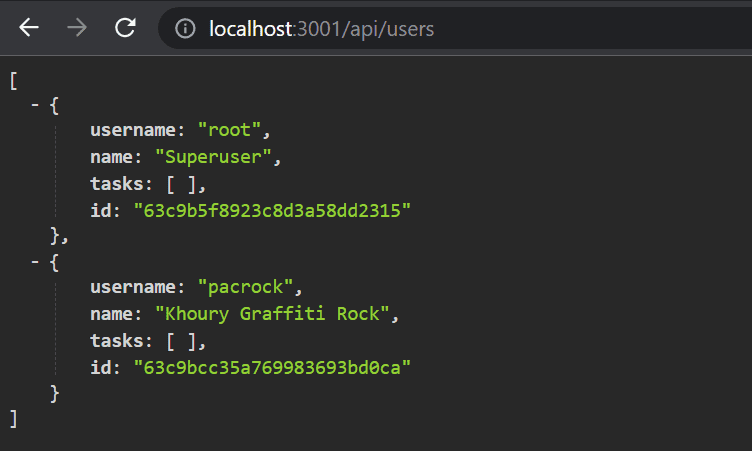
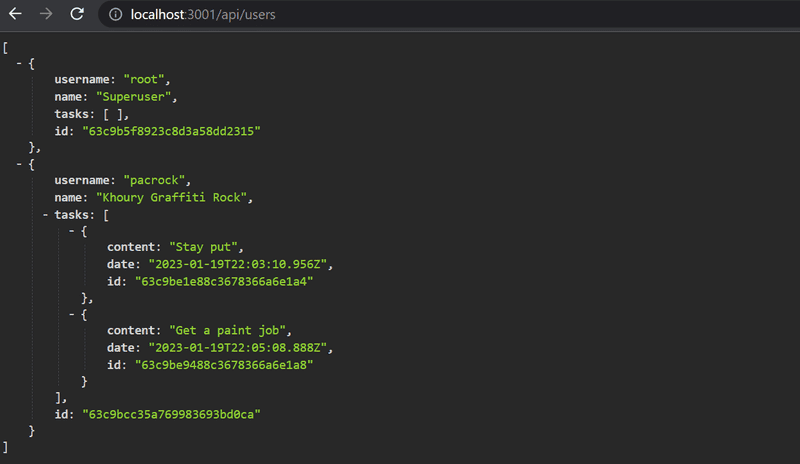
}I ended up adding this other user as well.
{
    "username": "pacrock",
    "name": "Khoury Graffiti Rock",
    "password": "ilikepaint"
}
After adding those users, the list looks like this:
You can find the code for our current application in its entirety in the part4-7 branch of this GitHub repository.
Creating a new task
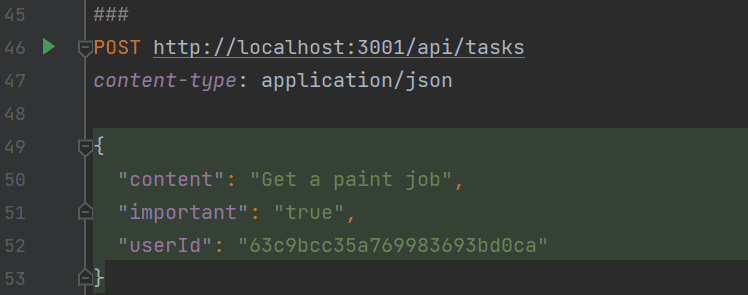
The code for creating a new task has to be updated so that the task is assigned to the user who created it.
Let's expand our current implementation in controllers/tasks.js so that the information about the user who created a task is sent in the userId field of the request body:
const tasksRouter = require('express').Router()
const Task = require('../models/task')
const User = require("../models/user");
//...

tasksRouter.post("/", async (request, response) => {
  const body = request.body;

  const user = await User.findById(body.userId);
  if (!user) {    return response.status(400).json({ error: 'userId missing or not valid' })  }
  const task = new Task({
    content: body.content,
    important: body.important || false,
    date: new Date(),
    user: user._id  })

  const savedTask = await task.save()
  user.tasks = user.tasks.concat(savedTask._id)  await user.save()
  response.status(201).json(savedTask)
})
The database is first queried for a user using the userId provided in the request.
If the user is not found, the response is sent with a status code of 400 (Bad Request) and an error message: userId missing or not valid.
It's worth noting that the user object also changes.
The id of the task is stored in the tasks field of the user object:
const user = await User.findById(body.userId);

// ...

user.tasks = user.tasks.concat(savedTask._id);
await user.save();
Let's try to create a new task
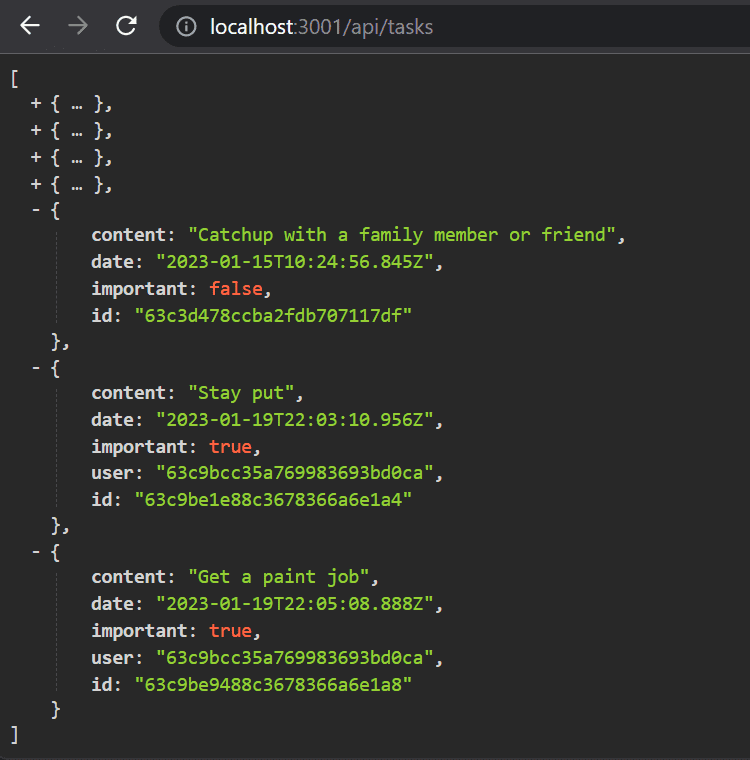
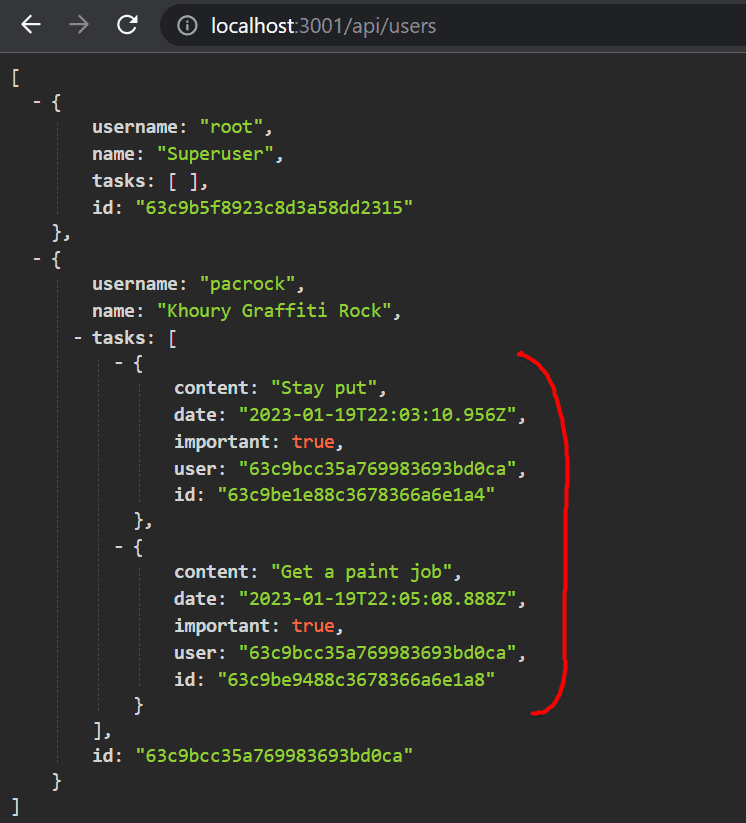
The operation appears to work. Let's add one more task and then visit the route for fetching all users:
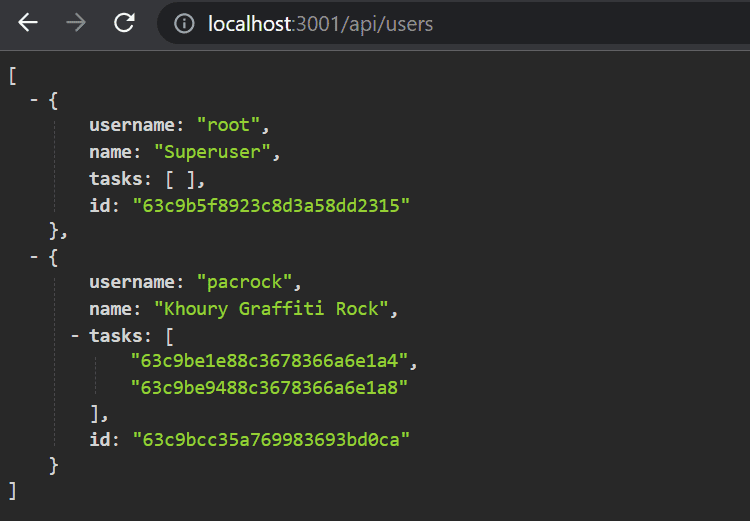
We can see that the user has two tasks.
Likewise, the IDs of the users who created the tasks can be seen when we visit the route for fetching all tasks:
Due to the changes we made, the tests no longer pass, but we leave fixing the tests as an optional exercise. The changes we made have also not been accounted for in the frontend, so the task creation functionality no longer works. We will fix the frontend in part 5 of the course.
Populate
We would like our API to work in such a way, that when an HTTP GET request is made to the /api/users route,
the user's objects would also contain the contents of the user's tasks and not just their id.
In a relational database, this functionality would be implemented with a join query.
As previously mentioned, document databases do not properly support join queries between collections, but the Mongoose library can do some of these joins for us. Mongoose accomplishes the join by doing multiple queries, which is different from join queries in relational databases which are transactional, meaning that the state of the database does not change during the time that the query is made. With join queries in Mongoose, nothing can guarantee that the state between the collections being joined is consistent, meaning that if we make a query that joins the user and tasks collections, the state of the collections may change during the query.
The Mongoose join is done with the populate method.
Let's update the route that returns all users first in controllers/users.js:
usersRouter.get("/", async (request, response) => {
  const users = await User
    .find({})    .populate("tasks");
  response.json(users);
});
We chain populate after the find method making the initial query.
The argument given to populate (i.e. tasks) will take task IDs from that array in the user document
and replace each ID with the referenced task documents.
Mongoose first queries the users collection for the list of users,
and then queries the collection corresponding to the model object specified by the ref property in the users schema for data with the given object id.
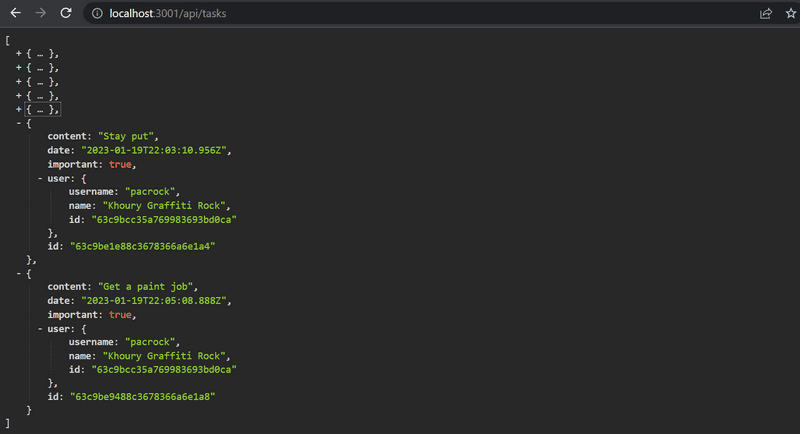
The result is almost exactly what we wanted:
We can use the populate method for choosing the fields we want to include from the documents.
In addition to the field id, we are now only interested in content and important.
The selection of fields is done with the Mongo syntax:
usersRouter.get("/", async (request, response) => {
  const users = await User
    .find({})
    .populate("tasks", { content: 1, important: 1 });
  response.json(users);
});
The result is now exactly like we want it to be:
Let's also add a suitable population of user information to tasks in controllers/tasks.js:
tasksRouter.get("/", async (request, response) => {
  const tasks = await Task
    .find({})
    .populate("user", { username: 1, name: 1 });

  response.json(tasks);
});
Now the user's information is added to the user field of task objects.
It's important to understand that the database does not know that the ids stored in the user field of tasks reference documents in the user collection.
The functionality of populate in Mongoose is based on how we defined types to the references in the Mongoose schema with the ref option:
const taskSchema = new mongoose.Schema({
  content: {
    type: String,
    required: true,
    minlength: 5
  },
  date: {
        type: Date,
        required: true,
  },
  important: Boolean,
  user: {
    type: mongoose.Schema.Types.ObjectId,
    ref: "User"  }
});
You can find the code for our current application in its entirety in the part4-8 branch of this GitHub repository.