b
Testing the backend
We will now start writing tests for the backend.
Since the backend does not contain any complicated logic, it doesn't make sense to write unit tests for it.
The only potential thing we could unit test is the toJSON method that is used for formatting tasks.
In some situations, it can be beneficial to implement some of the backend tests by mocking the database instead of using a real database. One library that could be used for this is mongodb-memory-server.
Since our application's backend is still relatively simple, we will decide to test the entire application through its REST API, so that it also tests the database at the same time. This kind of testing where multiple components are combined and tested as a unit is called integration testing.
Specifying Application modes
Your backend can have a variety of modes that it can be in. For example, we mentioned that when your backend server is running in Render, it is in production mode.
The convention in Node is to define the execution mode of the application with the NODE_ENV environment variable.
In using Render, we were lucky enough that we were able to use the same .env file that we had in our development environment.
Other services only allow you to set variables manually through their site,
which means that the environment variables defined in the .env file would *only be loaded if the application is in production mode*.
Because of tiny nuances like this, it is common practice to define separate modes for development and testing.
To do that, let's change the scripts in our package.json to include which mode we are in. For example when tests are run, NODE_ENV gets the value test:
{
  //...
  "scripts": {
    "start": "NODE_ENV=production node index.js",    "dev": "NODE_ENV=development node --watch index.js",    "test": "NODE_ENV=test node --test",    "build:ui": "rm -rf dist && cd ../reading/ && npm run build && cp -r dist ../backend-reading",
    "deploy": "npm run build:ui && git add . && git commit -m npm_generated_rebuild_of_the_UI && git push",
    "lint": "eslint .",
    "lint:fix": "npm run lint -- --fix"
  },
  //...
}
We specified the application mode (NODE_ENV) as:
- development in the
npm run devscript. - production in the default
npm startcommand.
Windows Users: There is a slight issue in how we have set up the application mode in our scripts: it will not work on Windows 😔. We can correct this by installing the cross-env package:
npm i -D cross-envWe can then achieve cross-platform compatibility by using the cross-env library in our npm scripts defined in package.json:
{ // ... "scripts": { "start": "cross-env NODE_ENV=production node index.js", "dev": "cross-env NODE_ENV=development node --watch index.js", "test": "cross-env NODE_ENV=test node --test", // ... }, // ... }Remember:: If you are deploying this application to a cloud service, keep in mind that if cross-env is saved as a development dependency, it may cause an application error on your web server. To fix this, change cross-env to a production dependency by running this in the command line:
npm i -P cross-env
Leveraging Application Modes in Code
Now we can modify the way that our application runs in different modes. As an example of this, we could define the application to use a separate test database when it is running tests.
We can create our separate test database in MongoDB Atlas. This is not an optimal solution in situations where many people are developing the same application. Test execution in particular typically requires a single database instance that is not used by tests that are running concurrently.
It would be better to run our tests using a database that is installed and running on the developer's local machine. The optimal solution would be to have every test execution use a separate database. This is "relatively simple" to achieve by running Mongo in-memory or by using Docker containers. Nonetheless, to reduce complexity at this point we will instead continue to use the MongoDB Atlas database.
Let's make some changes to the module that defines the application's configuration in utils/config.js:
require('dotenv').config();

const PORT = process.env.PORT;

const MONGODB_URI = process.env.NODE_ENV === "test"  ? process.env.TEST_MONGODB_URI  : process.env.MONGODB_URI;
module.exports = {
  MONGODB_URI,
  PORT
};
The .env file has separate variables for the database addresses of the development and test databases:
MONGODB_URI=mongodb+srv://comp227:<password>@cluster0.gb6u3el.mongodb.net/taskApp?retryWrites=true&w=majority&appName=Cluster0
PORT=3001

TEST_MONGODB_URI=mongodb+srv://comp227:<password>@cluster0.gb6u3el.mongodb.net/testTaskApp?retryWrites=true&w=majority&appName=Cluster0
The config module that we have implemented slightly resembles the node-config package. Writing our implementation is justified since our application is simple, and also because it teaches us valuable lessons.
These are the only changes we need to make to our application's code.
You can find the code for our current application in its entirety in the part4-2 branch of this GitHub repository.
supertest
Let's use the supertest package to help us write our tests for testing the API.
We will install the package as a development dependency:
npm i -D supertestLet's write our first test in the tests/task_api.test.js file:
const { test, after } = require('node:test')
const mongoose = require("mongoose");
const supertest = require("supertest");
const app = require("../app");

const api = supertest(app);

test("tasks are returned as json", async () => {
  await api
    .get("/api/tasks")
    .expect(200)
    .expect("Content-Type", /application\/json/);
});

after(async () => {
  await mongoose.connection.close();
});
The test imports the Express application from the app.js module and wraps it with the supertest function
into a so-called superagent object.
This object is assigned to the api variable and tests can use it for making HTTP requests to the backend.
Our test makes an HTTP GET request to the api/tasks URL and verifies that the request is responded to with the status code 200.
The test also verifies that the Content-Type header is set to application/json, indicating that the data is in the desired format.
Checking the value of the header uses a bit strange looking syntax:
.expect("Content-Type", /application\/json/);The desired value is now defined as a regular expression or in short regex.
The regex starts and ends with a slash /, and because the desired string application/json also contains the same slash,
it is preceded by a \ so that it is not interpreted as a regex termination character.
In principle, the test could also have been defined as a string
.expect("Content-Type", "application/json");The problem here, however, is that when using a string, the value of the header must be exactly the same.
For the regex we defined, it is acceptable that the header contains the string in question.
The actual value of the header is application/json; charset=utf-8, i.e. it also contains information about character encoding.
However, our test is not interested in this and therefore it is better to define the test as a regex instead of an exact string.
FYI: If you're not familiar with the RegEx syntax of
/application\/json/, you can learn more via Mozilla's documentation. I would strongly encourage you all to practice working more with regular expressions! If you're just plain rusty with regex and need practice, then there many sites that can help you test your regex as well, like regex101.
The test contains some details that we will explore a bit later on.
The arrow function that defines the test is preceded by the async keyword
and the method call for the api object is preceded by the await keyword.
We will write a few tests and then take a closer look at async/await.
Do not concern yourself with them for now, just be assured that the example tests work correctly.
The async/await syntax is related to the fact that making a request to the API is an asynchronous operation.
This syntax can be used for writing asynchronous code with the appearance of synchronous code.
Once all the tests (there is currently only one) have finished running, we have to close the database connection used by Mongoose.
This can be achieved with the after method:
after(async () => {
  await mongoose.connection.close();
});
Dealing with some supertest warnings
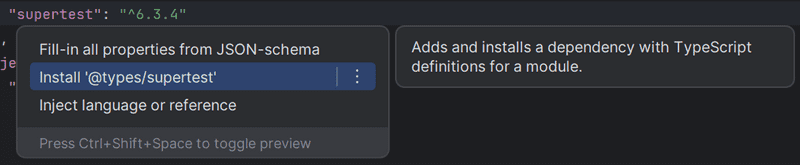
At this point, you may end up noticing that WebStorm will flag some false positive warnings in your code. Particularly you may see an error like this:

Your code still runs, but we want to prevent as many of these false positives from causing us to lose confidence in WebStorm's excellent warning system.
So to remove this, I'll show you how to do this from WebStorm.
Open package.json and locate the supertest dependency.
Then either right-click (or use your keyboard shortcut) to open up the context actions and select install @types/supertest option and you should be set.
For many of the libraries, we'll be able to download those types to have more information that WebStorm can provide us,
and I think it's prudent to install as many as they allow as devDependencies.
Pertinent: at the beginning of this part we extracted the Express application into the app.js file, and the role of the index.js file was changed to launch the application at the specified port via
app.listen:const app = require("./app"); // the actual Express app const config = require('./utils/config') const logger = require('./utils/logger') // ... app.listen(config.PORT, () => { logger.info(`Server running on port ${config.PORT}`); });The tests only use the express application defined in the app.js file, which doesn't listen to any ports.
const mongoose = require("mongoose");
const supertest = require("supertest");
const app = require("../app");
const api = supertest(app);
// ...
The documentation for supertest says the following:
if the server is not already listening for connections then it is bound to an ephemeral port for you so there is no need to keep track of ports.
In other words, supertest makes sure that the application being tested is started at the port that it uses internally. This is one of the reasons why we are going with supertest instead of something like axios, as we do not need to run another instance of the server separately before beginning to test. The other reason is that supertest provides functions like
expect(), which makes testing easier.
Let's write a few more tests:
const assert = require('node:assert')
// ...

test("there are two tasks", async () => {
  const response = await api.get("/api/tasks");
  assert.strictEqual(response.body.length, 2)
});

test("a specific task is within the returned tasks", async () => {
  const response = await api.get("/api/tasks");
  const contents = response.body.map(e => e.content)
  assert.strictEqual(contents.includes("Wash the dishes"), true)
});
Both tests store the response of the request in the response variable,
and unlike the previous test that used the methods provided by supertest for verifying the status code and headers,
this time we are inspecting the response data stored in response.body property.
Our tests verify the format and content of the response data with the
strictEqual method of the assert-library.
We could simplify the second test a bit,
and use the assert itself to verify that the task is among the returned ones:
test('a specific task is within the returned tasks', async () => {
  const response = await api.get('/api/tasks')

  const contents = response.body.map(e => e.content)
  assert(contents.includes("Wash the dishes"))
})
The benefit of using the async/await syntax is starting to become evident.
Normally we would have to use callback functions to access the data returned by promises, but with the new syntax things are a lot more comfortable:
const response = await api.get("/api/tasks");
// execution gets here only after the HTTP request is complete
// the result of HTTP request is saved in variable response
assert.strictEqual(response.body.length, 2)
The middleware that outputs information about the HTTP requests is obstructing the test execution output. Let us modify utils/logger.js so that it does not print to the console in test mode:
const info = (...params) => {
  if (process.env.NODE_ENV !== "test") {     console.log(...params);  }};

const error = (...params) => {
  if (process.env.NODE_ENV !== "test") {     console.error(...params);  }};

module.exports = {
  info, error
};
Initializing the database before tests
Currently, our tests have an issue where their success depends on the state of the database.
The tests pass if the test database happens to contain two tasks, one of which has the content "Wash the dishes".
To make our tests more robust, we have to reset the database and generate the needed test data in a controlled manner before we run the tests.
Our tests are already using the after function
to close the connection to the database after the tests are finished executing.
The library node:test offers many other functions
that can be used for executing operations once before any test is run or every time before a test is run.
In task_api.test.js, let's initialize the database before every test with the beforeEach function:
const assert = require('node:assert')
const { test, after, beforeEach } = require('node:test')const mongoose = require('mongoose')
const supertest = require('supertest')
const app = require('../app')
const Task = require('../models/task')
const api = supertest(app)

const initialTasks = [  {    content: "Wash the dishes",    date: new Date(),    important: false,  },  {    content: "Take out the trash",    date: new Date(),    important: true,  },];
beforeEach(async () => {  await Task.deleteMany({});  let taskObject = new Task(initialTasks[0]);  await taskObject.save();  taskObject = new Task(initialTasks[1]);  await taskObject.save();});
// ...
The database is cleared out at the beginning, and after that, we save the two tasks stored in the initialTasks array to the database.
By doing this, we ensure that the database is in the same state before every test is run.
Let's modify the test that checks the number of tasks as follows:
test("all tasks are returned", async () => {  const response = await api.get("/api/tasks");
  assert.strictEqual(response.body.length, initialTasks.length)})

// ...
Running tests one by one
The npm test command executes all of the tests for the application.
When we are writing tests, it is usually wise to only execute one or two tests.
There are a few different ways of accomplishing this, one of which is the only method.
With this method, we can define in the code what tests should be executed:
test.only('tasks are returned as json', async () => {
  await api
    .get('/api/tasks')
    .expect(200)
    .expect('Content-Type', /application\/json/)
})

test.only('all tasks are returned', async () => {
  const response = await api.get('/api/tasks')

  assert.strictEqual(response.body.length, 2)
})
When tests are run with option --test-only, that is, with the command:
npm test -- --test-onlyThe functions marked as test.only are the ones npm executes.
The danger of only is that one forgets to remove those from the code.
A better option is to specify the tests that need to be run as parameters of the npm test command.
The following command only runs the tests found in the tests/task_api.test.js file:
npm test -- tests/task_api.test.jsThe --tests-by-name-pattern option can be used for running tests with a specific name:
npm test -- --test-name-pattern="a specific task is within the returned tasks"The provided argument can refer to the name of the test or the describe block.
The parameter can also contain just a part of the name.
The following command will run all of the tests that contain tasks in their name:
npm run test -- --test-name-pattern="tasks"async/await
Before we write more tests let's take a look at the async and await keywords.
The async/await syntax that was introduced in ES7 makes it possible to use asynchronous functions that return a promise in a way that makes the code look synchronous.
As an example, the fetching of tasks from the database with promises looks like this:
Task.find({}).then(tasks => {
  console.log("operation returned the following tasks", tasks);
});
The Task.find() method returns a promise and we can access the result of the operation by registering a callback function with the then method.
All of the code we want to execute once the operation finishes is written in the callback function. If we wanted to make several asynchronous function calls in sequence, the situation would soon become painful. The asynchronous calls would have to be made in the callback. This would likely lead to complicated code and could potentially give birth to a so-called callback hell.
By chaining promises we could keep the situation somewhat under control,
and avoid callback hell by creating a fairly clean chain of then method calls.
We have seen a few of these during the course.
To illustrate this, you can view an artificial example of a function that fetches all tasks and then deletes the first one:
Task.find({})
  .then(tasks => {
    return tasks[0].deleteOne();
  })
  .then(response => {
    console.log("the 1st task is removed");
    // more code here
  });
The then chain is alright, but we can do better.
The generator functions
introduced in ES6 provided a clever way
of writing asynchronous code in a way that "looks synchronous".
The syntax is a bit clunky and not widely used.
The async and await keywords introduced in ES7 bring the same functionality as the generators,
but in an understandable and syntactically cleaner way to the hands of all citizens of the JavaScript world.
We could fetch all of the tasks in the database by utilizing the await operator like this:
const tasks = await Task.find({});
console.log("operation returned the following tasks", tasks);
The code looks exactly like synchronous code.
The execution of code pauses at const tasks = await Task.find({}) and waits until the related promise is fulfilled, and then continues its execution to the next line.
When the execution continues, the result of the operation that returned a promise is assigned to the tasks variable.
The slightly complicated example presented above could be implemented by using await like this:
const tasks = await Task.find({});
const response = await tasks[0].deleteOne();

console.log("the 1st task is removed");
Let's see them side-by-side:
| .then | .now |
|---|---|
Task.find({}) |
const tasks = await Task.find({}); |
Thanks to the new syntax, the code is a lot simpler than the previous then chain.
There are a few important details to pay attention to when using async/await syntax.
To use the await operator with asynchronous operations, they have to return a promise.
This is not a problem as such, as regular asynchronous functions using callbacks are easy to wrap around promises.
The await keyword can't be used just anywhere in JavaScript code.
Using await is possible only inside of an async function.
This means that for the previous examples to work, they have to be using async functions.
Notice the first line in the arrow function definition:
const main = async () => {  const tasks = await Task.find({});
  console.log("operation returned the following tasks", tasks);

  const response = await tasks[0].deleteOne();
  console.log("the first task is removed");
}

main();
The code declares that the function assigned to main is asynchronous.
After this, the code calls the function with main().
async/await in the backend
Let's start to change the backend routes to async and await.
As all of the asynchronous operations are currently done inside of a function,
it is enough to change the route handler functions into async functions.
Let's start with the route in controllers/tasks.js for fetching all tasks:
tasksRouter.get('/', (request, response) => {
  Task.find({}).then((tasks) => {
    response.json(tasks)
  })
})
that route gets changed to the following:
tasksRouter.get("/", async (request, response) => {
  const tasks = await Task.find({});
  response.json(tasks);
});
We can verify that our refactoring was successful by testing the endpoint through the browser and by running the tests that we wrote earlier.
You can find the code for our current application in its entirety in the part4-3 branch of this GitHub repository.
More tests and refactoring the backend
When code gets refactored, there is always the risk of regression, meaning that existing functionality may break.
Let's refactor the remaining operations by first writing a test for each route of the API. Start with the add task operation.
Write a new test in task_api.test.js that:
- adds a new task
- verifies that the number of tasks returned by the API increases
- verifies the newly added task is in the list.
test("a valid task can be added", async () => {
  const newTask = {
    content: "async/await simplifies making async calls",
    important: true,
  };

  await api
    .post("/api/tasks")
    .send(newTask)
    .expect(201)
    .expect("Content-Type", /application\/json/);

  const response = await api.get("/api/tasks");

  const contents = response.body.map(r => r.content);

  assert.strictEqual(response.body.length, initialTasks.length + 1)

  assert(contents.includes('async/await simplifies making async calls'))
})
Our test fails because we accidentally returned the status code 200 OK when a new task is created. Let us change that to 201 CREATED in controllers/tasks.js:
tasksRouter.post("/", (request, response, next) => {
  const body = request.body;

  const task = new Task({
    content: body.content,
    important: Boolean(body.important) || false,
    date: new Date(),
  });

  task.save()
    .then(savedTask => {
      response.status(201).json(savedTask);    })
    .catch(error => next(error));
});
Let's also add a test that verifies that a task without content will not be saved into the database.
test("task without content is not added", async () => {
  const newTask = {
    important: true
  };

  await api
    .post("/api/tasks")
    .send(newTask)
    .expect(400);

  const response = await api.get("/api/tasks");

  assert.strictEqual(response.body.length, initialTasks.length)
})
Both tests check the state stored in the database after the saving operation, by fetching all the tasks of the application.
const response = await api.get("/api/tasks");The same verification steps will repeat in other tests later on, and it is a good idea to extract these steps into helper functions. Let's add the function into a new file called tests/test_helper.js which is in the same directory as the test file.
const Task = require("../models/task");

const initialTasks = [
  {
    content: "Wash the dishes",
    date: new Date(),
    important: false
  },
  {
    content: "Take out the trash",
    date: new Date(),
    important: true
  }
];

const nonExistingId = async () => {
  const task = new Task({ content: "willremovethissoon", date: new Date() });
  await task.save();
  await task.deleteOne();

  return task._id.toString();
};

const tasksInDb = async () => {
  const tasks = await Task.find({});
  return tasks.map(task => task.toJSON());
};

module.exports = {
  initialTasks, nonExistingId, tasksInDb
};
The module defines the tasksInDb function that can be used for checking the tasks stored in the database.
The initialTasks array containing the initial database state is also in the module.
We also define the nonExistingId function ahead of time,
which can be used for creating a database object ID that does not belong to any task object in the database.
Our task_api.test.js can now use the helper module and be changed like this:
const assert = require('node:assert')
const { test, after, beforeEach } = require('node:test')
const mongoose = require("mongoose");
const supertest = require("supertest");
const app = require("../app");
const helper = require("./test_helper");const Task = require("../models/task");

const api = supertest(app)

beforeEach(async () => {
  await Task.deleteMany({});

  let taskObject = new Task(helper.initialTasks[0]);  await taskObject.save();

  taskObject = new Task(helper.initialTasks[1]);  await taskObject.save();
});

test("tasks are returned as json", async () => {
  await api
    .get("/api/tasks")
    .expect(200)
    .expect("Content-Type", /application\/json/);
});

test("all tasks are returned", async () => {
  const response = await api.get("/api/tasks");

  assert.strictEqual(response.body.length, helper.initialTasks.length)})

test("a specific task is within the returned tasks", async () => {
  const response = await api.get("/api/tasks");

  const contents = response.body.map(r => r.content)
  assert(contents.includes("Take out the trash"))
})

test("a valid task can be added ", async () => {
  const newTask = {
    content: "async/await simplifies making async calls",
    important: true,
  };

  await api
    .post("/api/tasks")
    .send(newTask)
    .expect(201)
    .expect("Content-Type", /application\/json/);

  const tasksAtEnd = await helper.tasksInDb();  assert.strictEqual(tasksAtEnd.length, helper.initialTasks.length + 1)
  const contents = tasksAtEnd.map(t => t.content);  assert(contents.includes("async/await simplifies making async calls"))
});

test("task without content is not added", async () => {
  const newTask = {
    important: true
  };

  await api
    .post("/api/tasks")
    .send(newTask)
    .expect(400);

  const tasksAtEnd = await helper.tasksInDb();
  assert.strictEqual(tasksAtEnd.length, helper.initialTasks.length)})

after(async () => {
  await mongoose.connection.close()
})
The code using promises works and the tests pass.
We are ready to refactor our code to use the async/await syntax.
Change the code in controllers/tasks.js that adds a new task changes from:
tasksRouter.post('/', (request, response, next) => {
  const body = request.body

  const task = new Task({
    content: body.content,
    important: body.important || false,
    date: new Date(),
  })

  task
    .save()
    .then((savedTask) => {
      response.status(201).json(savedTask)
    })
    .catch((error) => next(error))
})
changes to:
tasksRouter.post("/", async (request, response, next) => {  const body = request.body

  const task = new Task({
    content: body.content,
    important: body.important || false,
    date: new Date(),
  })
  const savedTask = await task.save();  response.status(201).json(savedTask);})
You need to add the async keyword at the beginning of the handler to enable the use of async/await syntax.
The code becomes much simpler.
Notably, possible errors no longer need to be forwarded separately for handling. In code using promises, a possible error was passed to the error-handling middleware like this:
  task
    .save()
    .then((savedTask) => {
      response.json(savedTask)
    })
    .catch((error) => next(error))
When using async/await syntax, Express will automatically call
the error-handling middleware if an await statement throws an error or the awaited promise is rejected.
This makes the final code even cleaner.
FYI: This feature is available starting from Express version 5. If you installed Express as a dependency before March 31, 2025, you might still be using version 4. You can check your project's Express version in the package.json file. If you have an older version, update to version 5 with the following command:
npm install express@5
Refactoring the route responsible for fetching a single task
Next, let's write a test for viewing the details of a single task. The code highlights the actual API operation being performed:
test('a specific task can be viewed', async () => {
  const tasksAtStart = await helper.tasksInDb()
  const taskToView = tasksAtStart[0]

  const resultTask = await api    .get(`/api/tasks/${taskToView.id}`)    .expect(200)    .expect("Content-Type", /application\/json/);
  assert.deepStrictEqual(resultTask.body, taskToView)
})
First, the test fetches a single task from the database. Then, it checks that the specific task can be retrieved through the API. Finally, it verifies that the content of the fetched task is as expected.
There is one point worth noting in the test.
Instead of the previously used strictEqual method,
the deepStrictEqual method is used:
assert.deepStrictEqual(resultTask.body, taskToView)The reason for this is that strictEqual uses the Object.is method
to compare similarity, i.e. it compares whether the objects are the same.
In our case, we want to check that the contents of the objects, i.e. the values of their fields, are the same.
For this purpose deepStrictEqual is suitable.
The tests pass and we can safely refactor the tested route to use async/await:
tasksRouter.get('/:id', async (request, response) => {
  const task = await Task.findById(request.params.id)
  if (task) {
    response.json(task)
  } else {
    response.status(404).end();
  }
});
Refactoring the route responsible for deleting a task
Let's also add a test for the route that handles deleting a task:
test('a task can be deleted', async () => {
  const tasksAtStart = await helper.tasksInDb()
  const taskToDelete = tasksAtStart[0]

  await api
    .delete(`/api/tasks/${taskToDelete.id}`)
    .expect(204)

  const tasksAtEnd = await helper.tasksInDb()

  const contents = tasksAtEnd.map(n => n.content)
  assert(!contents.includes(taskToDelete.content))

  assert.strictEqual(tasksAtEnd.length, helper.initialTasks.length - 1)
})
The test is structured similarly to the one that checks viewing a single task. First, a single task is fetched from the database, then its deletion via the API is tested. Finally, it is verified that the task no longer exists in the database and that the total number of tasks has decreased by one.
The tests still pass, so we can safely proceed with refactoring the route:
tasksRouter.delete('/:id', async (request, response) => {
  await Task.findByIdAndDelete(request.params.id)
  response.status(204).end()
})
You can find the code for our current application in its entirety in the part4-4 branch of this GitHub repository.
Optimizing the beforeEach function
Let's return to task_api.test.js and take a closer look at the beforeEach function that sets up the tests:
beforeEach(async () => {
  await Task.deleteMany({});

  let taskObject = new Task(helper.initialTasks[0]);
  await taskObject.save();

  taskObject = new Task(helper.initialTasks[1]);
  await taskObject.save();
});
The function saves the first two tasks from the helper.initialTasks array into the database with two separate operations.
The solution is alright, but there's a more elegant way of saving multiple objects to the database:
beforeEach(async () => {
  await Task.deleteMany({});
  console.log("cleared");

  helper.initialTasks.forEach(async (task) => {
    let taskObject = new Task(task);
    await taskObject.save();
    console.log("saved");
  });
  console.log("done");
});

test("tasks are returned as json", async () => {
  console.log("entered test");
  // ...
};
We save the tasks stored in the array into the database inside of a forEach loop.
The tests don't quite seem to work however.
Imagine someone else added some console logs and wants your help to find the problem.
The console displays the following output:
cleared
done
entered test
saved
saved
Despite our use of the async/await syntax, our solution does not work as we expected it to.
From the logs, we notice the test execution begins before the database is initialized!
The problem is that every iteration of the forEach loop generates an asynchronous operation, and beforeEach won't wait for them to finish executing.
In other words, the await commands defined inside of the forEach loop are not in the beforeEach function, but in separate functions that beforeEach will not wait for.
Additionally, the forEach method expects a synchronous function as its parameter,
so the async/await structure does not work correctly within it.
Since the execution of tests begins immediately after beforeEach has finished executing,
the execution of tests begins before the database state is initialized.
One way of fixing this is to wait for all of the asynchronous operations to finish executing with the
Promise.all method:
beforeEach(async () => {
  await Task.deleteMany({})

  const taskObjects = helper.initialTasks
    .map(task => new Task(task))
  const promiseArray = taskObjects.map(task => task.save())
  await Promise.all(promiseArray)
})
The solution is quite advanced despite its compact appearance.
The taskObjects variable is assigned to an array of Mongoose objects that are created with the Task constructor for each of the tasks in the helper.initialTasks array.
The next line of code creates a new array that consists of promises,
that are created by calling the save method of each item in the taskObjects array.
In other words, it is an array of promises for saving each of the items to the database.
The Promise.all method
can be used for transforming an array of promises into a single promise,
which will be fulfilled once every promise in the array passed to it as an argument is resolved.
The last line of code await Promise.all(promiseArray) waits until every promise for saving a task is finished, meaning that the database has been initialized.
The returned values of each promise in the array can still be accessed when using the
Promise.allmethod. If we wait for the promises to be resolved with theawaitsyntaxconst results = await Promise.all(promiseArray), the operation will return an array that contains the resolved values for each promise in thepromiseArray, and they appear in the same order as the promises in the array.
Promise.all executes the promises it receives in parallel.
If the promises need to be executed in a particular order, this will be problematic.
In situations like this, the operations can be executed inside of a
for...of block,
that guarantees a specific execution order.
beforeEach(async () => {
  await Task.deleteMany({});

  for (const task of helper.initialTasks) {
    let taskObject = new Task(task);
    await taskObject.save();
  }
});
FYI: Score another a point for the use of the IDE, if you started with our original
forEachloop, WebStorm will flag this as a warning. It then provides you the option to change it automatically to use thefor...ofsyntax we've just explained here. Make sure to look at the warnings!
However, there is an even simpler way to implement the beforeEach function.
The easiest way to handle the situation is by utilizing Mongoose's built-in method insertMany:
beforeEach(async () => {
  await Task.deleteMany({})
  await Task.insertMany(helper.initialTasks)})
The code for our application can be found on GitHub, branch part4-5.
Web developers pledge v4
We will once again update our web developer pledge but will also add another item, since last time we pledged to check the database:
I also pledge to:
- Check that my code works when one of my tests does not pass
Refactoring tests
Our test coverage is currently lacking.
Some requests like GET /api/tasks/:id and DELETE /api/tasks/:id aren't tested when the request is sent with an invalid id.
The grouping and organization of tests could also use some improvement, as all tests exist on the same "top level" in the test file.
The readability of the test would improve if we group related tests with describe blocks.
Below is an example of task_api.test.js after making some minor improvements:
const assert = require('node:assert')
const { test, after, beforeEach, describe } = require('node:test')
const mongoose = require('mongoose')
const supertest = require('supertest')
const app = require('../app')
const helper = require('./test_helper')
const Task = require('../models/task')

const api = supertest(app)

describe('when there is initially some tasks saved', () => {
  beforeEach(async () => {
    await Task.deleteMany({})
    await Task.insertMany(helper.initialTasks)
  })

  test('tasks are returned as json', async () => {
    await api
      .get("/api/tasks")
      .expect(200)
      .expect("Content-Type", /application\/json/);
  });

  test('all tasks are returned', async () => {
    const response = await api.get('/api/tasks')

    assert.strictEqual(response.body.length, helper.initialTasks.length)
  })

  test('a specific task is within the returned tasks', async () => {
    const response = await api.get('/api/tasks')

    const contents = response.body.map(e => e.content)
    assert(contents.includes('HTML is easy'))
  })

  describe('viewing a specific task', () => {
    test('succeeds with a valid id', async () => {
      const tasksAtStart = await helper.tasksInDb()
      const taskToView = tasksAtStart[0]

      const resultTask = await api
        .get(`/api/tasks/${taskToView.id}`)
        .expect(200)
        .expect('Content-Type', /application\/json/)

      assert.deepStrictEqual(resultTask.body, taskToView)
    })

    test('fails with status code 404 if task does not exist', async () => {
      const validNonexistingId = await helper.nonExistingId()

      await api.get(`/api/tasks/${validNonexistingId}`).expect(404)
    })

    test('fails with status code 400 id is invalid', async () => {
      const invalidId = '5a3d5da59070081a82a3445'

      await api.get(`/api/tasks/${invalidId}`).expect(400)
    })
  })

  describe('addition of a new task', () => {
    test('succeeds with valid data', async () => {
      const newTask = {
        content: 'async/await simplifies making async calls',
        important: true,
      }

      await api
        .post('/api/tasks')
        .send(newTask)
        .expect(201)
        .expect('Content-Type', /application\/json/)

      const tasksAtEnd = await helper.tasksInDb()
      assert.strictEqual(tasksAtEnd.length, helper.initialTasks.length + 1)

      const contents = tasksAtEnd.map(n => n.content)
      assert(contents.includes('async/await simplifies making async calls'))
    })

    test('fails with status code 400 if data invalid', async () => {
      const newTask = { important: true }

      await api.post('/api/tasks').send(newTask).expect(400)

      const tasksAtEnd = await helper.tasksInDb()

      assert.strictEqual(tasksAtEnd.length, helper.initialTasks.length)
    })
  })

  describe('deletion of a task', () => {
    test('succeeds with status code 204 if id is valid', async () => {
      const tasksAtStart = await helper.tasksInDb()
      const taskToDelete = tasksAtStart[0]

      await api.delete(`/api/tasks/${taskToDelete.id}`).expect(204)

      const tasksAtEnd = await helper.tasksInDb()

      const contents = tasksAtEnd.map(n => n.content)
      assert(!contents.includes(taskToDelete.content))

      assert.strictEqual(tasksAtEnd.length, helper.initialTasks.length - 1)
    })
  })
})

after(async () => {
  await mongoose.connection.close()
})
The test output in the console is grouped according to the describe blocks:
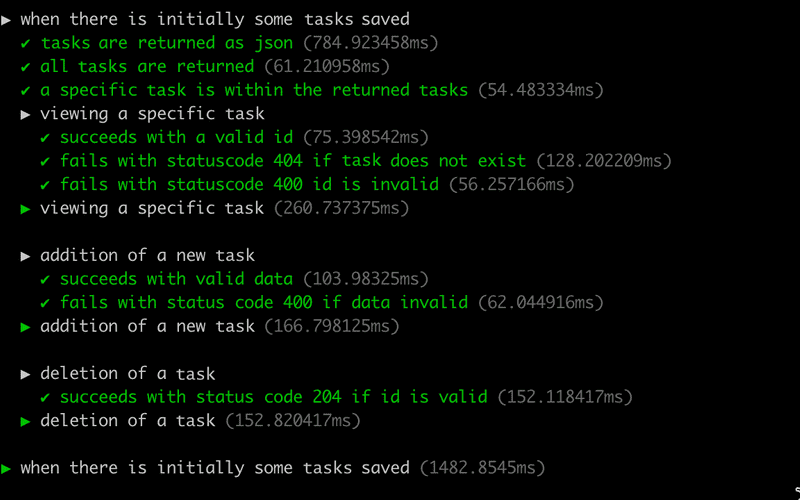
There is still room for improvement, but it is time to move forward.
This way of testing the API, by making HTTP requests and inspecting the database with Mongoose, is by no means the only nor the best way of conducting API-level integration tests for server applications. There is no universal best way of writing tests, as it all depends on the application being tested and available resources.
You can find the code for our current application in its entirety in the part4-6 branch of this GitHub repository.