d
Webpack
In the early days, React was somewhat famous for being very difficult to configure the tools required for application development. To make the situation easier, Create React App was developed, which eliminated configuration-related problems. Vite, which is also used in the course, has recently replaced Create React App in new applications.
Both Vite and Create React App use bundlers to do the actual work. We will now familiarize ourselves with the bundler called Webpack used by Create React App. Webpack was by far the most popular bundler for years. Recently, however, there have been several new generation bundlers such as esbuild, which is used by Vite. It is significantly faster and easier to use esbuild instead of Webpack. However, e.g. esbuild still lacks some useful features (such as hot reload of the code in the browser), so next we will get to know the old ruler of bundlers, Webpack.
Bundling
We have implemented our applications by dividing our code into separate modules that have been imported to places that require them. Even though ES6 modules are defined in the ECMAScript standard, older browsers do not know how to handle code that is divided into modules.
For this reason, code that is divided into modules must be bundled for browsers,
meaning that all of the source code files are transformed into a single file that contains all of the application code.
When we deployed our React frontend to production in part 3,
we performed the bundling of our application with the npm run build command.
Under the hood, the npm script bundles the source, which produces the following collection of files in the dist directory:
.
├── assets
│   ├── index-d526a0c5.css
│   ├── index-e92ae01e.js
│   └── react-35ef61ed.svg
├── index.html
└── vite.svg
The index.html file located at the root of the dist directory is the "main file" of the application which loads the bundled JavaScript file with a script tag:
<!doctype html>
<html lang="en">
  <head>
    <meta charset="UTF-8" />
    <link rel="icon" type="image/svg+xml" href="/vite.svg" />
    <meta name="viewport" content="width=device-width, initial-scale=1.0" />
    <title>Vite + React</title>
    <script type="module" crossorigin src="/assets/index-e92ae01e.js"></script>
    <link rel="stylesheet" href="/assets/index-d526a0c5.css">
  </head>
  <body>
    <div id="root"></div>

  </body>
</html>
As we can see from the example application that was created with Vite, the build script also bundles the application's CSS files into a single /static/css/main.d526a0c5.css file.
In practice, bundling is done so that we define an entry point for the application, which typically is the index.js file. When webpack bundles the code, it includes
- all of the code that the entry point imports
- the code that its imports import
- and so on.
Since part of the imported files are packages like React, Redux, and Axios, the bundled JavaScript file will also contain the contents of each of these libraries.
The old way of dividing the application's code into multiple files was based on the fact that the index.html file loaded all of the separate JavaScript files of the application with the help of
scripttags. This resulted in decreased performance, since the loading of each separate file results in some overhead. For this reason, these days the preferred method is to bundle the code into a single file.
Creating a webpack configuration
Next, we will create a webpack configuration by hand, suitable for a new React application.
Let's create a new project with the following subdirectories (build and src) and files:
├── build
├── package.json
├── src
│   └── index.js
└── webpack.config.js
The contents of the package.json file can e.g. be the following:
{
  "name": "webpack-part7",
  "version": "0.0.1",
  "description": "practicing webpack",
  "scripts": {},
  "license": "MIT"
}
Let's install webpack with the command:
npm i -D webpack webpack-cliWe define the functionality of webpack in the webpack.config.js file, which we initialize with the following content:
const path = require('path')

const config = () => {
  return {
    entry: './src/index.js',
    output: {
      path: path.resolve(__dirname, 'build'),
      filename: 'main.js'
    }
  }
}

module.exports = config
Pertinent: it would be possible to make the definition directly as an object instead of a function:
const path = require('path')

const config = {  entry: './src/index.js',
  output: {
    path: path.resolve(__dirname, 'build'),
    filename: 'main.js'
  }
}

module.exports = config
An object will suffice in many situations, but we will later need certain features that require us to define
configas a function.
Next, define a new npm script called build that will execute the bundling with webpack:
// ...
"scripts": {
  "build": "webpack --mode=development"
},
// ...
Let's add more code to src/index.js:
const hello = name => {
  console.log(`hello ${name}`)
}
When we execute the npm run build command, our application code will be bundled by webpack.
The operation will produce a new main.js file that is added under the build directory:
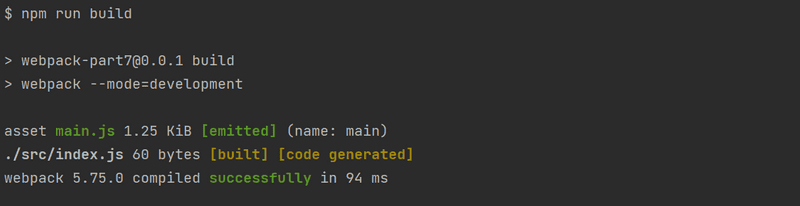
The file contains a lot of stuff that looks quite interesting. We can also see the code we wrote in the middle of the file:
eval("const hello = name => {\r\n console.log(`hello ${name}`)\r\n}\n\n//# sourceURL=webpack://webpack-part7/./src/index.js?");Let's add an App.js file under the src directory with the following content:
const App = () => {
  return null
}

export default App
Let's import and use the App module in the index.js file:
import App from './App';

const hello = name => {
  console.log(`hello ${name}`)
}

App()
When we bundle the application again with the npm run build command, we notice that webpack has acknowledged both files:
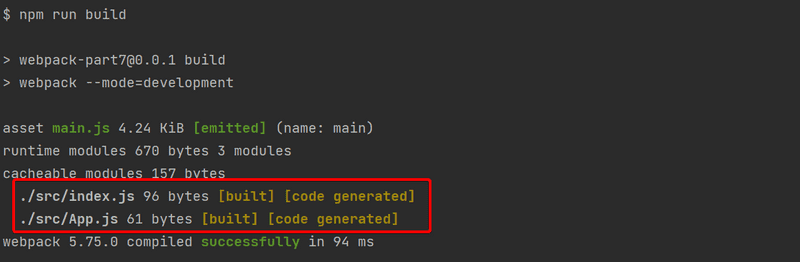
Our application code can be found in the middle of our bundle file (main.js) in a rather obscure format:

Configuration file
Let's take a closer look at the contents of our current webpack.config.js file:
const path = require('path')

const config = () => {
  return {
    entry: './src/index.js',
    output: {
      path: path.resolve(__dirname, 'build'),
      filename: 'main.js'
    }
  }
}

module.exports = config
The configuration file has been written in JavaScript and the function returning the configuration object is exported using Node's module syntax.
Our minimal configuration definition helps us to decipher it.
The entry property of the configuration object specifies the file that will serve as the entry point for bundling the application.
The output property defines the location where the bundled code will be stored.
The target directory must be defined as an absolute path,
which is easy to create with the path.resolve method.
We also use __dirname
which is a global variable in Node that stores the path to the current directory.
Bundling React
Next, let's transform our application into a minimal React application. Let's install the required libraries:
npm i react react-domAnd let's turn our application into a React application by adding the familiar definitions in the index.js file:
import React from 'react'
import ReactDOM from 'react-dom/client'
import App from './App'

ReactDOM.createRoot(document.getElementById('root')).render(<App />)
We will also make the following changes to the App.js file:
import React from 'react' // will need this in all component files

const App = () => {
  return (
    <div>
      hey webpack
    </div>
  )
}

export default App
We also need the build/index.html file.
This file will serve as the "main page" of our application, which will load our bundled JavaScript code with a script tag:
<!DOCTYPE html>
<html lang="en">
  <head>
    <meta charset="utf-8" />
    <title>React App</title>
  </head>
  <body>
    <div id="root"></div>
    <script type="text/javascript" src="./main.js"></script>
  </body>
</html>
When we bundle our application, we run into the following problem:
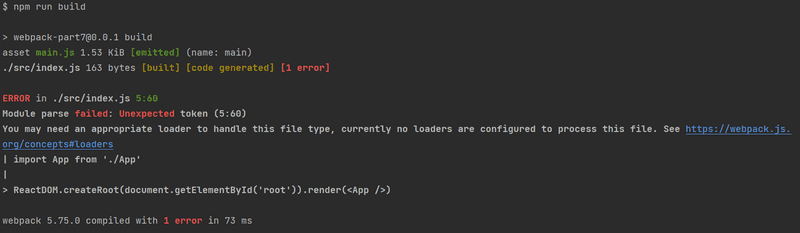
Loaders
The error message from webpack states that we may need an appropriate loader to bundle the App.js file correctly. By default, webpack only knows how to deal with plain JavaScript. Although we may have become unaware of it, we are using JSX for rendering our views in React. To illustrate this, the following code is not regular JavaScript:
const App = () => {
  return (
    <div>
      hey webpack
    </div>
  )
}
The syntax used above comes from JSX and it provides us with an alternative way of defining a React element for an HTML div tag.
We can use loaders to inform webpack of the files that need to be processed before they are bundled.
Let's configure a loader to our application that transforms the JSX code into regular JavaScript:
const path = require('path')

const config = () => {
  return {
    entry: './src/index.js',
    output: {
      path: path.resolve(__dirname, 'build'),
      filename: 'main.js'
    },
    module: {      rules: [        {          test: /\.js$/,          loader: 'babel-loader',          options: {            presets: ['@babel/preset-react'],          },        },      ],    },  }
}

module.exports = config
Loaders are defined under the module property in the rules array.
The definition of a single loader consists of three parts:
{
  test: /\.js$/,
  loader: 'babel-loader',
  options: {
    presets: ['@babel/preset-react']
  }
}
The test property specifies that the loader is for files that have names ending with .js.
The loader property specifies that the processing for those files will be done with babel-loader.
The options property is used for specifying parameters for the loader, which configure its functionality.
Let's install the loader and its required packages as a development dependency:
npm i -D @babel/core babel-loader @babel/preset-reactBundling the application will now succeed.
If we make some changes to the App component and take a look at the bundled code, we notice that the bundled version of the component looks like this:
const App = () => {
  return react__WEBPACK_IMPORTED_MODULE_0___default.a.createElement(
    "div",
    null,
    "hey webpack"
  );
};
As we can see from the example above, the React elements that were written in JSX are now created with regular JavaScript by using React's createElement function.
You can test the bundled application by opening the build/index.html file with the open file functionality of your browser:

It's worth noting that if the bundled application's source code uses async/await, the browser will not render anything on some browsers.
Googling the error message in the console will shed some light on the issue.
With the previous solution being deprecated we now have to install two more missing dependencies,
that is core-js and regenerator-runtime:
npm i core-js regenerator-runtimeYou need to import these dependencies at the top of the index.js file:
import 'core-js/stable/index.js'
import 'regenerator-runtime/runtime.js'
We have configured almost everything for React development.
Transpilers
The process of transforming code from one form of JavaScript to another is called transpiling. The general definition of the term is to compile source code by transforming it from one language to another.
By using the configuration from the previous section, we are transpiling the code containing JSX into regular JavaScript with the help of babel, which is currently the most popular tool for the job.
As mentioned in part 1, most browsers do not support the latest features that were introduced in ES6 and ES7, and for this reason, the code is usually transpiled to a version of JavaScript that implements the ES5 standard.
The transpilation process that is executed by Babel is defined with plugins. In practice, most developers use ready-made presets that are groups of pre-configured plugins.
Currently, we are using the @babel/preset-react preset for transpiling the source code of our application:
{
  test: /\.js$/,
  loader: 'babel-loader',
  options: {
    presets: ['@babel/preset-react']  }
}
Let's add the @babel/preset-env plugin that contains everything needed to take code using all of the latest features and transpile it to code that is compatible with the ES5 standard:
{
  test: /\.js$/,
  loader: 'babel-loader',
  options: {
    presets: ['@babel/preset-env', '@babel/preset-react']  }
}
Let's install the preset with the command:
npm i -D @babel/preset-envWhen we transpile the code, it gets transformed into old-school JavaScript.
The definition of the transformed App component looks something like this:
var App = function App() {  return react_default().createElement('div', null, 'hey webpack')
};
As we can see, variables are declared with the var keyword as ES5 JavaScript does not understand the const keyword.
Arrow functions are also not used, which is why the function definition used the function keyword.
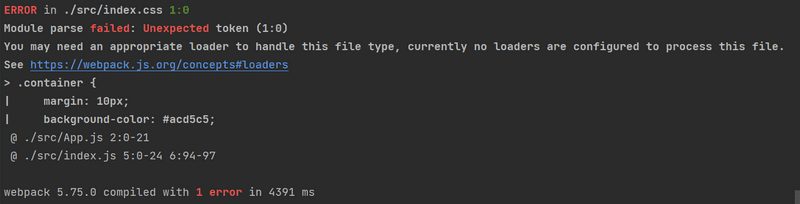
CSS
Let's add some CSS to our application. Let's create a new src/index.css file:
.container {
  margin: 10px;
  background-color: #cdf1e5;
}
Then let's use the style in the App component:
const App = () => {
  return (
    <div className="container">
      hey webpack
    </div>
  )
}
And we import the style in the index.js file:
import './index.css'This will cause the transpilation process to break:
When using CSS, we have to use the css and style loaders:
{
  rules: [
    {
      test: /\.js$/,
      loader: 'babel-loader',
      options: {
        presets: ['@babel/preset-react', '@babel/preset-env'],
      },
    },
    {      test: /\.css$/,      use: ['style-loader', 'css-loader'],    },  ],
}
The job of the css loader is to load the CSS files
and the job of the style loader
is to generate and inject a style element that contains all of the styles of the application.
With this configuration, the *CSS definitions are included in the main.js file of the application. For this reason, there is no need to separately import the *CSS styles in the main index.html file.
If needed, the application's CSS can also be generated into its own separate file, by using the mini-css-extract-plugin.
Once we install the loaders:
npm i -D style-loader css-loaderThe bundling will succeed again and the application gets new styles.
Webpack-dev-server
The current configuration makes it possible to develop our application but the workflow is bad (so bad it almost resembles the development workflow of Java). Every time we make a change to the code, we have to bundle it and refresh the browser to test it 🤦.
The webpack-dev-server offers a solution to our problems. Let's install it with the command:
npm i -D webpack-dev-serverLet's define an npm script for starting the dev server:
{
  // ...
  "scripts": {
    "build": "webpack --mode=development",
    "start": "webpack serve --mode=development"  },
  // ...
}
Let's also add a new devServer property to the configuration object in the webpack.config.js file:
const config = {
  entry: './src/index.js',
  output: {
    path: path.resolve(__dirname, 'build'),
    filename: 'main.js',
  },
  devServer: {    static: path.resolve(__dirname, 'build'),    compress: true,    port: 3000,  },  module: {
  // ...
};
The npm start command will now start the dev-server at port 3000, meaning that our application will be available by visiting http://localhost:3000 in the browser.
When we make changes to the code, the browser will automatically refresh the page.
The process for updating the code is fast. When we use the dev-server, the code is not bundled the usual way into the main.js file. The result of the bundling exists only in memory.
Let's extend the code by changing the definition of the App component as shown below:
import React, { useState } from 'react'
import './index.css'
const App = () => {
const [counter, setCounter] = useState(0)
return (
<div className="container">
hey webpack <br/>
{counter} clicks
<button onClick={() => setCounter(counter + 1)}>
press
</button>
</div>
)
}
export default AppThe application works nicely and the development workflow is quite smooth.
Source maps
Let's extract the click handler into its own function and store the previous value of the counter in its own values state:
const App = () => {
const [counter, setCounter] = useState(0)
const [values, setValues] = useState()
const handleClick = () => { setCounter(counter + 1) setValues(values.concat(counter)) }
return (
<div className="container">
hey webpack <br/>
{counter} clicks
<button onClick={handleClick}> press
</button>
</div>
)
}The application no longer works and the console will display the following error:
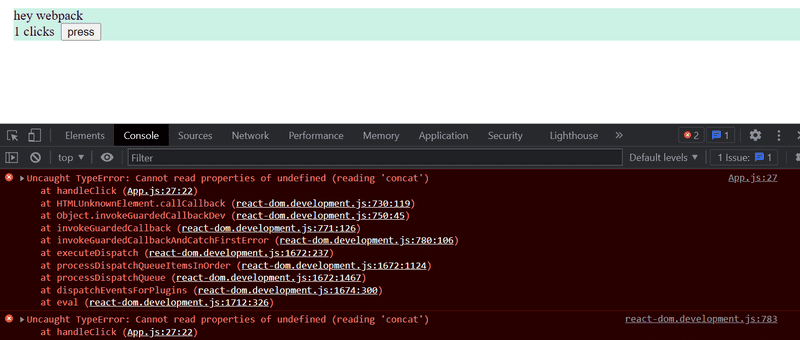
We know that the error is in the handleClick method, but if the application was any larger the error message would be quite difficult to track down:
App.js:27 Uncaught TypeError: Cannot read properties of undefined (reading 'concat')
    at handleClick (App.js:27:22)
The location of the error indicated in the message does not match the actual location of the error in our source code. If we click the error message, we notice that the displayed source code does not resemble our application code:
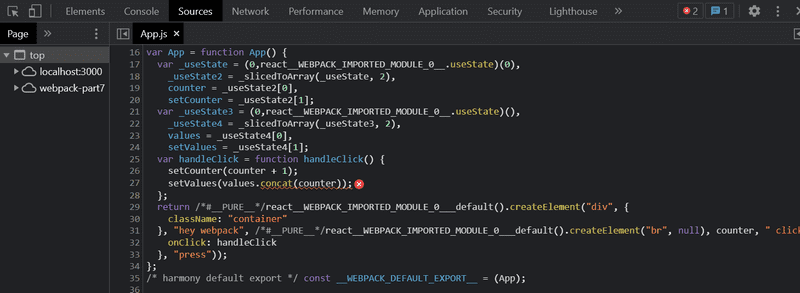
We prefer to see our actual source code instead.
Luckily, fixing this error message is quite easy. We will ask webpack to generate a so-called source map for the bundle, which makes it possible to *map errors that occur during the execution of the bundle to the corresponding part in the original source code*.
The source map can be generated by adding a new devtool property in webpack.config.js with the value 'source-map':
const config = {
  entry: './src/index.js',
  output: {
    // ...
  },
  devServer: {
    // ...
  },
  devtool: 'source-map',  module: {
  // ..
};
Webpack has to be restarted when we make changes to its configuration. It is also possible to make webpack watch for changes made to itself, but we will not do that this time.
The error message is now a lot better
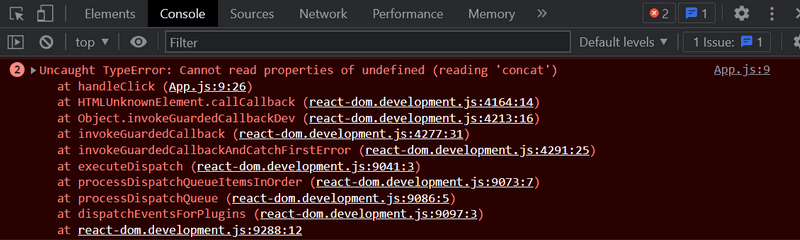
since it refers to the code we wrote:
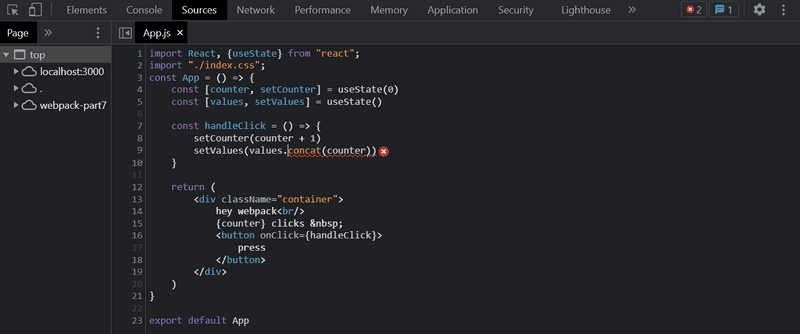
Generating the source map also makes it possible to use the Chrome debugger:
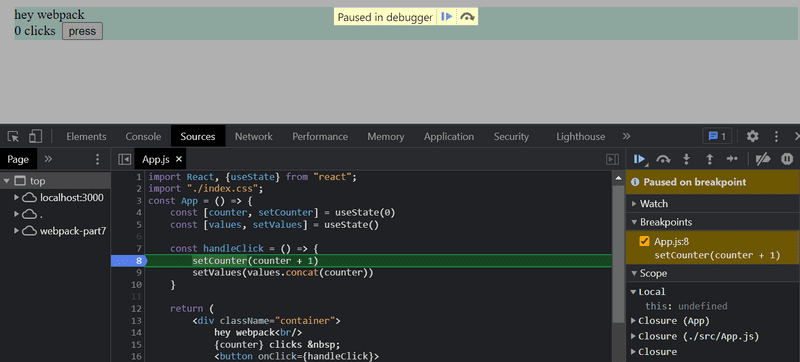
Let's fix the bug by initializing the state of values as an empty array:
const App = () => {
  const [counter, setCounter] = useState(0)
  const [values, setValues] = useState([])
  // ...
}
Minifying the code
When we deploy the application to production, we are using the main.js code bundle that is generated by webpack. The size of the main.js file for me is 2000891 bytes even though our application only contains a few lines of our code. The large file size is because the bundle also contains the source code for the entire React library. The size of the bundled code matters since the browser has to load the code when the application is first used. With high-speed internet connections, 2000891 bytes (1.9MB) is not an issue, but if we were to keep adding more external dependencies, loading speeds could become an issue, particularly for mobile users.
Or for those of us whose connection still feels like it's a 56k modem. 😏
If we inspect the contents of the bundle file, we notice that it could be greatly optimized in terms of file size by removing all of the comments. There's no point in manually optimizing these files, as there are many existing tools for the job.
The optimization process for JavaScript files is called minification. One of the leading tools intended for this purpose is UglifyJS.
Starting from version 4 of webpack, the minification plugin does not require additional configuration to be used. It is enough to modify the npm script in the package.json file to specify that webpack will execute the bundling of the code in production mode:
{
  "name": "webpack-part7",
  "version": "0.0.1",
  "description": "practicing webpack",
  "scripts": {
    "build": "webpack --mode=production",    "start": "webpack serve --mode=development"
  },
  "license": "MIT",
  "dependencies": {
    // ...
  },
  "devDependencies": {
    // ...
  }
}
When we bundle the application again, the size of the resulting main.js decreases substantially:
$ ls -l build/main.js
-rw-r--r--  1 powercat 197609 323677 Feb  5 15:58 build/main.js
The output of the minification process resembles old-school C code; all of the comments and even unnecessary whitespace and newline characters have been removed, and variable names have been replaced with a single character.
function(){var t=y((0,e.useState)(0),2),r=t[0],n=t[1],o=y((0,e.useState)([]),2),a=o[0],i=o[1];return e.createElement("div",{className:"container"},"hey webpack",e.createElement("br",null),r," clicks ",e.createElement("button",{onClick:function(){n(r+1),i(a.concat(r))}},"press"))};t.createRoot(document.getElementById("root")).render(e.createElement(b,null));Development and production configuration
Next, let's add a backend to our application by repurposing the now-familiar task application backend.
Let's store the following content in the db.json file:
{
  "tasks": [
    {
      "important": true,
      "content": "Wash the dishes",
      "id": "5a3b8481bb01f9cb00ccb4a9"
    },
    {
      "important": false,
      "content": "Catch up with a family member",
      "id": "5a3b920a61e8c8d3f484bdd0"
    }
  ]
}
Our goal is to configure the application with webpack in such a way that, when used locally, the application uses a json-server available in port 3001 as its backend. Feel free to go back and review the steps necessary to start that server.
The bundled file will then be configured to use the backend available at the https://comp227-osvaldo-lab3.onrender.com/api/tasks URL.
We will leave it to you to install axios, start the json-server, and then make the necessary changes to the application.
For the sake of changing things up, we will fetch the tasks from the backend with our custom hook called useTasks:
import React, { useState, useEffect } from 'react'import axios from 'axios'const useTasks = (url) => { const [tasks, setTasks] = useState([]) useEffect(() => { axios.get(url).then(response => { setTasks(response.data) }) }, [url]) return tasks}
const App = () => {
const [counter, setCounter] = useState(0)
const [values, setValues] = useState([])
const url = 'https://comp227-osvaldo-lab3.onrender.com/api/tasks' const tasks = useTasks(url)
const handleClick = () => {
setCounter(counter + 1)
setValues(values.concat(counter))
}
return (
<div className="container">
hey webpack <br/>
{counter} clicks
<button onClick={handleClick}>press</button>
<div>{tasks.length} tasks on server - {url}</div> </div>
)
}
export default AppThe address of the backend server is currently hardcoded in the application code. How can we change the address in a controlled fashion to point to the production backend server when the code is bundled for production?
Webpack's configuration function has two parameters, env and argv.
We can use the latter in webpack.config.js to find out the mode defined in the npm script.
const path = require('path')

const config = (env, argv) => {  console.log('argv.mode:', argv.mode)
  return {
    // ...
  }
}

module.exports = config
Now we can set Webpack to work differently depending on whether the application's mode (operating environment), is set to production or development.
We can also use webpack's DefinePlugin
for defining global default constants that can be used in the bundled code.
Let's define a new global constant BACKEND_URL that gets a different value depending on the environment that the code is being bundled for:
const path = require('path')
const webpack = require('webpack')
const config = (env, argv) => {
  console.log('argv', argv.mode)

  const backend_url = argv.mode === 'production'    ? 'https://comp227-osvaldo-lab3.onrender.com/api/tasks'    : 'http://localhost:3001/tasks'
  return {
    entry: './src/index.js',
    output: {
      path: path.resolve(__dirname, 'build'),
      filename: 'main.js'
    },
    devServer: {
      static: path.resolve(__dirname, 'build'),
      compress: true,
      port: 3000,
    },
    devtool: 'source-map',
    module: {
      // ...
    },
    plugins: [      new webpack.DefinePlugin({        BACKEND_URL: JSON.stringify(backend_url)      })    ]  }
}

module.exports = config
The global constant is used in the following way in the code:
const App = () => {
const [counter, setCounter] = useState(0)
const [values, setValues] = useState([])
const tasks = useTasks(BACKEND_URL)
// ...
return (
<div className="container">
hey webpack <br/>
{counter} clicks
<button onClick={handleClick} >press</button>
<div>{tasks.length} tasks on server - {BACKEND_URL}</div> </div>
)
}If the configuration for development and production differs a lot, it may be a good idea to separate the configuration of the two into their own files.
Now, if the application is started with the command npm start in development mode, it fetches the tasks from the address http://localhost:3001/tasks.
The version bundled with the command npm run build uses the external address https://comp227-osvaldo-lab3.onrender.com/api/tasks to retrieve the list of tasks.
We can inspect the bundled production version of the application locally by executing the following command *from the build directory*:
npx static-serverDoing this allows us to view the production version. By default, the bundled application will be available at http://localhost:9080.
Polyfill
Our application is finished and works with all relatively recent versions of modern browsers, except for Internet Explorer. The reason for this is that, because of axios, our code uses Promises, and no existing version of IE supports them:
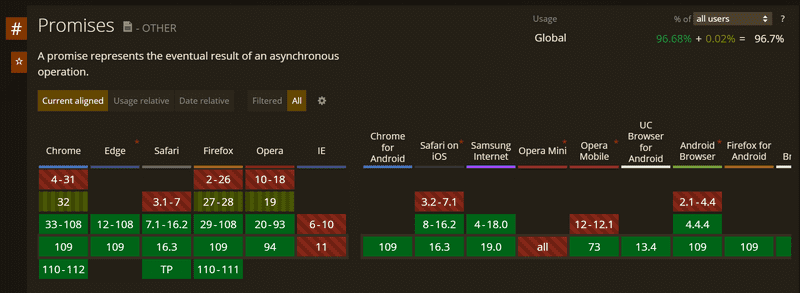
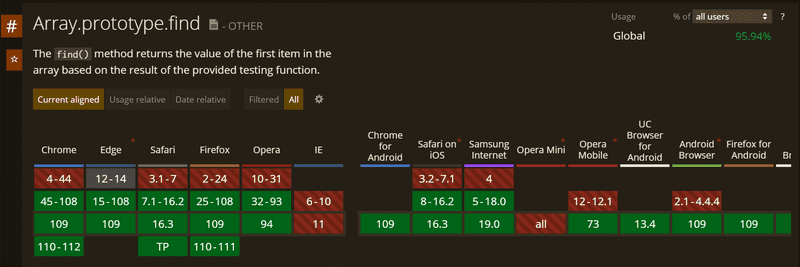
There are many other things in the standard that IE does not support. Something as harmless as the find method of JavaScript arrays exceeds the capabilities of IE:
While we may not really care to support IE,
there may be other situations where it is not enough to transpile the code,
as transpilation simply transforms the code from a newer version of JavaScript to an older one with wider browser support.
IE understands Promises syntactically but it never implemented their functionality.
The find property of arrays in IE is simply undefined.
If we want the application to be IE-compatible, we need to add a polyfill, which is code that adds the missing functionality to older browsers.
Polyfills can be added with the help of webpack and Babel or by installing one of many existing polyfill libraries.
The polyfill provided by the promise-polyfill library is easy to use. We simply have to add the following to our existing application code:
import PromisePolyfill from 'promise-polyfill'

if (!window.Promise) {
  window.Promise = PromisePolyfill
}
If the global Promise object does not exist, meaning that the browser does not support Promises, the polyfilled Promise is stored in the global variable.
If the polyfilled Promise is implemented well enough, the rest of the code should work without issues.
Here is one exhaustive list of existing polyfills.
The browser compatibility of different APIs can be checked by visiting https://caniuse.com or Mozilla's website.